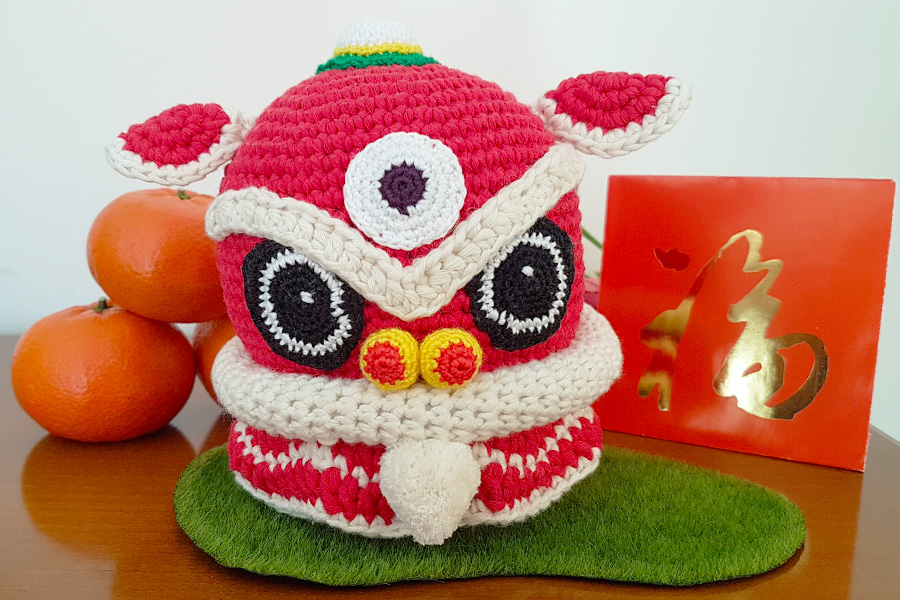
Notes:
-Hooks: 3.0mm (5/0 JNP standard hook) Or C2/D3 (US standard hook) & 1.0mm (Japanese lace hook 6) Or 12 steel (US steel hook)
-Cotton Yarns: Red, Creamy (Fibra Natura Cottonwood Yarn)
-Lace Cotton Yarns: Red, White & Black (Wolle Rödel Häkelgarn); Yellow, Green and Purple (Alize forever)
-Polyester filling
-Tapestry Needle and Small Size Needle
-Scissors
-Stitch Marker
-This pattern is worked in Spiral Rounds, except Ears & Head Accessory A & B
Abbreviation:
ch= Chain
st(s)= Stitch(es)
sl st= Slip Stitch
sc= Single Crochet
hdc= Half Double Crochet
dc= Double Crochet
tr= Treble Crochet
crochet round= sl st to join the first st of previous round, ch 1, sc in same st
Head
We are using the red cotton yarn for the head with the hook 3.0mm…
Round 1: Magic Ring (7)
Round 2: 2sc in each st around (14)
Round 3: *sc, 2sc in next st, repeat from *till round ends (21)
Round 4: *sc in next 2 sts, then 2sc in next st, repeat from * till round ends (28)
Round 5: *sc in next 3 sts, then 2sc in next st, repeat from * till round ends (35)
Round 6: *sc in next 4 sts, then 2sc in next st, repeat from * till round ends (42)
Round 7: *sc in next 5 sts, then 2sc in next st, repeat from * till round ends (49)
Round 8: sc around (49)
Round 9: *sc in next 6 sts, then 2sc in next st, repeat from * till round ends (56)
Round 10: sc around (56)
Round 11: *sc in next 7 sts, then 2sc in next st, repeat from * till round ends (63)
Round 12-23: sc around (63)
Round 24: *sc in next 7 sts, then join next 2sc together, repeat from * till round ends (56)
Round 25: sc around (56)
Round 26: *sc in next 6 sts, then join the next 2sc together, repeat from * till round ends (49)
Round 27: sc around (49)
Round 28: *sc in next 5 sts, then join the next 2sc together, repeat from * till round ends (42)
Round 29: *sc in next 4 sts, then join the next 2sc together, repeat from * till round ends (35)
-Stuff the filling
Round 30: *sc in next 3 sts, then join the next 2sc together, repeat from * till round ends (28)
Round 31: *sc in next 2 sts, then join then next 2sc together, repeat from * till round ends (21)
Round 32: *sc, then join the next 2sc together, repeat from * till round ends (14)
-Stuff more filling before closing the end
Round 33: *join the next 2sc together, repeat from * till round ends (7)
-Cast off, weave in ends
Lion Costume

Use the red cotton yarn with 3.0mm crochet hook
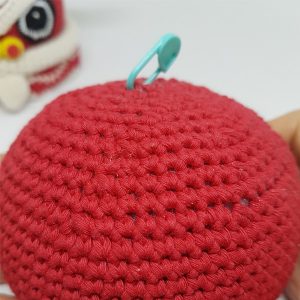
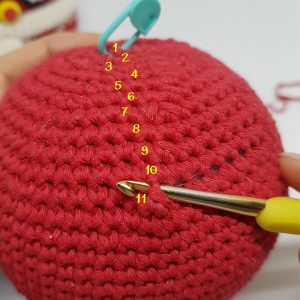
Turn the head upside down, count 10 rows from the middle of the bottom head
- Turn the bottom facing up
- Count 10 rows from the middle of the bottom
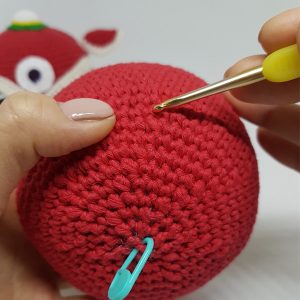
Decide the Back side of the Lion Head, then start a new round by working on the “bridge” between Round 10 and Round 11. (count from the bottom)
- Work on the “bridge” between Round 10 and 11 count from the bottom
- Start a new round
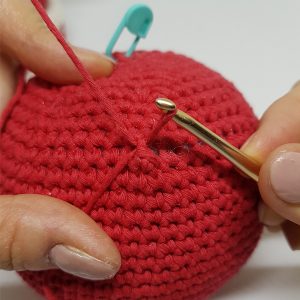
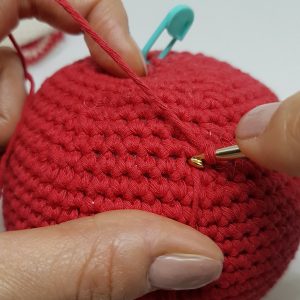
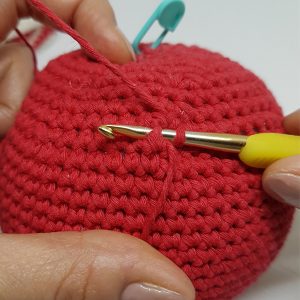
Use the same red cotton yarn as the lion head, hook goes through the holes as shown in the picture above, yarn over and pull the yarn out through the first hole, then chain 1. This chain will count as a stitch.
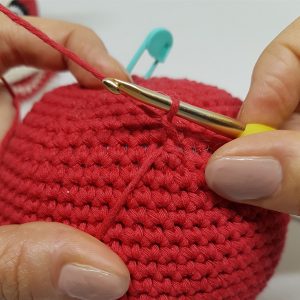
Chain 1
- Insert the hook into the hole before the next bridge
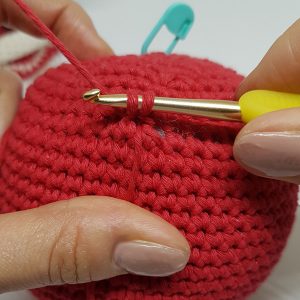
- Make a single crochet
- Making a single crochet
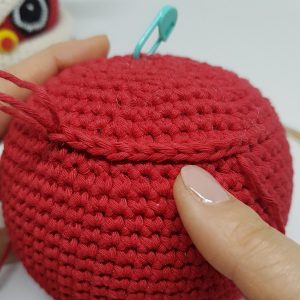
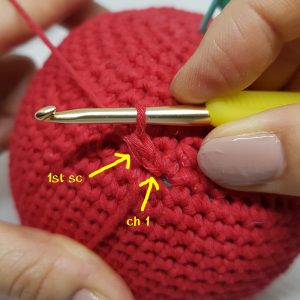
Continue sc around
Single crochet around (56)
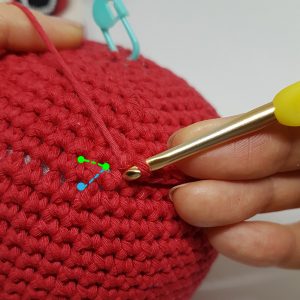
As the lion head is working in spiral rounds, we have to do some adjustment so that the beginning and the end are aligned.
I did the adjustment at the 47th sc. You can see the picture below, the beginning stitch is 1 row below.
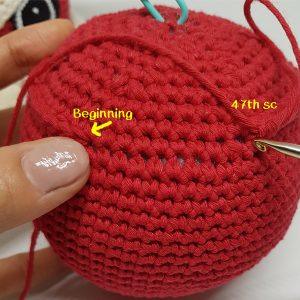
The beginning stitch is 1 row below
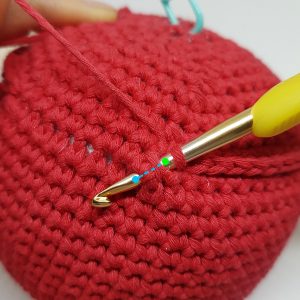
So, instead of continuing sc on the same row, we have to switch it to 1 row below. You can see the left hand side picture, instead of following the green line to make another sc, we follow the blue line.
- Follow the blue line
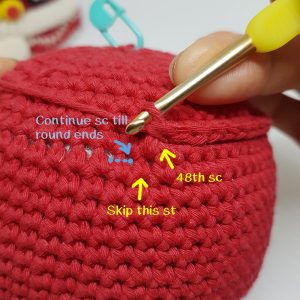
The 48th sc
Skip the closest bridge after the 48th sc, sc into the next bridge (the blue line as shown in the picture) and continue till round ends.
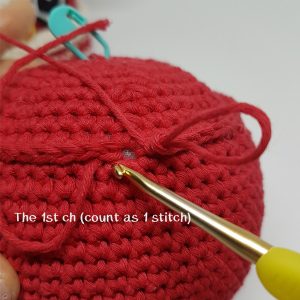
The end of the round
Round 1 of the Lion Costume is done.
In round 2, 7 sts work as a group.
Round 2: * sl st, hdc, 2dc in next st, tr, 2dc in next st, hdc, sc * , repeat ** till round ends (8 groups)
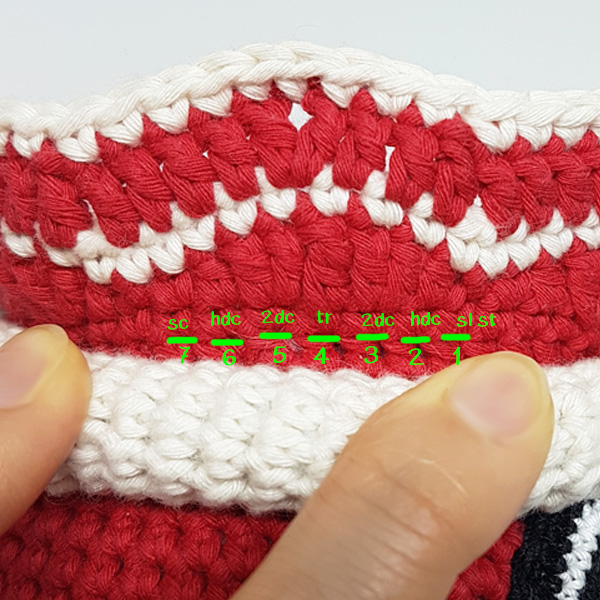
-Change the color to creamy
Round 3: sc around (72)
-Switch the color back to red
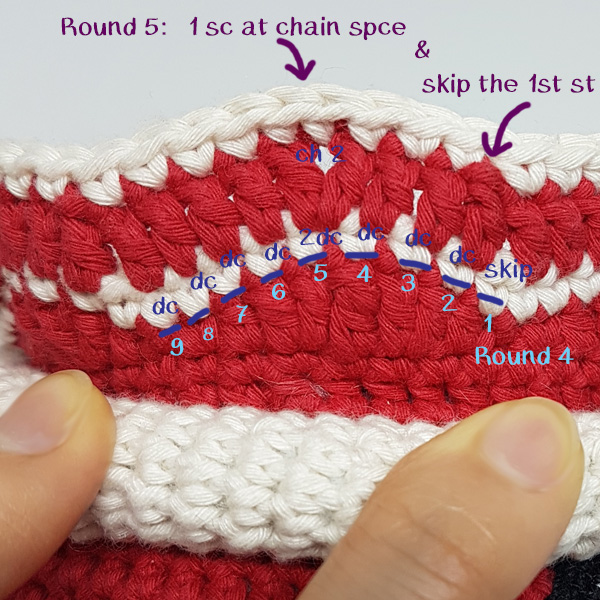
In Round 4, 9 sts work as a group.
Round 4: * skip first st, dc in next 4sts, ch 2, dc in same last st, dc in next 4sts*, repeat ** till round ends (8 groups)
-Change the color to creamy
Round 5: sc around (72) Note: skip the first st of each group & only 1 sc at the chain space in Round 4
Neck Ring
Round 1: Magic Ring (8)
Round 2-66: sc around (8)
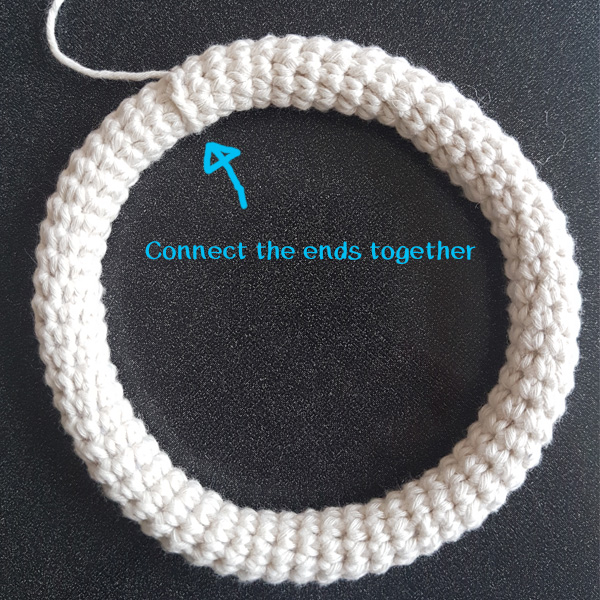
-Leave a long tail and cast off, connect the ends together
Tip: Insert the filling every 10 or 15 rounds
Ear(have to make 2)
We are working in rounds for ears…
Start with the red cotton yarn…
Round 1: Magic Ring (6)
Round 2: sl st to join the first st of the previous round, ch 1, 2sc into same st, 2sc in next st around (12)
Round 3: crochet round, sc into same st, 2sc in next st, *sc, 2sc in next st, repeat from * till round ends (18)
-Change the yarn from red cotton yarn to creamy cotton yarn
Round 4: crochet round, sc, 2sc in next st, *2sc, 2sc in next st, repeat from * till round ends (24)
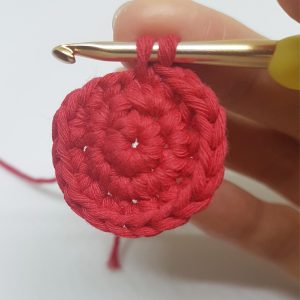
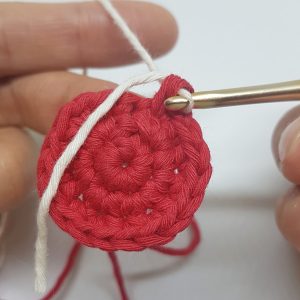
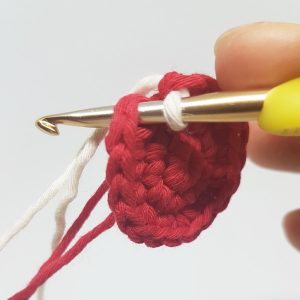
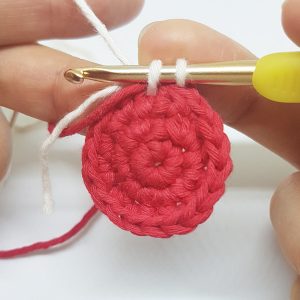
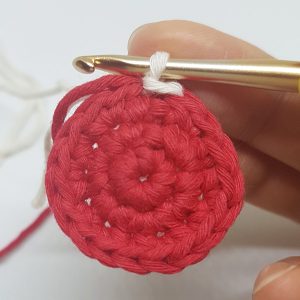
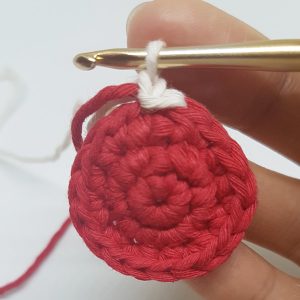
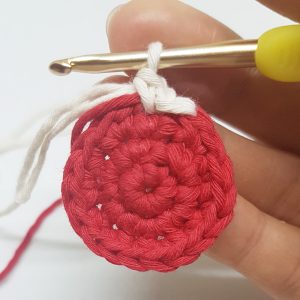
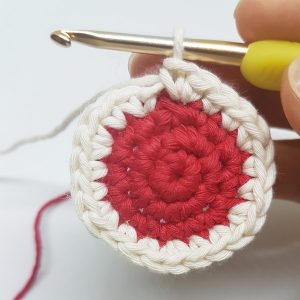
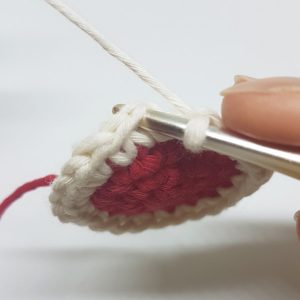
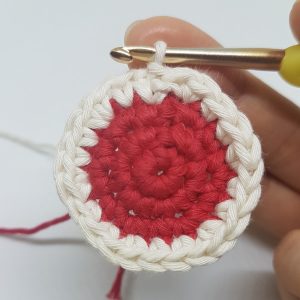
Tip for seamless color changing: change the yarn at the last st of round 3, before pulling the yarn through the loops (below pictures show you step by step)
- Last sc of Round 3
- Change the yarn to creamy color
- sl st to join the first st of the previous round (Round 3)
- 2 loops of the hook
- sl st to end the round
- ch 1 to start a new round
- sc into first st
- End of the round
- sl st to end the round
- Seamless color change
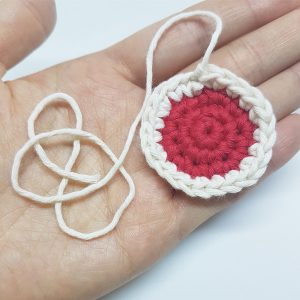
-Cast off and leave a long tail for assembly later; Hidden and cut the rest of the yarn at the back
Note: Fold it into a half circle when assemble to the head
Nose(have to make 2)
Use thr red lace cotton yarn with 1.0mm crochet hook
Round 1: Magic Ring (6)
Round 2: 2sc in each st around (12)
-Change the yarn to yellow lace cotton yarn
Round 3: sc around (12)
Round 4: *sc, 2sc in next st, repeat from * till round ends (18)
Round 5-6: sc around (18)
Round 7: *sc, then join the next 2sc together, repeat from * till round ends (12)
Round 8: *join the next 2sc together, repeat from * till round ends (6)
-Cast off with a long tail
Eye(have to make 2)
Start with the black lace cotton yarn with 1.0mm crochet hook…
Round 1: Magic Ring (7)
Round 2: 2sc in each st around (14)
Round 3: *sc, 2sc in next st, repeat from * till round ends (21)
Round 4: *sc in next 2 sts , 2sc in next st, repeat from * till round ends (28)
-Change the yarn to white lace cotton yarn
Round 5: *sc in next 3 sts, 2sc in next st, repeat from * till round ends (35)
-Switch the yarn back to black lace cotton yarn
Round 6: *sc in next 4 sts, 2sc in next st, repeat from * till round ends (42)
Round 7: *sc in next 15 sts, hdc, dc, tr, dc,hdc, sc in next 15 sts, sl st to end the round (35)
-Cast off with a long tail for assembly
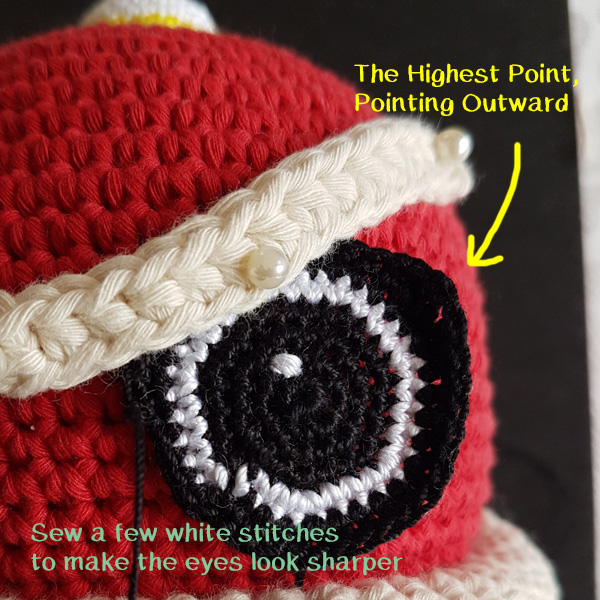
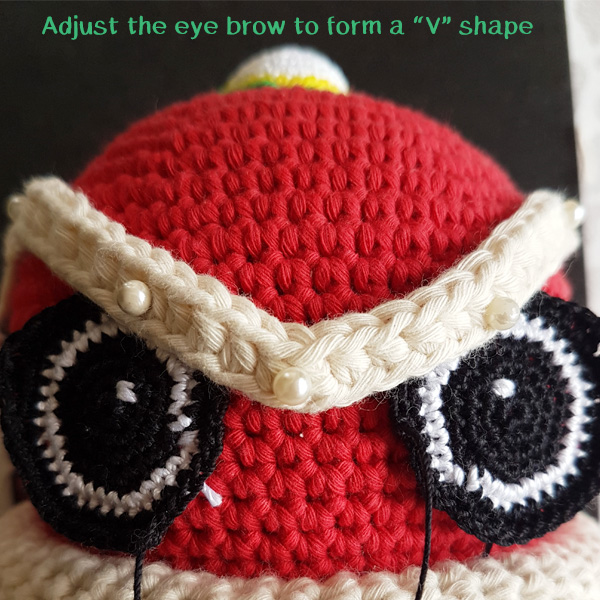
-Remember the highest point of the eye (treble crochet) will point outward as shown in the picture, sew a few white stitches close the middle of the eye accordingly
Eye Brow
Use the creamy cotton yarn, Leave a short tail around 6/7cm at the beginning,
Row 1: ch 31
Row 2: skip the first ch, hdc in next 30 sts
-Cast off with a long long tail for assembly
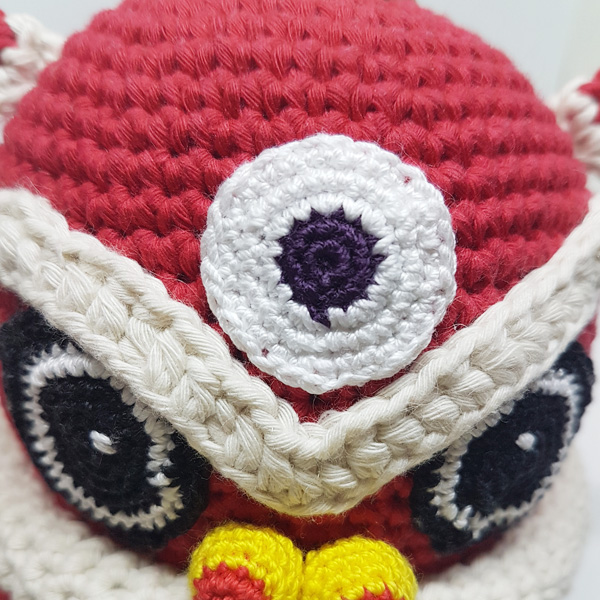
Head Accessory A(above the eye brow)
Working in rounds for head accessory A…
Start with the purple lace cotton yarn with 1.0mm crochet hook…
Round 1: Magic Ring (7)
Round 2: sl st to join the first st of the previous round, ch 1, 2sc into same st, 2sc in next st around (14)
-Change the yarn to white lace cotton yarn
Round 3: crochet round, 2sc in next st, *sc, 2sc in next st, repeat from * till round ends (21)
Round 4: crochet round, sc, 2sc in next st, * sc in next 2 sts, 2sc in next st, repeat from * till round ends (28)
Round 5: crochet round, sc around (28)
-Leave a long tail and cast off
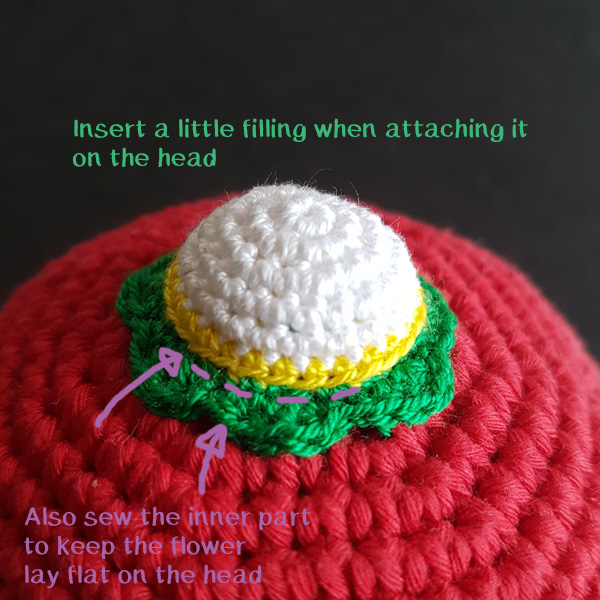
Head Accessory B(at the top of the head)
Working in rounds for head accessory B…
Start with the white lace cotton yarn with 1.0mm crochet hook…
Round 1: Magic Ring (7)
Round 2: sl st to join the first st of the previous round, ch 1, 2sc into same st, 2sc in next st around (14)
Round 3: crochet round, sc into same st, 2sc in next st, *sc, 2sc in next st, repeat from * till round ends (21)
Round 4: crochet round, sc around (21)
Round 5: crochet round, sc into same st, sc , 2sc in next st, * sc in next 2 sts, 2sc in next st, repeat from * till round ends (28)
-Change the yarn to yellow lace cotton yarn
Round 6: crochet round, sc around (28)
-Change the yarn to green lace cotton yarn and only work in the back loop
Round 7: crochet round, sc in next 2 sts, 2sc in next st, *sc in next 3 sts, 2scin next st, repeat from * till round ends (35)
Round 8: *sc, hdc, 2dc in next st, hdc, sl st, repeat from * till round ends (a flower shape)
Mustache
Make a PomPom and trim it patiently to form a mustache like shape.
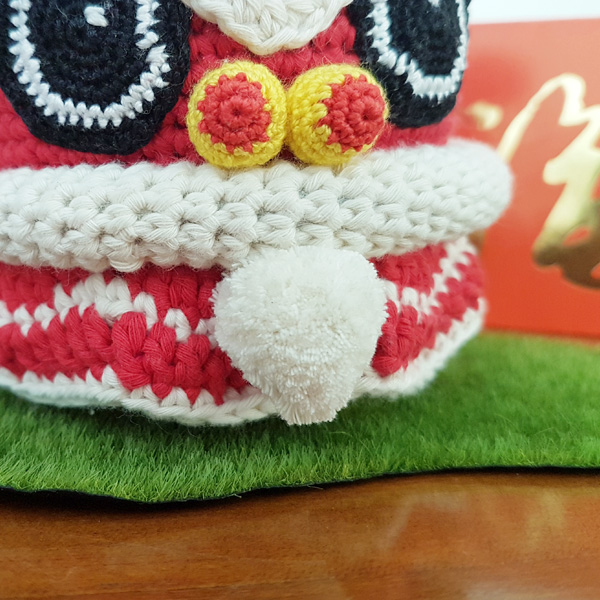
The last step is to assemble all together.
For the lace cotton yarn, it is better to use small size of needle instead of tapestry needle.
I hope you enjoy this pattern and feel free to share your lion head with me 🙂



 Unicorn Crochet Wrist Rest Cushion (Free Crochet Pattern)
  Crochet Magic Ring for Beginner
  Jasmine Crochet Pattern
  Lion Head for Lion Dance (Free Crochet Pattern)
  Crochet Round: Magic Ring ends with Slip Stitch
  Year of the Ox - Mr. Ox C...
  Twitter Bird Crochet Pattern
  Mulan Crochet Pattern
  Jasmine Crochet Pattern
  Ariel Crochet Pattern
Thanks so much for pattern 🤗🤗🤗
You’re welcome 😊
This is so amazingly detailed! Very cool!
Thanks, Sarah 🙂
Thank you so much for this amazing pattern😃🤗🤗
You’re welcome! 🙂