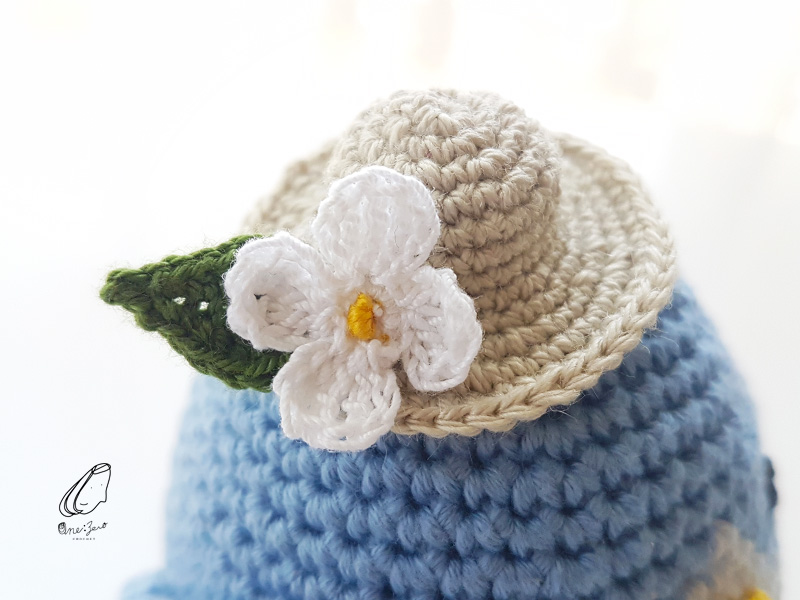
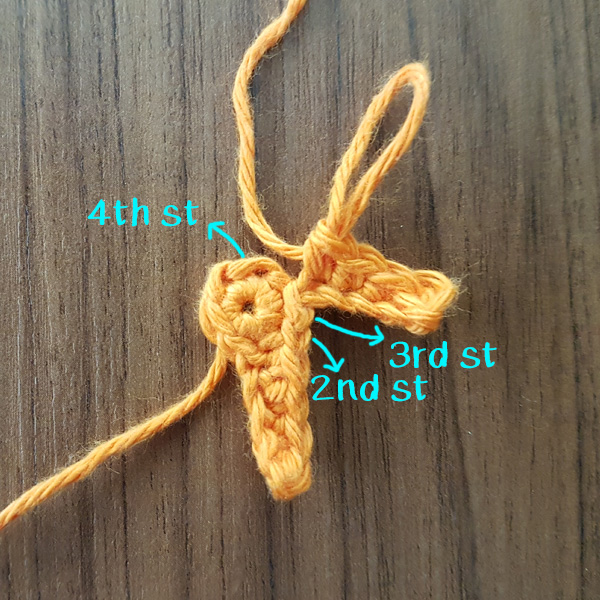
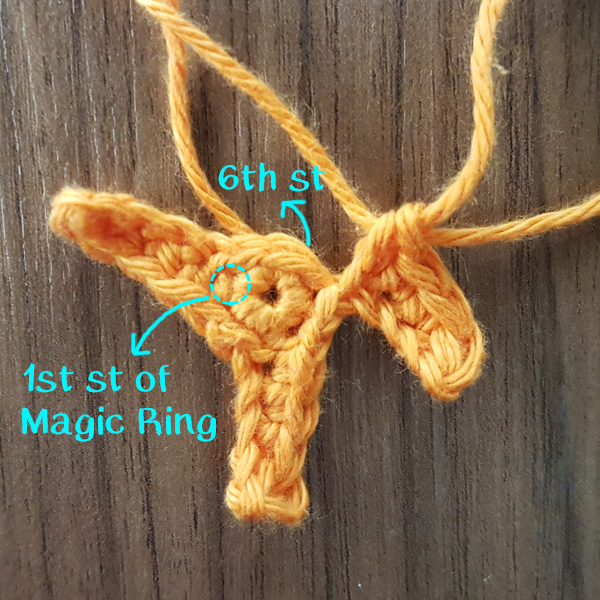
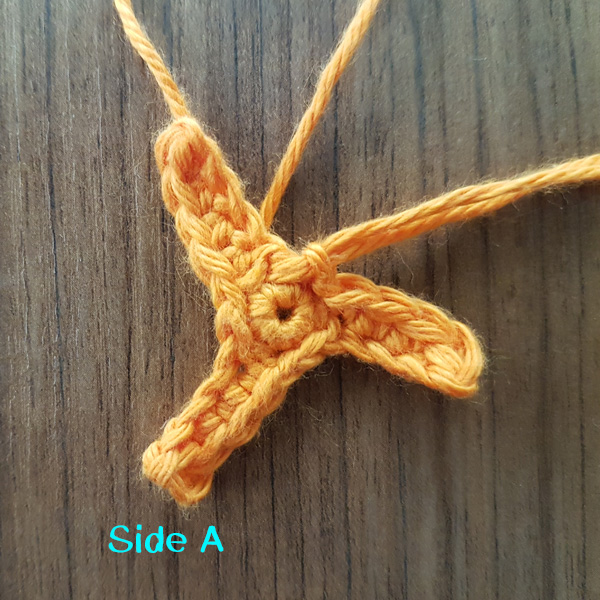
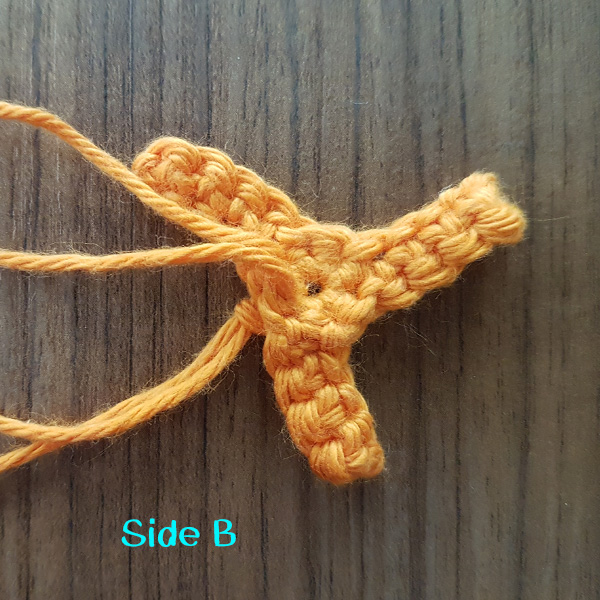
Category: Creative Inspiration
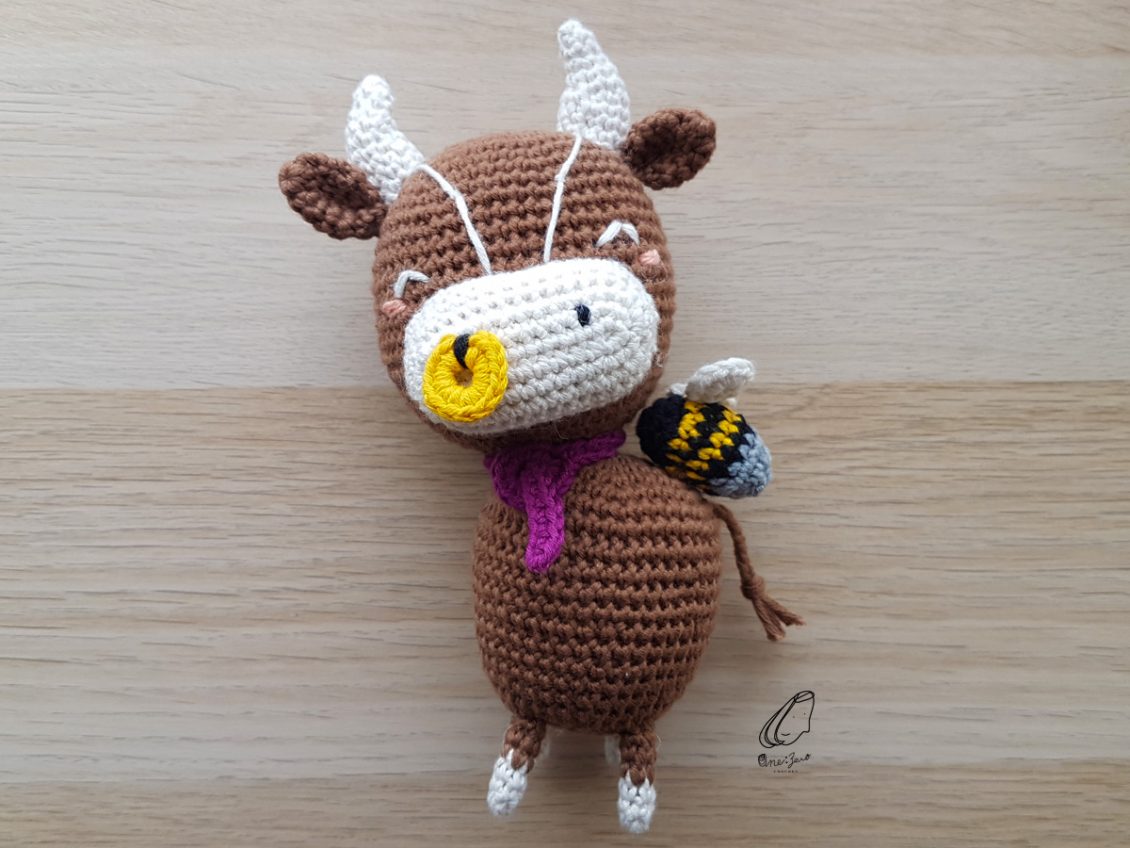
Year of the Ox – Mr. Ox Crochet Pattern
Do you know what are the Chinese Zodiac Animals? In the Lunar calendar, there are 12 zodiac animals, in order, they’re the Rat, Ox, Tiger, Rabbit, Dragon, Snake, Horse, Sheep, Monkey, Rooster, Dog & Pig. Each of them takes turns to represent the year and each year will be characterized by that assigned animal’s attributes in a 12-year cycle. And this year 2021 is the year of the Ox!
Unfortunately, the region I’m staying in doesn’t celebrate Lunar New Year and there isn’t really any new year decorations I can get here. So I came up with the idea to create Mr. Ox and have him celebrate the new year with me!
Mr. Ox is made out of cotton yarn with 2.5mm crochet hook. This pattern is suitable for intermediate-level crocheters. However, if you’re a beginner with basic crochet skill knowledge like magic ring, single crochet, half double crochet, Increase and decrease etc., and have done a few crochet projects, perhaps, you would like to try out something more challenging… then how about Mr. Ox?
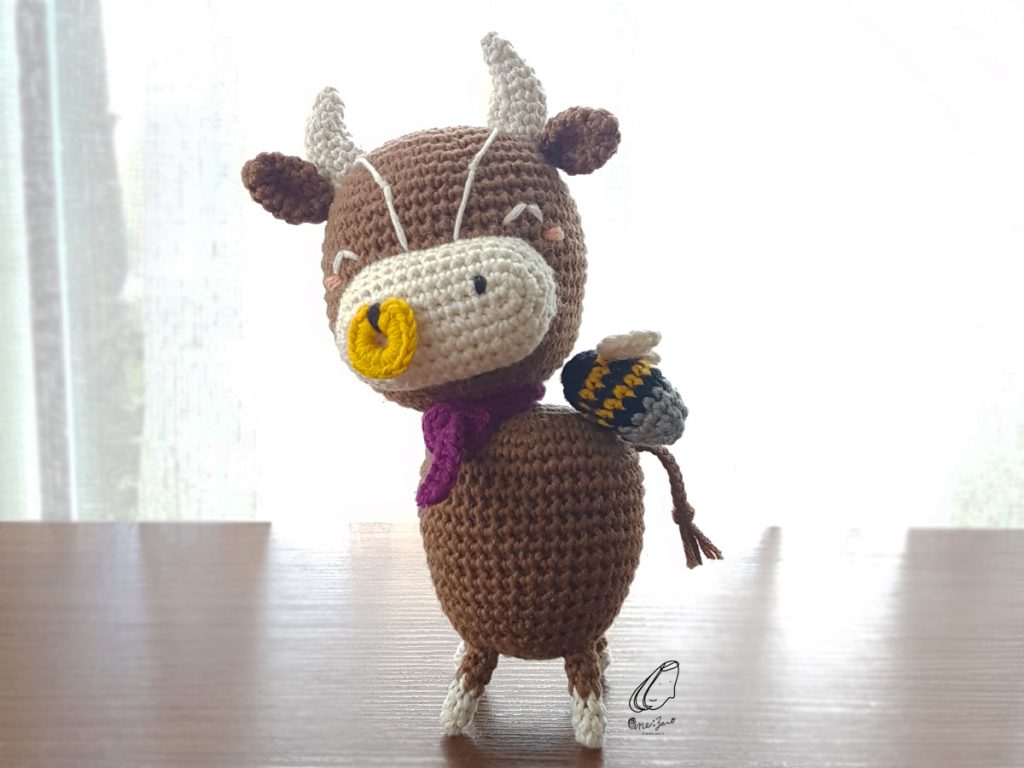
You can now find Year of the Ox – Mr. Ox downloadable PDF crochet pattern in my shop and One Zero Crochet Etsy shop! This pattern contains 18-page detailed instructions with lots of step-by-step pictures to guide you through this crochet project. You’ll get the pattern immediately right after the payment confirmation.
If you have any questions about the pattern, don’t hesitate to contact me!
Happy niú (Chinese pinyin=Ox) Year!!
Mini Elf Christmas Ornament ( Free Pattern)
Materials
2.5mm crochet hook
Size 3 light worsted cotton yarn: Red, White, Yellow, Beige
Tapestry needle
Polyester filling
scissors
Stitch Marker
Abbreviations
MR = magic ring
ch = chain
ard =around
st(s) =stitch(es)
sc = Single Crochet
hdc = half double crochet
dc = double crochet
sl st = slip stitch
Inc = 2sc in next stitch
Dec = join next 2 stitches together

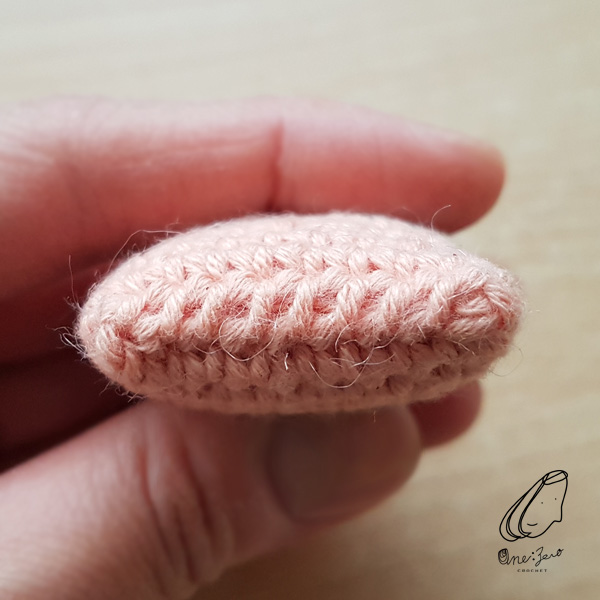
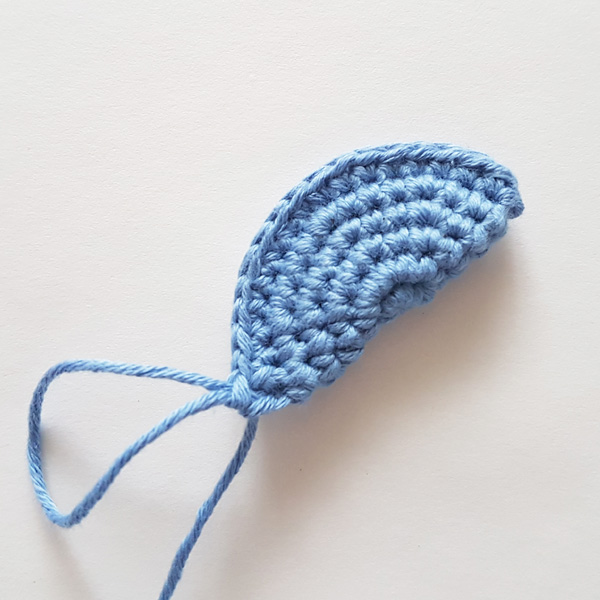
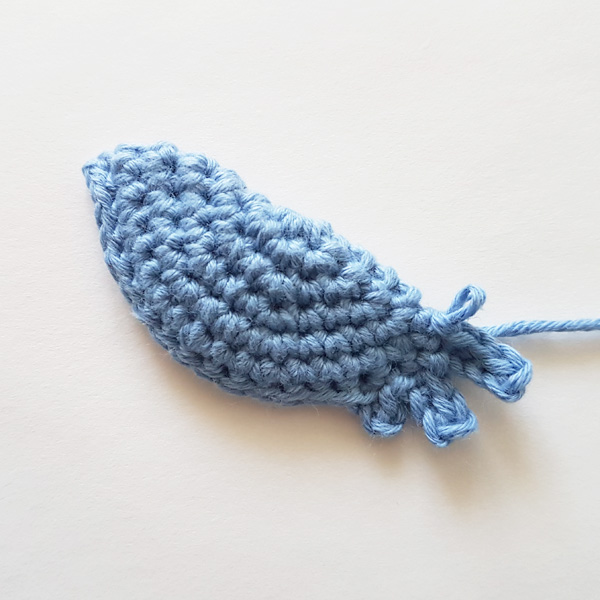
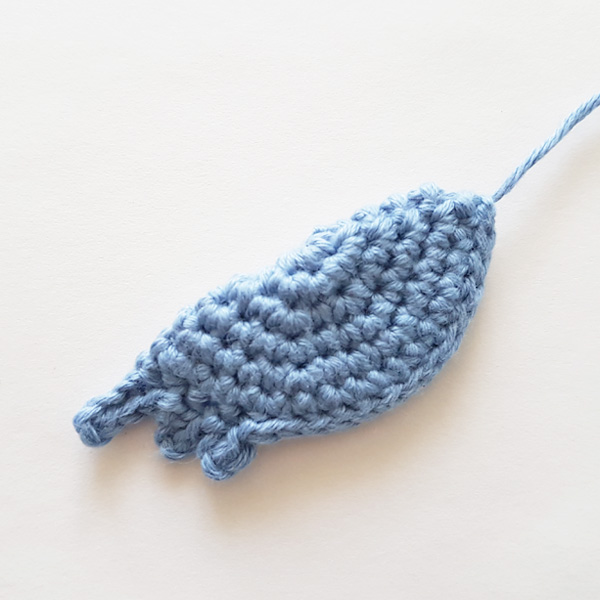
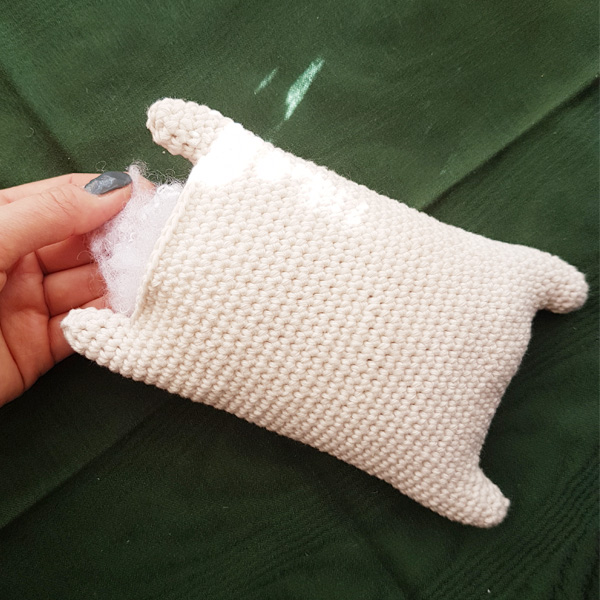
Head & Body
Start with red yarn,
ch 11,
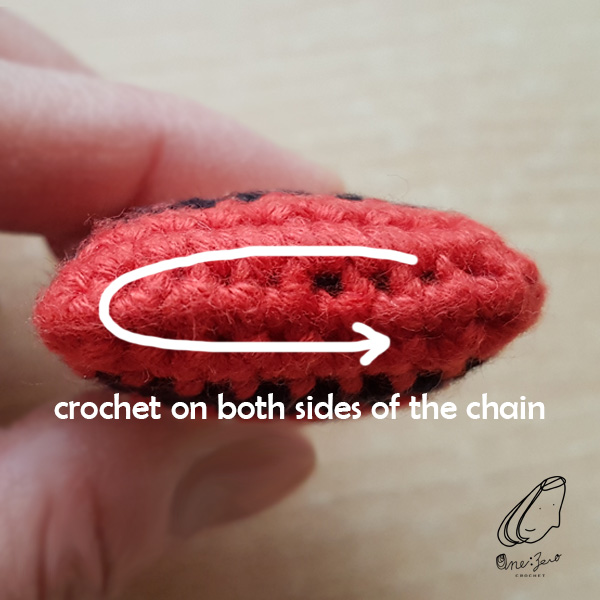
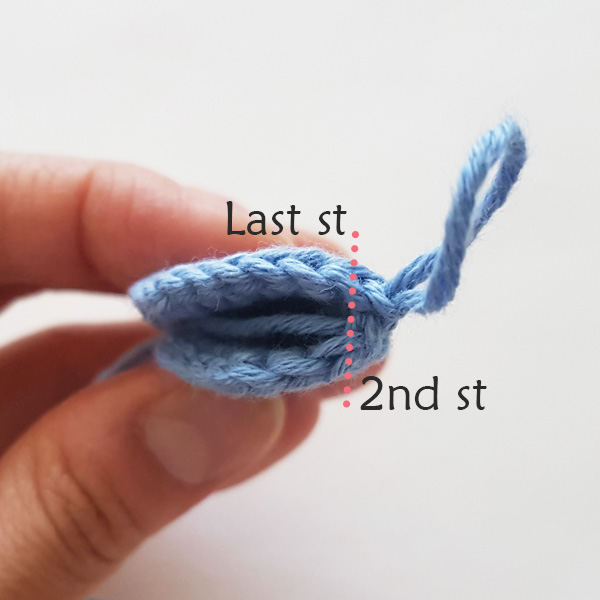
R 1: skip first ch from hook, sc in next 9 back loops of chain, 2sc in last ch, turn clockwise, sc in next 9 front loops of chain [we’re going to crochet on both sides of the foundation chain](20)
Change color to white
R 2: sc ard (20)
Change color back to red
R 3: sc ard (20)
Change color to white
R 4: sc ard (20)
Change color to green
R 5 – 6: sc ard (20)
Change color to beige
R 7 – 10: sc ard (20)
Leave a tail and cast off.
Stuff some polyester filling.
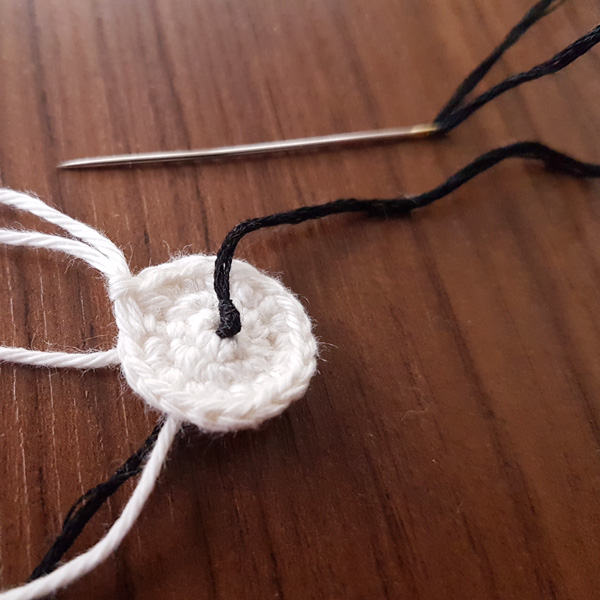
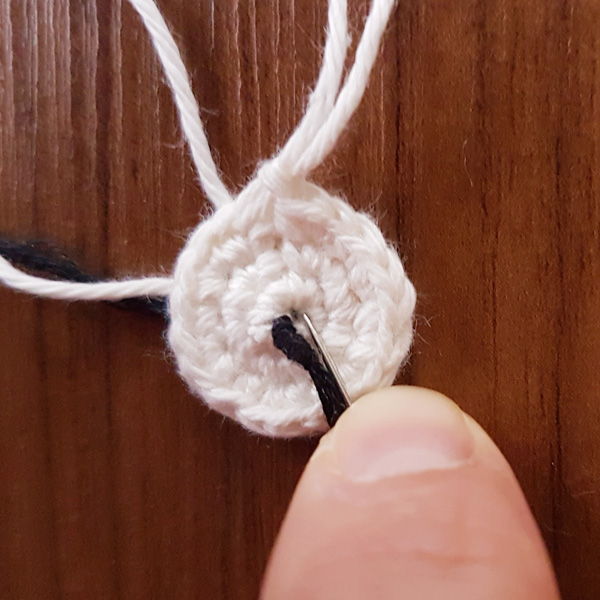
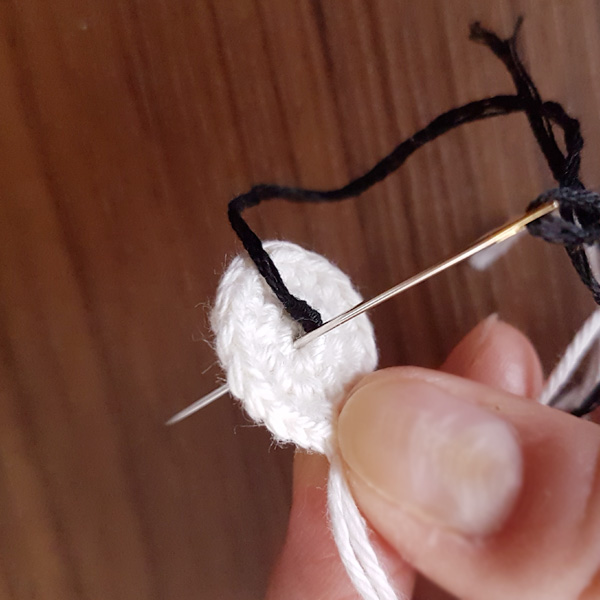
Use tapestry needle, whip stitch across to close the top of the head.
[you may do a few sl st to travel back to the start point of the round]
Weave in ends.
Whip stitch to close the top of the head. 
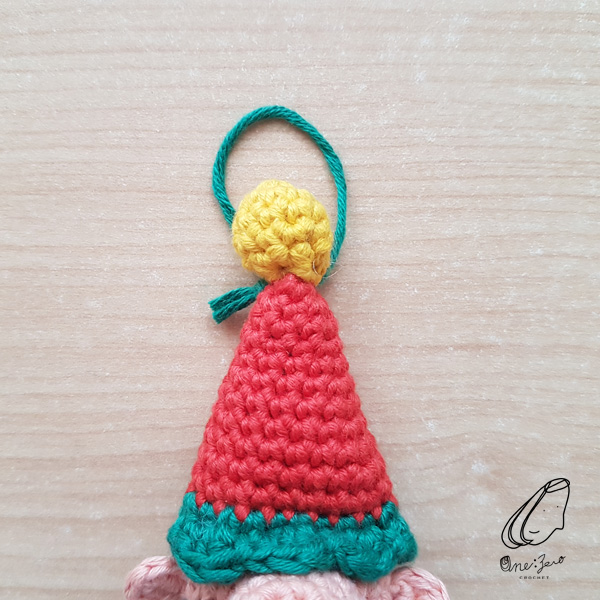
Hat
Use red yarn,
R 1: MR (4)
R 2: {sc, Inc} ard (6)
R 3: {sc, Inc} ard (9)
R 4: sc ard (9)
R 5: {sc 2, Inc} ard (12)
R 6: sc ard (12)
R 7: {sc 3, Inc} ard (15)
R 8: sc ard (15)
R 9: {sc 4, Inc} ard (18)
R 10: sc ard (18)
R 11: {sc 5, Inc} ard (21)
R 12: sc ard (21)
Change color to green
R 13: sc ard (21)
R 14: {hdc, 2dc, sl st} x 7
Secure the end by making a knot, leave a tail for assembly later, and cast off.
“Pompom” on the top of the hat
Use yellow yarn,
R 1: MR (5)
R 2: 2sc in each st (10)
R 3 – 4: sc ard (10)
R 5: Dec ard (5)
Stuff filling, leave a tail for assembly later and cast off.
Ear (Make 2)
Magic ring (5), sl st,
Leave a tail and cast off.
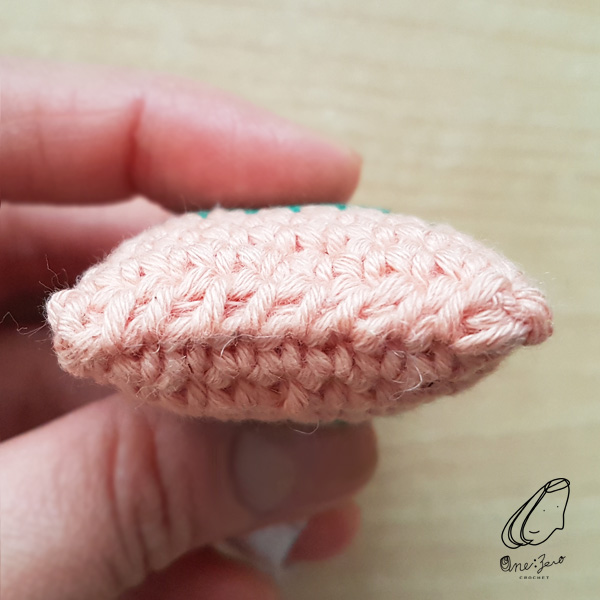
Nose
Use beige yarn,
R 1: MR (7)
R 2: 2sc in each st ard (14)
R 3 – 4: sc ard (14)
Leave a tail for assembly later, and cast off.
Final Assembly
1, Sew the pompom on the tip of the hat. 
2, Stuff filling and sew the nose on the middle top section of the head/body. (Between R 6 – 9) 
3, Attach the ears on both sides of the head. (Between R 7 – 8) 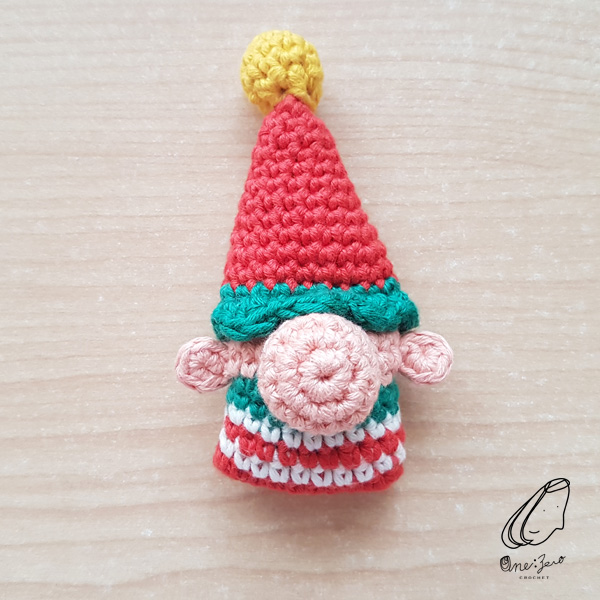
4, Finally, stuff a bit of filling and join
the hat to the top of the head.
hang up the elf on the tree!
If you’ve missed the Santa Claus Christmas Ornament free pattern, click HERE to check it out! Merry Christmas!!
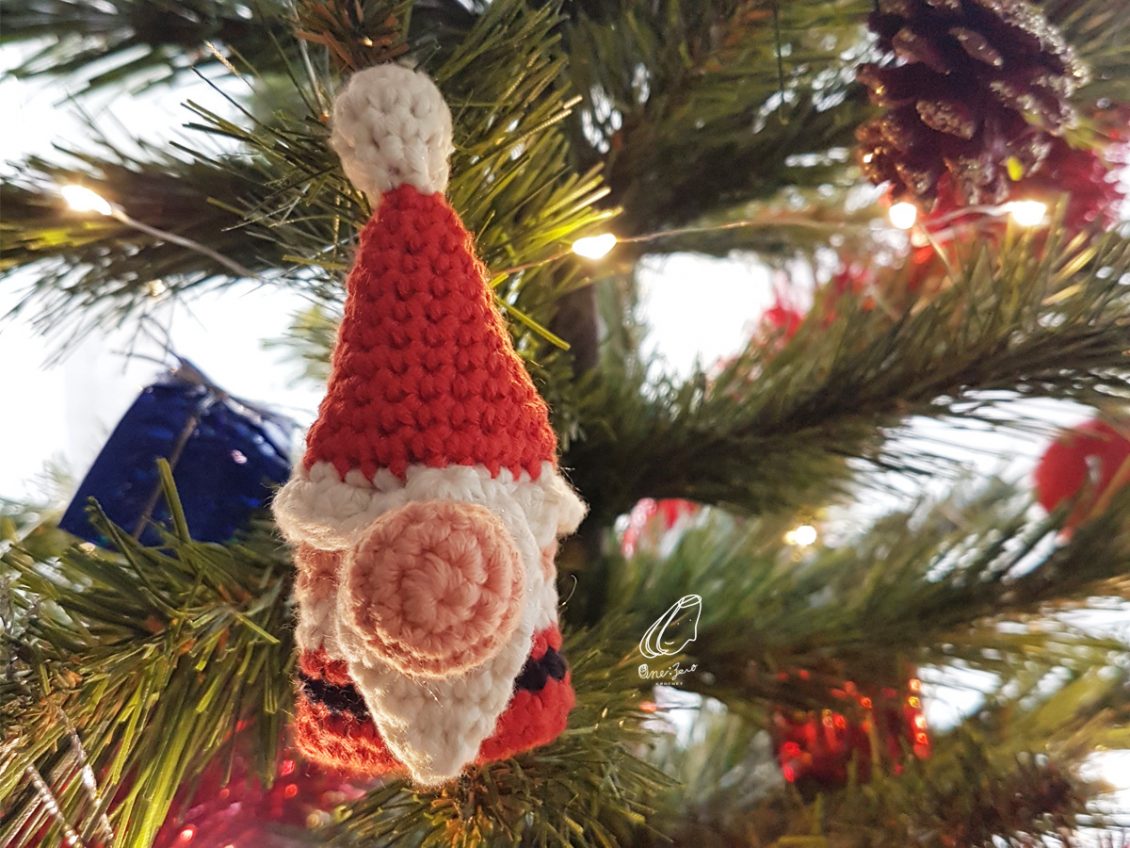
Santa Claus Christmas Ornament (Free Pattern)
Christmas is around the corner but with my little girl taking up most of my time I haven’t had much time to decorate our Christmas tree this year. After putting on the standard factory-made ornaments, I felt like there was something missing… Perhaps some handmade crochet ornaments would give some character to the tree but with little free time, I needed something simple and fast. So that’s how I came up with this last-minute Santa Claus Christmas crochet ornament!
If like me you’ve left your Christmas tree decoration to the last second and need a little something to make your tree standout, you can make your own one now by following the Santa Clause Christmas Ornament free pattern below and the Mini Elf Christmas Ornament HERE! Happy Crochet and wish you a wonderful holiday season!
Materials
2.5mm crochet hook
Size 3 light worsted cotton yarn: Red, White, Black, Beige
Tapestry needle
Polyester filling
scissors
Stitch Marker
Abbreviations
MR = magic ring
ch = chain
ard =around
st(s) =stitch(es)
sc = Single Crochet
hdc = half double crochet
dc = double crochet
sl st = slip stitch
Inc = 2sc in next stitch
Dec = join next 2 stitches together
Head & Body
Start with red yarn,
ch 11,
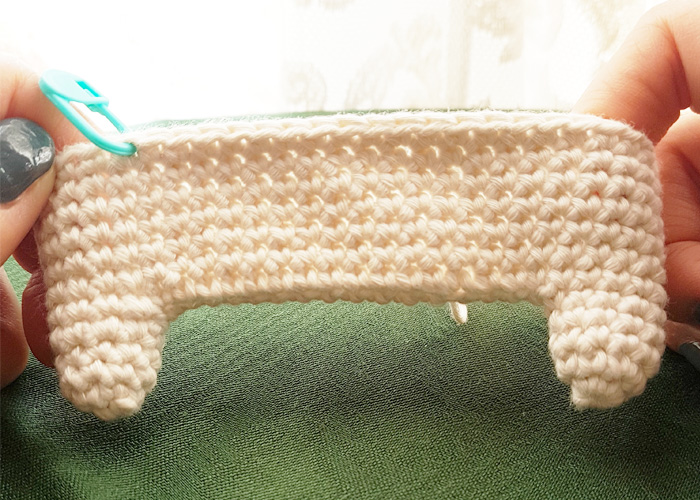
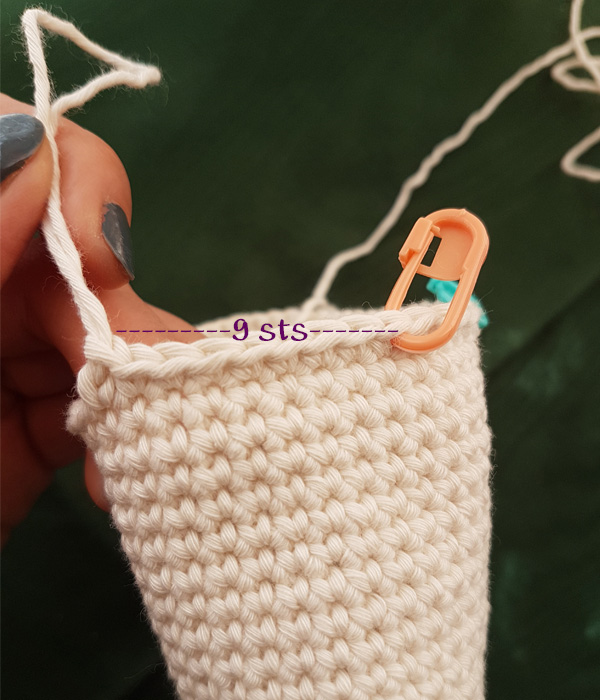
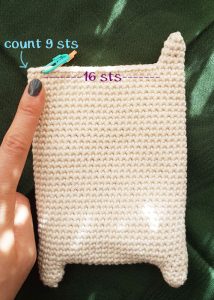
R 1: skip first ch from hook, sc in next 9 back loops of chain, 2sc in last ch, turn clockwise, sc in next 9 front loops of ch [we’re going to crochet on both sides of the foundation chain, as shown in the picture] (20)
R 2: sc ard (20)
Change color to black
R 3: sc ard (20)
Change color back to red
R 4: sc ard (20)
Change color to white
R 5 – 6: sc ard (20)
Change color to beige
R 7 – 10: sc ard (20)
Leave a tail and cast off.
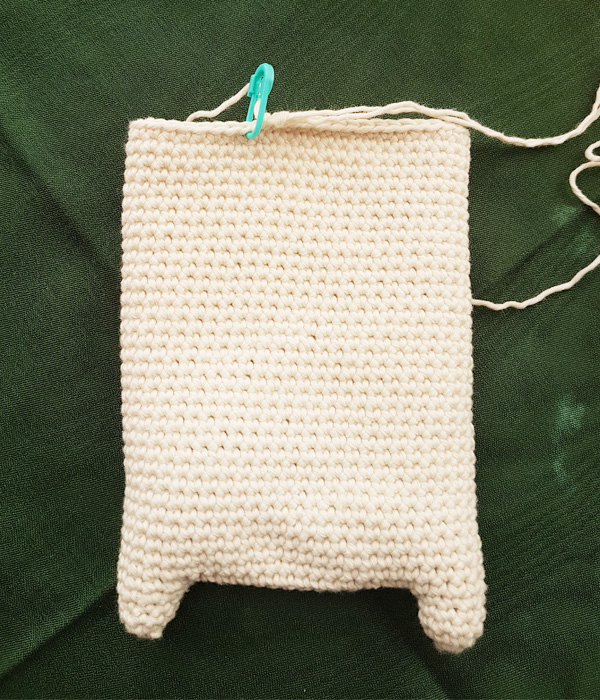
Stuff polyester filling.
Use tapestry needle, whip stitch across to close the top of the head.
[you may need to do a few sl st to travel back to the start point of the round]
Weave in ends.
Whip stitch across to close
the top of the head.
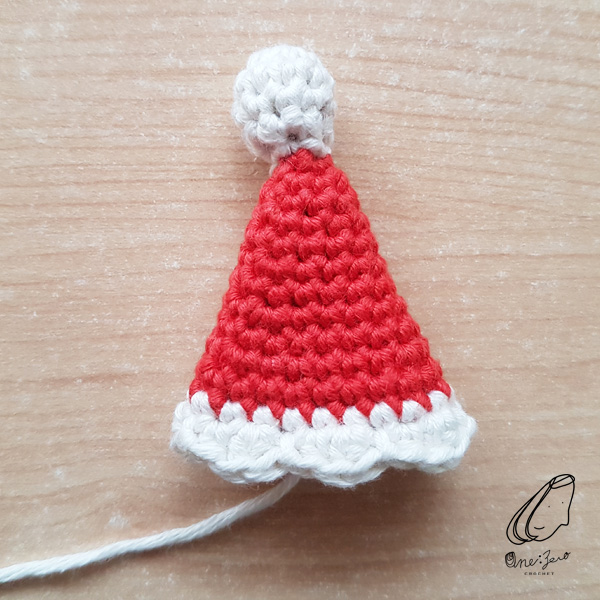
Hat
Use red yarn,
R 1: MR (4)
R 2: {sc, Inc} ard (6)
R 3: {sc, Inc} ard (9)
R 4: sc ard (9)
R 5: {sc 2, Inc} ard (12)
R 6: sc ard (12)
R 7: {sc 3, Inc} ard (15)
R 8: sc ard (15)
R 9: {sc 4, Inc} ard (18)
R 10: sc ard (18)
R 11: {sc 5, Inc} ard (21)
R 12: sc ard (21)
Change color to white
R 13: sc ard (21)
R 14: {hdc, 2dc, sl st} x 7
Secure the end by making a knot, leave a tail for assembly later, and cast off.
“Pompom” on the top of the hat
Use white yarn,
R 1: MR (5)
R 2: 2sc in each st (10)
R 3 – 4: sc ard (10)
R 5: Dec ard (5)
Stuff filling, leave a tail for assembly later and cast off.
Beard
Use white yarn,
R 1: MR (7)
R 2: 2sc in each st (14)
R 3 – 5: sc ard (14)
R 6: {Dec, sc 5} x 2 (12)
R 7: {Dec , sc 4} x 2 (10)
R 8: {Dec, sc 3} x 2 (8)
R 9: Dec ard (4)
Close the end, cast off, and weave in ends.
Nose
Use beige yarn,
R 1: MR (7)
R 2: 2sc in each st ard (14)
R 3 – 4: sc ard (14)
Leave a tail for assembly later, and cast off.
Final Assembly
1, Attach the ‘pompom’ on
the tip of the hat.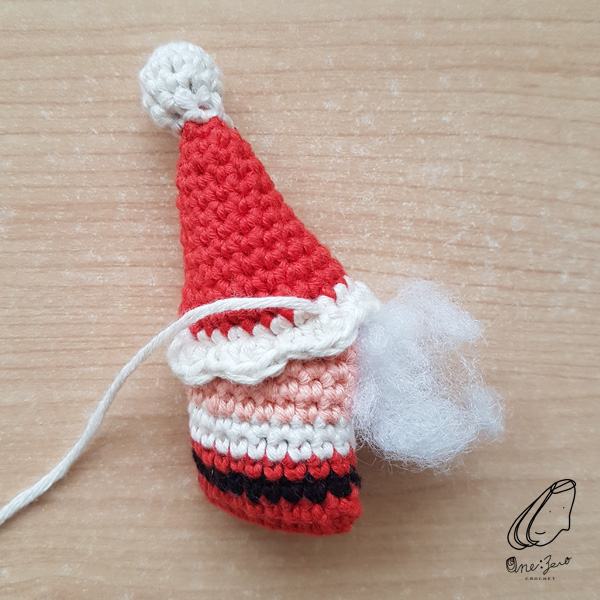
2, Join the hat to the top of the
head and stuff a bit of filling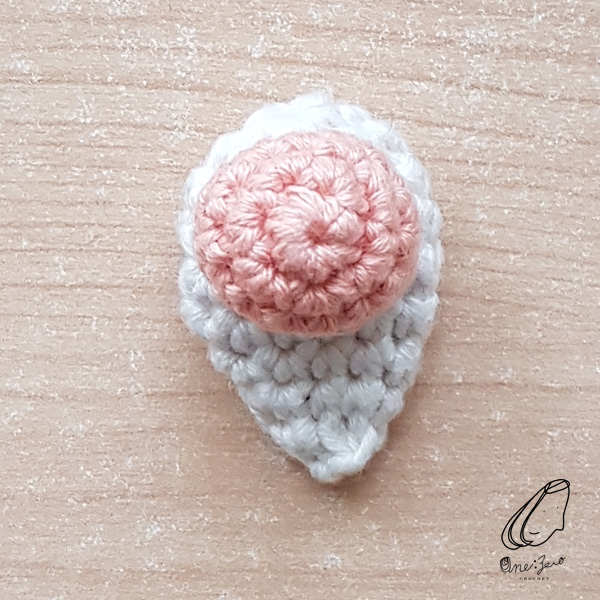
3, Sew the nose on the top
section of the beard.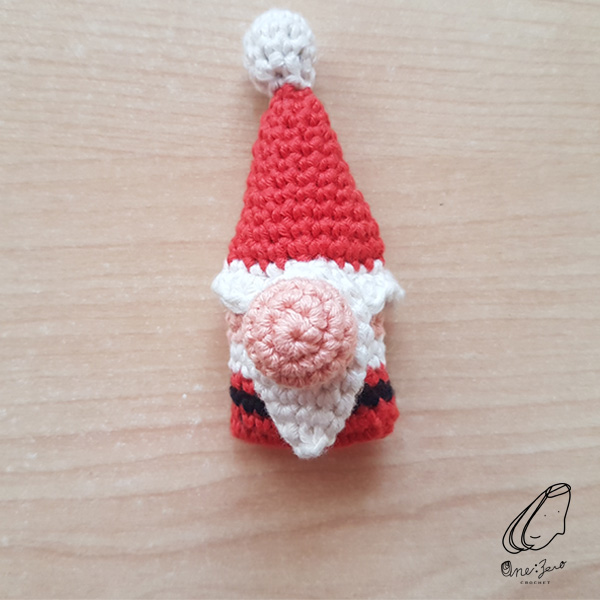
4, Sew the beard on the middle section
of the head/body and let the
beard cover a bit of the hat.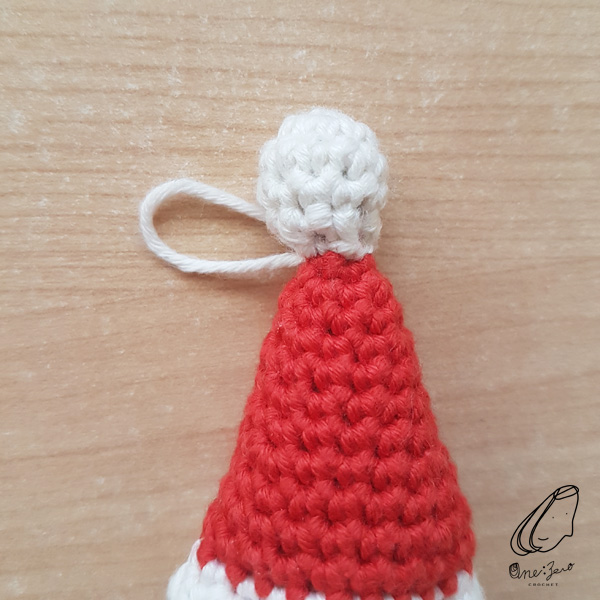
5, Last but not least, attach a string of yarn around the pompom so that you
can hang up the Santa on your tree!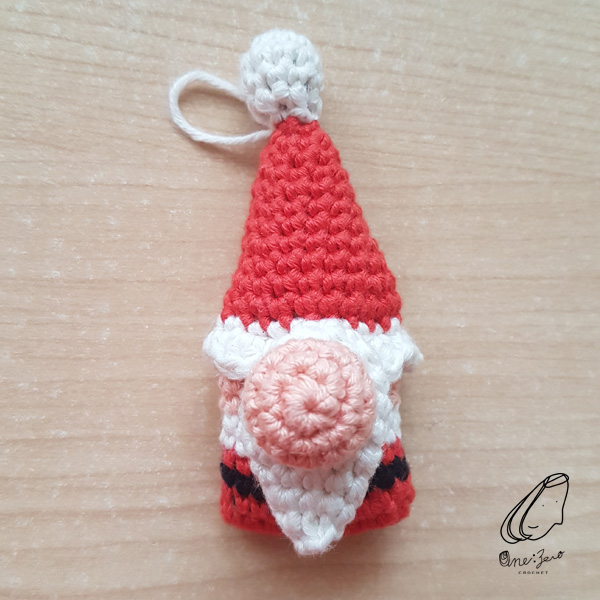
Merry Christmas & Happy New Year!!
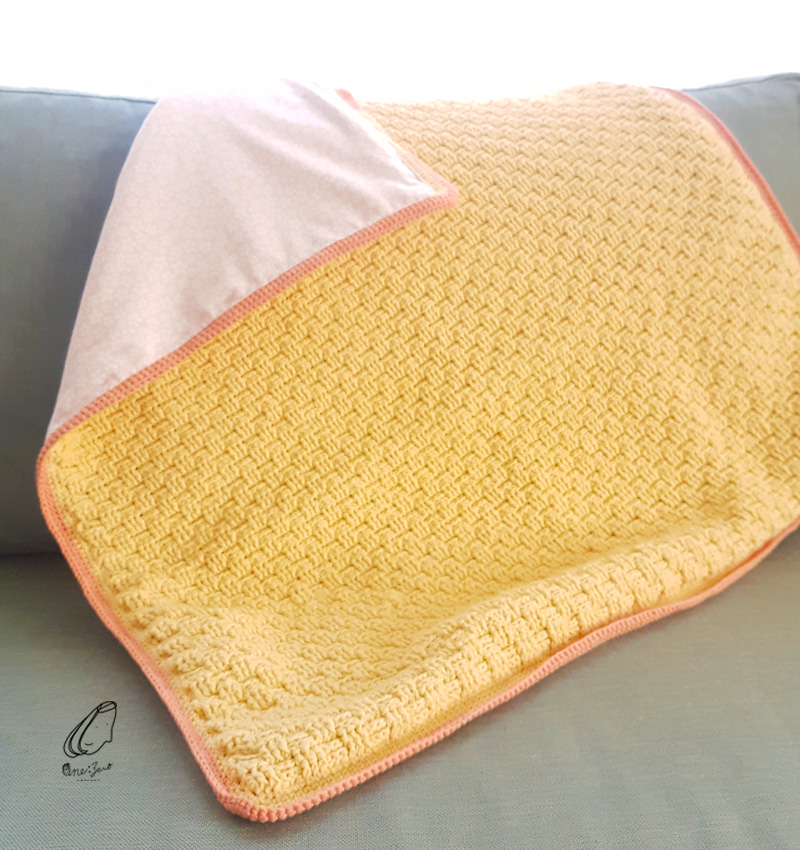
Basket Weave Stitch Baby Blanket
With my baby almost on the way, I’ve been meaning to finish up my basket weave stitch baby blanket which has been sitting in the drawer for a while. However, it took me some time to look for the baby-friendly materials for the lining part to complete the job.
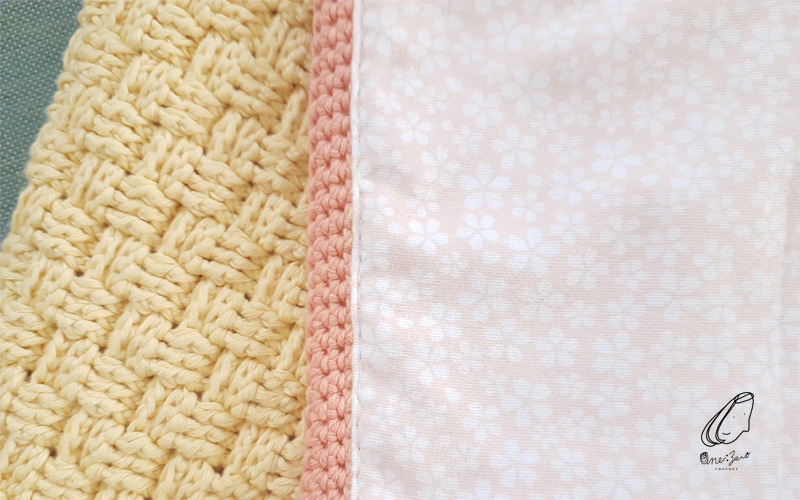
After some search, I’ve picked this pink fabric with little white flower print on it for lining on the crochet blanket. It’s 100% cotton fabric which is very soft, breathable and machine washable. And of course, the yarn [fibranatura Cottonwood] I’ve used for the crochet blanket is also baby-friendly, it labels itself 100% organic cotton.
I’m not a quick crocheter and sometimes I work on more than one project at the same time, so I don’t remember how many weeks or months I’ve used to complete this blanket. One thing for sure is that crocheting a blanket is a wonderful thing to do during the early stages of pregnancy when you don’t feel like you have energy to do anything but mentally you would still like to do something “useful” instead of just laying down.
I don’t have a sewing machine, so I hand-sewed the lining on the crochet blanket and it did take some time (like a whole day xD), but it was all worth it! With the back up of the lining, the blanket won’t stretch out even after machine washing. I love how the blanket turned out!

*just for your own reference, general baby blanket size is about 76 x 89cm (30″ x 35″).
**If you also want to know how to do the [Basket Weave Stitch], this is the youtube link I used as the reference for my Basket Weave Stitch Baby Blanket.

Twitter Bird Crochet Pattern
Twitter has become a worldwide tool for people to communicate with just about anyone online. I always thought the Twitter bird had a very simple but cute design and thought it would be neat to bring it to life with crochet into the 3D world. Since it’s autumn, I even gave it a cute flowery hat to match the season!
Materials
- Hook: 2.5mm and 0.75mm
- Cotton Yarn: Baby Blue, Sky Blue & Yellow [la mia Conttony (3/Light)]
- Lace Yarn: Grey, Dark Green, Yellow, Black & White
- Tapestry Needle & Sewing Needle
- Sewing Pins
- Scissors
- Stitch Marker
- Polyester filling
Abbreviations
- ch(s) = chain(s)
- MR = Magic Ring
- ard = around
- st(s) = stitch(es)
- sl st = slip stitch
- sc = single crochet
- hdc = half double crochet
- dc = double crochet
- tc = treble crochet
- Inc = 2sc in next st
- Dec = join next 2 sc together
- sc .. = sc in next .. sts
- {instructions} x .. = repeat instructions in {} as stated number
Head & Body
Start with sky blue yarn,
R 1: MR [7]
R 2: 2sc in each st ard [14]
R 3: {sc, Inc} ard [21]
R 4: {sc 2, Inc} ard [28]
R 5: sc ard [28]
R 6: {sc 3, Inc} ard [35]
R 7: sc ard [35]
R 8: {sc 4, Inc} ard [42]
R 9 – 10: sc ard [42]
R 11: {sc 5, Inc} ard [49]
-Add baby blue yarn from R 12
(B) = baby blue, indicate to change yarn color from sky blue to baby blue
R 12: sc 24, (B)sc, sc 24 [49]
R 13: sc 23, (B)sc 3,sc 23 [49]
R 14: {sc 6, Inc} x 3, sc, (B)sc 5, sc Inc, {sc 6, Inc} x 2, sc 5, Inc [56]
R 15: sc 23, (B)sc 9, sc 24 [56]
R 16: sc 21, (B)sc 13, sc 22 [56]
R 17: sc 20, (B)sc 15, sc 21 [56]
R 18: {sc 7, Inc} x 2, sc 3, (B)Inc, (B)sc 15, (B)Inc, sc 3, Inc, {sc 7, Inc} x 2 [63]
R 19 – 20: sc 21, (B)sc 19, sc 23 [63]
R 21: sc 3, Dec, sc 7, Dec, sc 7, (B)Dec, (B)sc 15, (B)Dec, {sc 7, Dec} x 2, sc 3, Dec [56]
R 22: sc 19, (B)sc 17, sc 20 [56]
R 23: {sc 6, Dec} x 2, sc 4, (B)Dec, (B)sc 11, (B)Dec, {sc 6, Dec} x 2, sc 3, Dec [49]
R 24: {sc 5, dec} x 2, sc 5, (B)Dec, (B)sc 8, (B)Dec, {sc 5, Dec} x 2, sc 2, Dec [42]
R 25: {sc 4, Dec} x 3, (B)sc 5, (B)Dec, {sc 4, Dec} x 2, sc 3 [35]
-Stuff filling
R 26: {sc 3, Dec} ard [28]
R 27: {sc 2, Dec} ard [21]
R 28: {sc, Dec} ard [14]
R 29: Dec ard [7]
-Stuff more filling, cast off and weave in ends
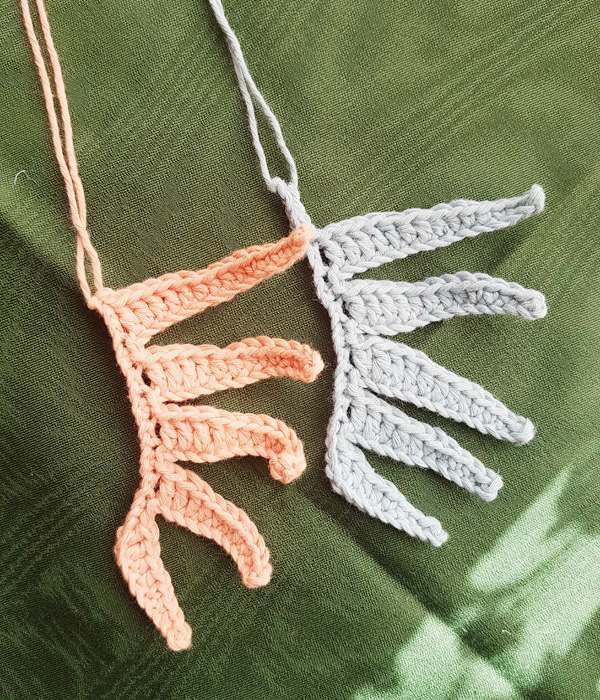
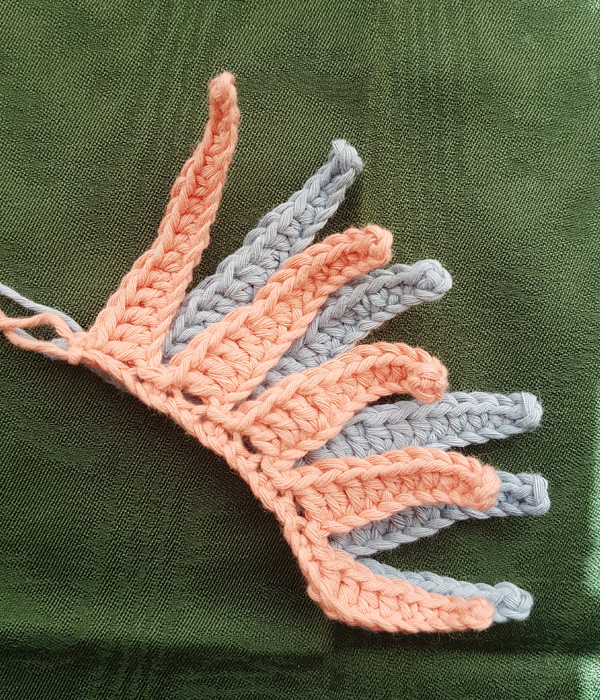
Wings
Right Wing
Use sky blue yarn and apply crochet rounds in this part
R 1: MR, sl st [7]
R 2: ch 1, 2sc in same st, 2sc in each st ard, sl st [14]
R 3: ch 1, sc in same st, Inc, {sc, Inc} ard, sl st [21]
R 4: ch 1, sc in same st, sc Inc, {sc 2, Inc} ard, sl st [28]
R 5: ch 1, sc in same st, sc 2, Inc, {sc 3, Inc} ard, sl st [35]
Next, fold the circle into a semicircle,

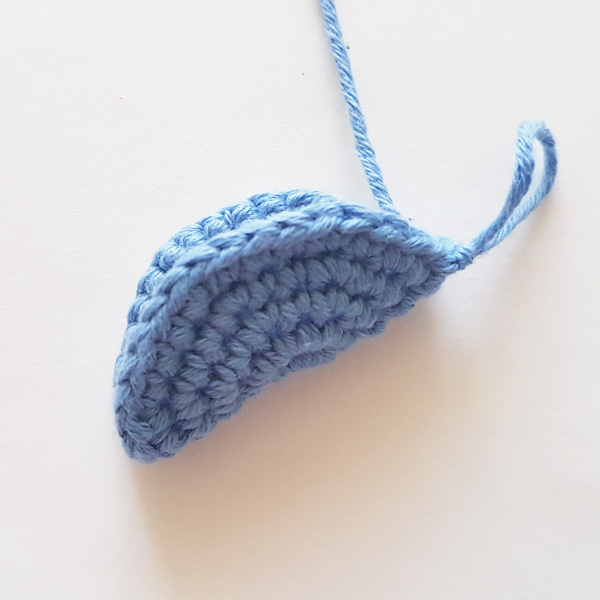
Fold the circle into a semicircle
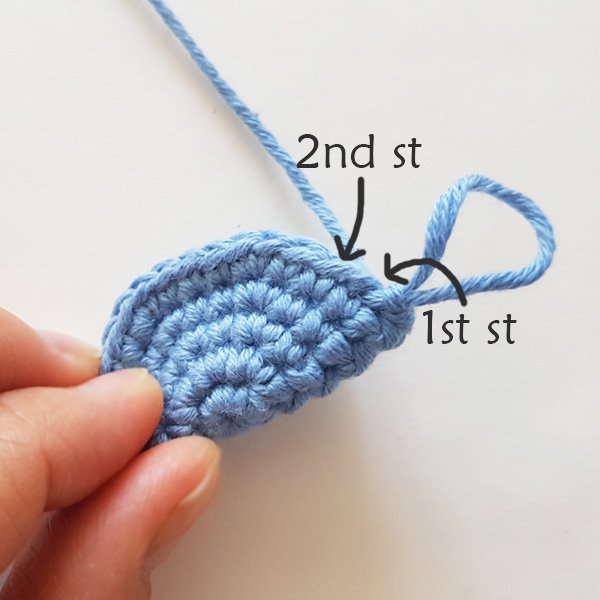
Skip 1st st
ch 1 (count as a st), hook goes through sts on both sides (e.g. 2nd st and last st, work as a pair), then make a sc
sc along the edge of the half circle [18]
**17sc plus ch 1 at the beginning
Then, turn, ch 1, sl st into next 15 sts,
ch 3, sl st into 3rd ch from hook, sl st into next st;
ch 4, sl st into 3rd ch from hook, sc in next ch, sl st into next st;
ch 5, sl st into 3rd ch from hook, sc in next 2 chs, sl st into last st
Left Wing
Use sky blue yarn and apply crochet rounds in this part
R 1: MR, sl st [7]
R 2: ch 1, 2sc in same st, 2sc in each st ard, sl st [14]
R 3: ch 1, sc in same st, Inc, {sc, Inc} ard, sl st [21]
R 4: ch 1, sc in same st, sc Inc, {sc 2, Inc} ard, sl st [28]
R 5: ch 1, sc in same st, sc 2, Inc, {sc 3, Inc} ard, sl st [35]
Then apply Step 1-5 as Right Wing,
Step 6
ch 5, sl st into 3rd ch from hook, sl st into next st;
ch 4, sl st into 3rd ch from hook, sl st into next st;
ch 3, sl st into 3rd ch from hook, sl st into next st;
sl st into next 14 sts
-Leave a tail and cast off
Beak
Use yellow yarn,
R 1: MR [4]
R 2: {sc, Inc} ard [6]
R 3: {sc, Inc} ard [9]
-Leave a tail and cast off
Eye (Make 2)
Use black lace yarn with 0.75mm hook,
MR [5],
sl st,
-Leave a tail and cast off
Hat
Use grey lace yarn with 0.75mm hook and works in crochet rounds.
R 1: MR, sl st [6]
R 2: ch 1, 2sc in same st, 2sc in each st ard, sl st [12]
R 3: ch 1, sc in same st, Inc, {sc, Inc} ard, sl st [18]
R 4: ch 1, sc in same st, sc, Inc, {sc 2, Inc} ard, sl st [24]
R 5 – 7: ch 1, sc ard, sl st [24]
R 8: ch 1, sc in same st, sc 2, Inc, {sc 3, Inc} ard, sl st [30]
R 9: ch 1, sc in same st, sc 3, Inc, {sc 4, Inc} ard, sl st [36]
R 10: ch 1, sc in same st, sc, Inc, {sc 5, Inc} x 5, sc 3, sl st [42]
R 11: ch 1, sc in same st, sc 2, Inc, {sc 6, Inc} x 5, sc 3, sl st [48]
R 12: ch 1, sc ard, sl st [48]
-Leave a tail for assembling later and cast off
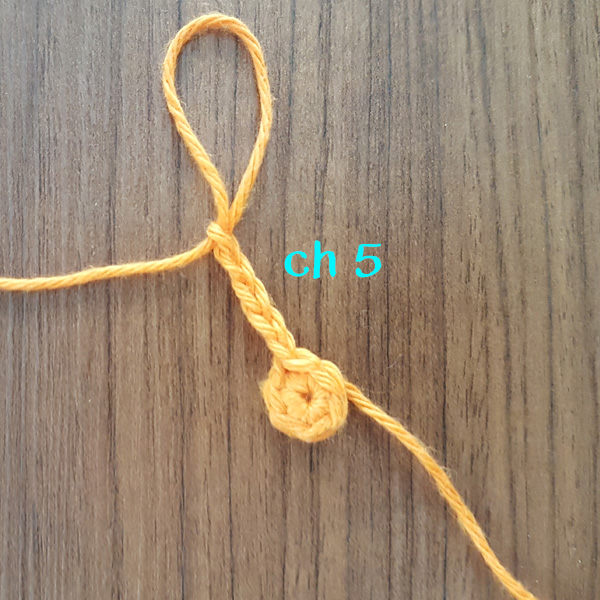
Leaf
Use green lace yarn with 0.75mm hook,
leave a long tail at the beginning for final assembly.
ch 10,
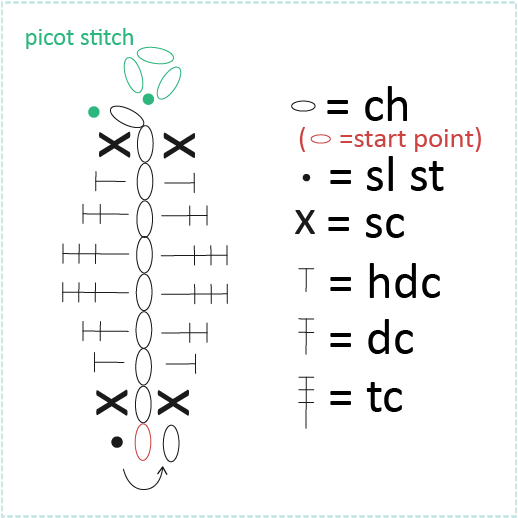
sc into 2nd ch from hook, hdc, dc, tc into next 2 chs, dc, hdc, sc, sl st, ch, skip next ch, sc, hdc, dc, tc into next 2 chs, dc, hdc, sc, picot stitch
**picot stitch: ch 3, sl st into 3rd ch from hook, sl st into next st/ch
-Secure the end, cast off and weave in ends
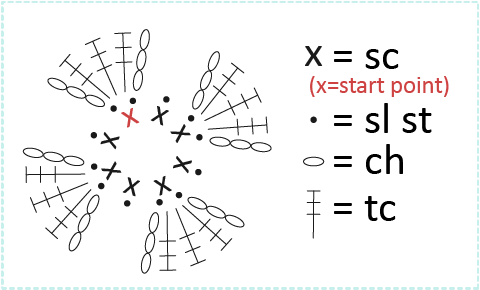
White Flower
Use white lace yarn with 0.75mm hook,
Start withe a magic ring [8],
{sl st into 1st / next st, ch 3, 3 tc in same st, ch 3, sl st into same st, sl st into next st} x 4
-Secure the end, leave a tail and cast off
Final Assembly
- Sew the wings accordingly in each side of the body.
- Sew the beak on the head/body (counting fro the top of the baby blue triangle part, at around the 3rd and the 4th row position).
- Sew the eyes onto the head accordingly.
- Assemble the leaf and the white flower on the hat.
- Finally, sew the hat on the top of the head.
Happy Crochet!! 😀
**If you want to get the downloadable PDF copy, you can check out the SHOP

Waluigi Crochet Doll / Wrist Cushion
For a few months now I’ve been using a Unicorn crochet wrist cushion that I made and it has helped lower the pain I sometimes got from over internet surfing. My husband saw it and wanted one for himself but asked if I could do one with his favorite Nintendo character. I agreed as it was the first time he had asked me to create something with crochet and I thought it would make for a fun project…until I found out who his favorite character was! His name is…

…Waluigi, and as you can probably tell, it’s not the usual cute looking thing that I try to make on this blog. But with Valentine’s Day coming up, I thought it would make a great gift and so I tried my best to recreate this goofy and creepy looking guy. Here’s the end result:
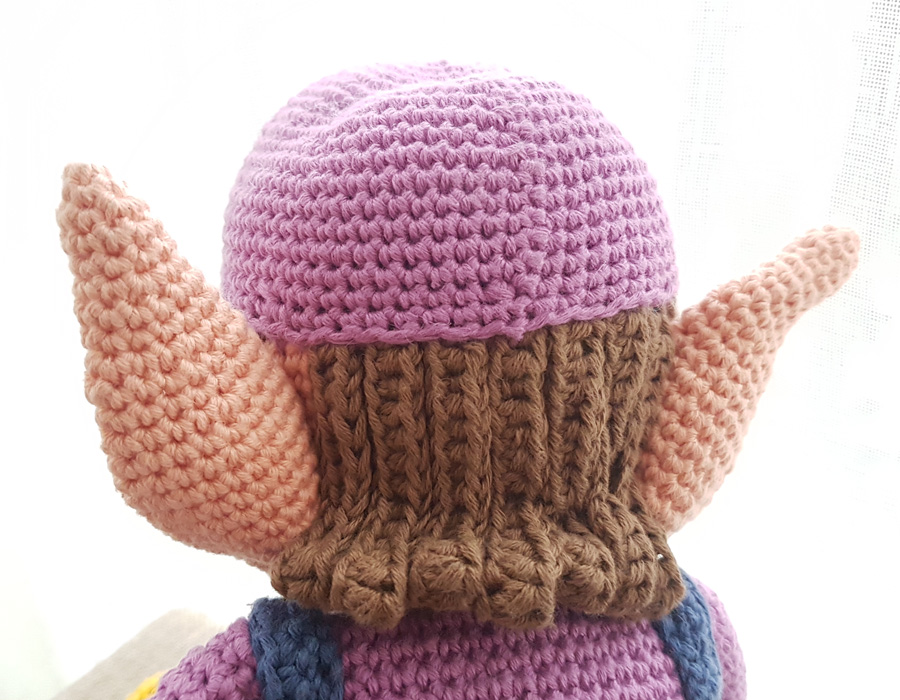
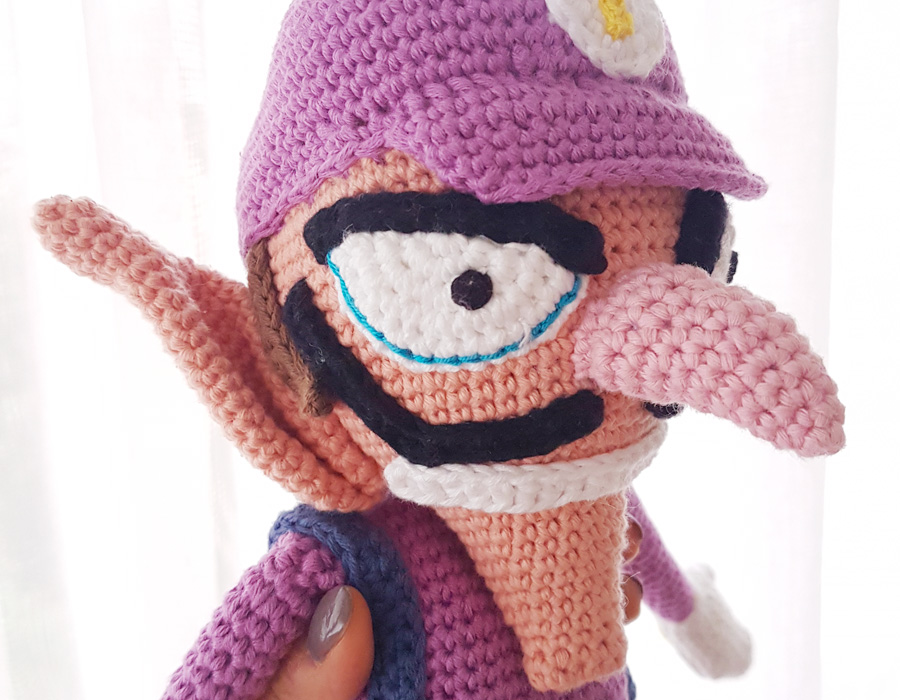
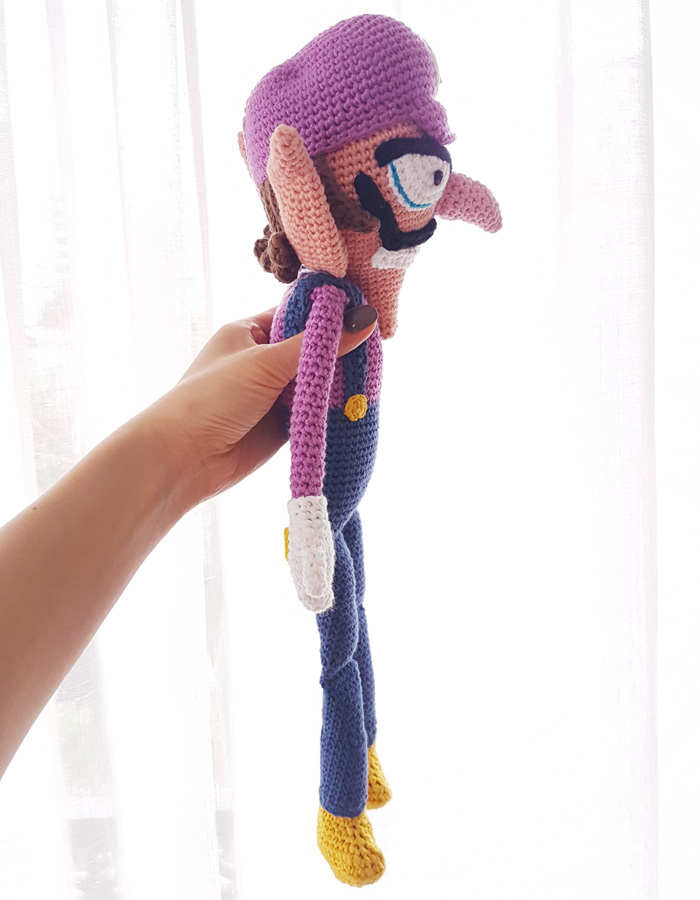
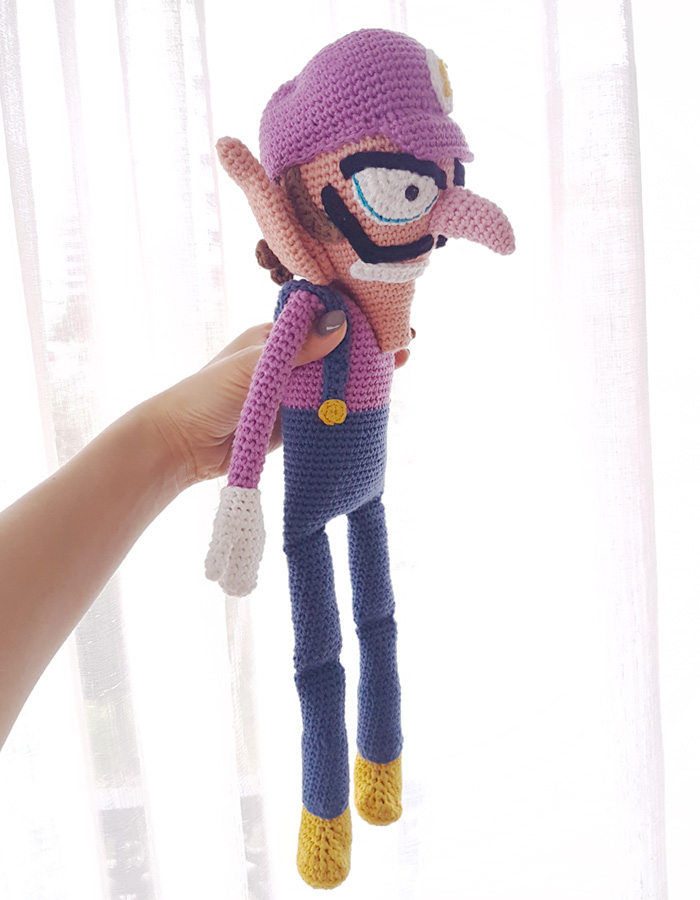
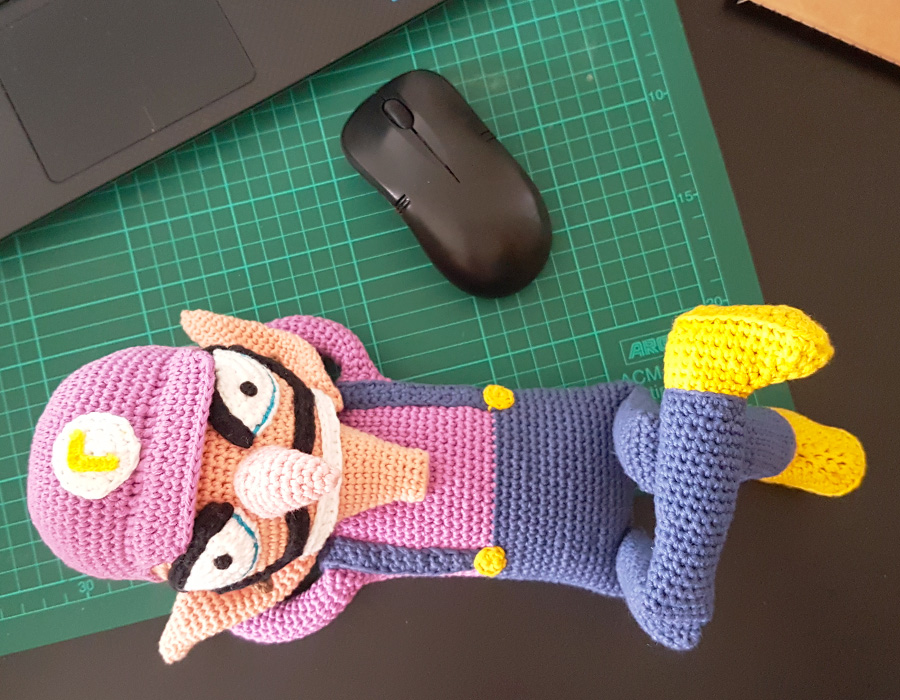
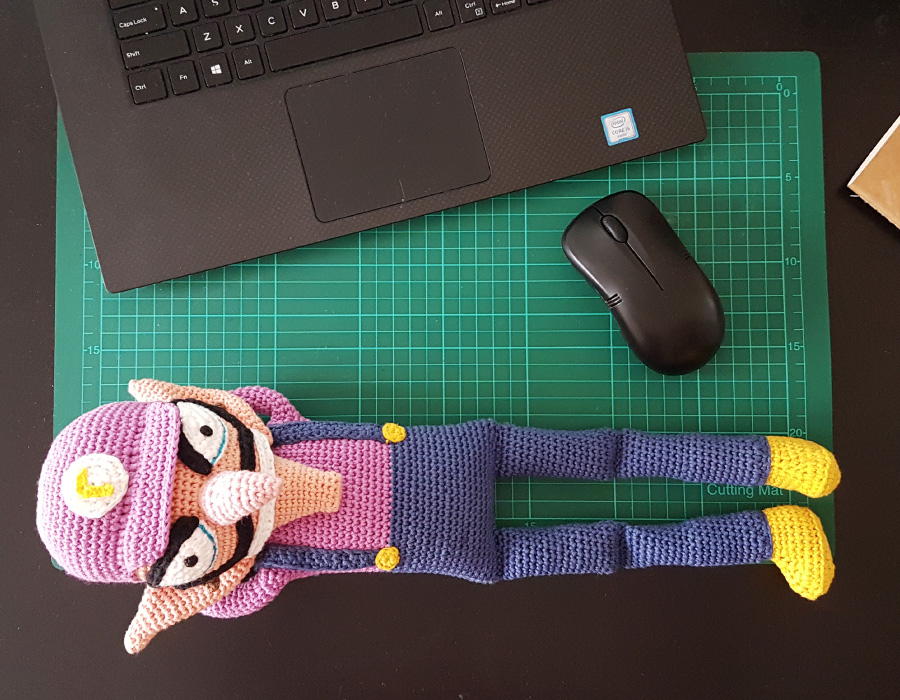
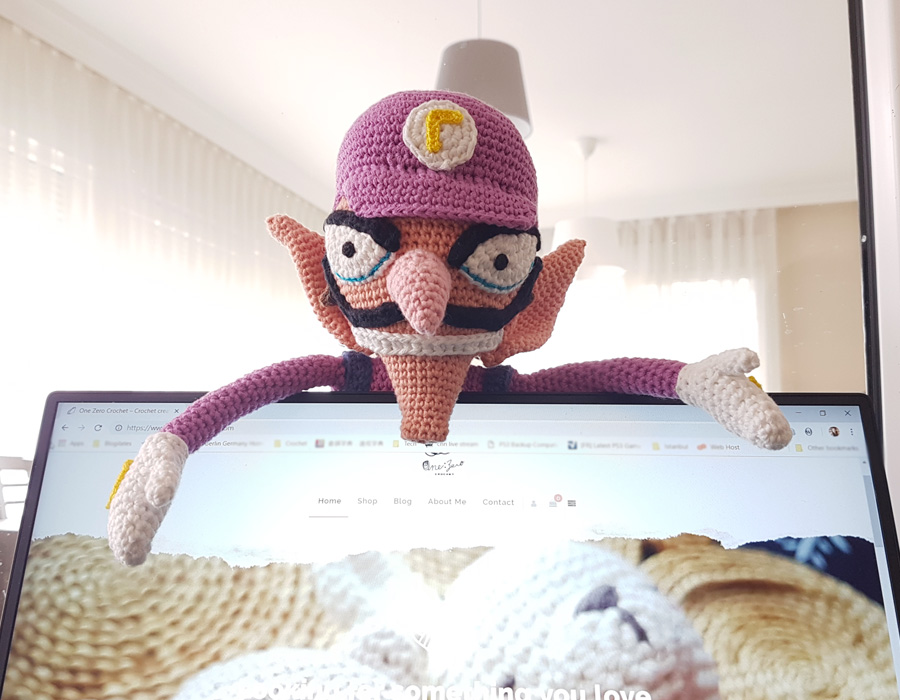
In this project, I mainly used the cotton yarn and polyester filling. But for the bottom part of the legs, instead of stuffing with polyester filling, I’ve used the small green beans so that the weight can allow Waluigi to do more funny postures.
Have you ever made a crochet gift to your Valentine on the Valentine’s Day? I would also love to hear about your projects 🙂
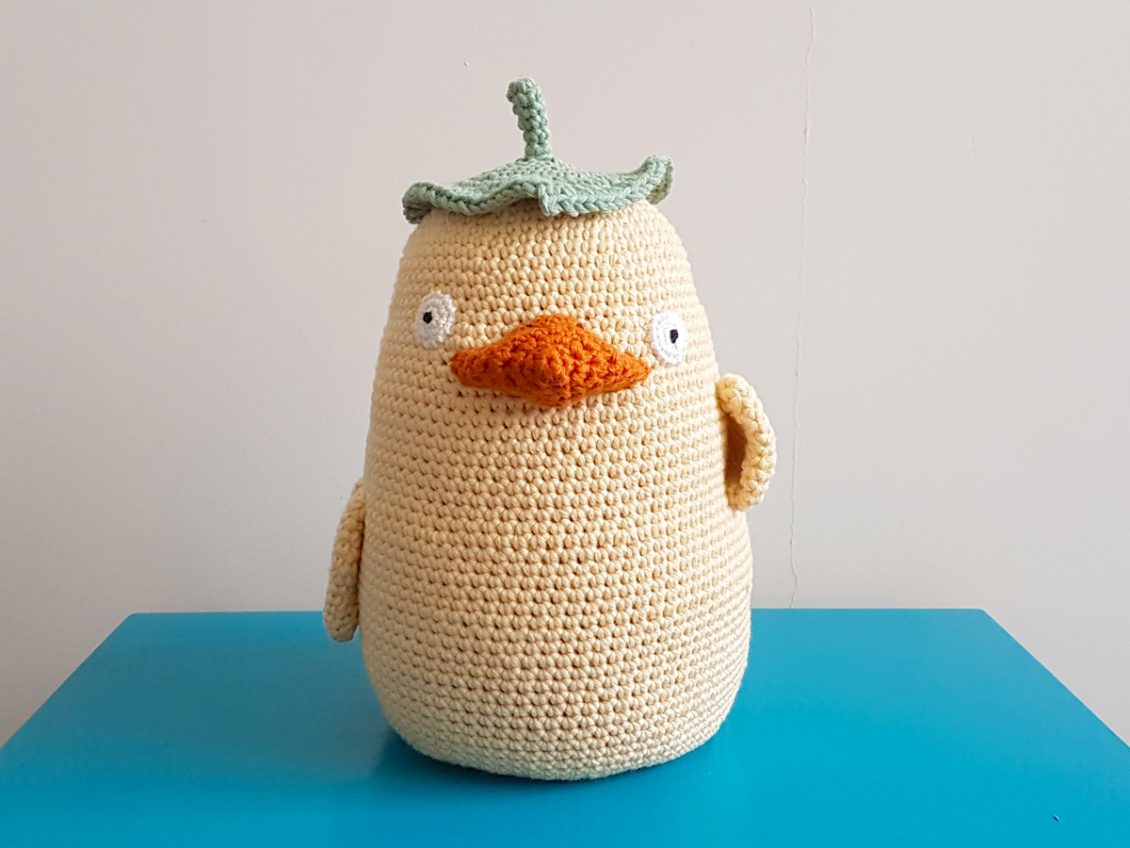
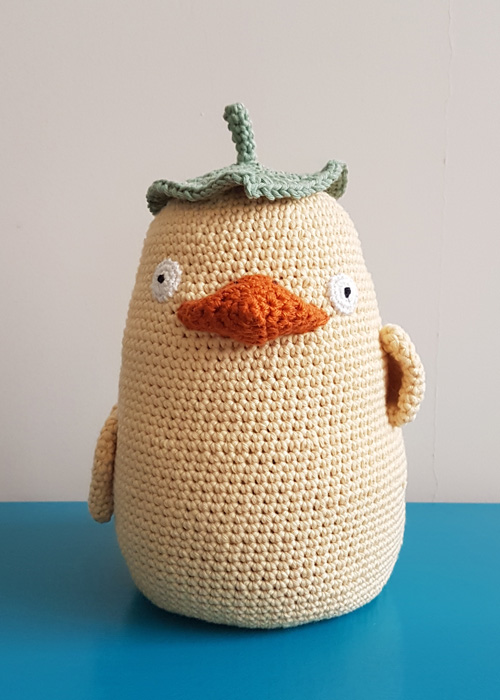
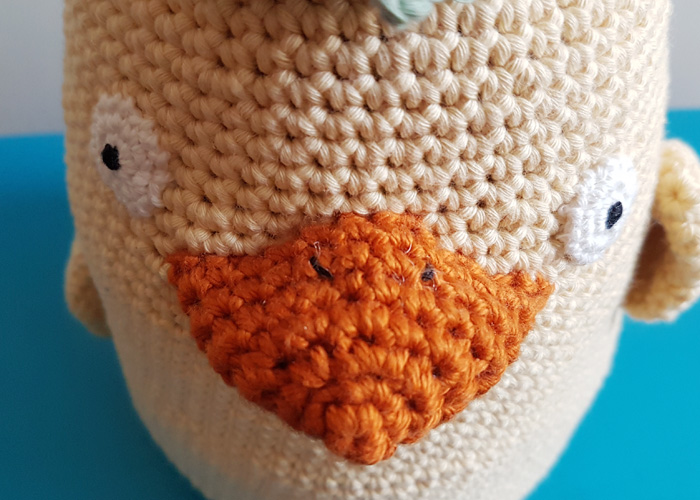
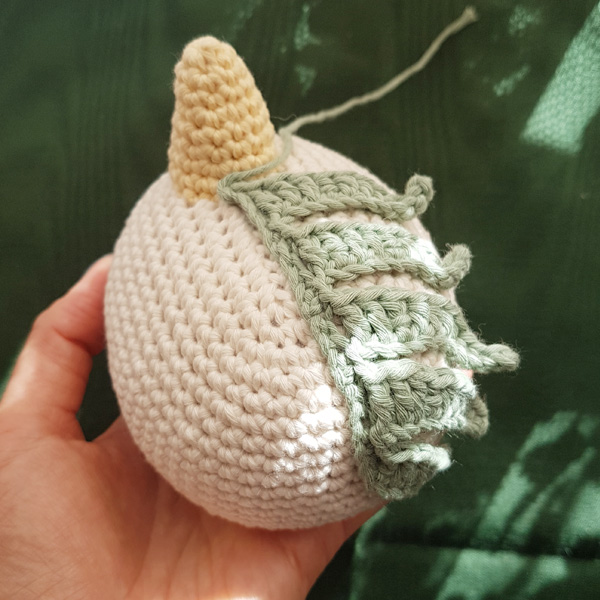
Studio Ghibli Ootori-Sama Door Stopper (Free Crochet Pattern)
After making No-Face & Boh, I have decided to make Ootori-Sama to complete my Spirited Away Door Stopper set. Ootori-Sama, sometimes referred as ‘the yellow duck’, are the clients of the Bathhouse in Spirited Away. They are minor characters in the film but they can be your major door guard at home!
Notes
-Hooks: 3.5mm (6/0 JNP standard hook Or E4 US standard hook); And 2.5mm (4/0 JNP standard hook Or B1/C2 US standard hook ); And 0.85mm (0.9mm JNP lace hook Or US steel hook 13)
-Cotton Yarns: Yellow, Pumpkin Orange & Green; Lace Yarn: White
– Embroidery Thread: Black
-Tapestry Needle
-Sewing Needle
-Scissors
-Stitch Marker
-Polyester filling
-Beans or Rice (White bean is using in this project, about 1.5kg)
-This pattern is worked in both Crochet Rounds and Spiral Rounds
Abbreviation
ch(s)= Chain(s)
st(s)= Stitch(es)
sl st= Slip Stitch
sc= Single Crochet
hdc= Half Double Crochet
dc= Double Crochet
tr= Treble Crochet
Inc= 2sc in next st
Dec= Join next 2 single crochet together
blsc = back loop single crochet
Head & Body
Use yellow yarn with 3.5mm crochet hook,
Rd 1: Magic Ring [7]
Rd 2: 2sc in each st around [14]
Rd 3: *sc, Inc, repeat from * till round ends [21]
Rd 4: *sc in next 2 sts, Inc, repeat from * till round ends [28]
Rd 5: *sc in next 3 sts, Inc, repeat from * till round ends [35]
Rd 6: *sc in next 4 sts, Inc, repeat from * till round ends [42]
Rd 7: sc around [42]
Rd 8: *sc in next 5 sts, Inc, repeat from * till round ends [49]
Rd 9: sc around [49]
Rd 10: *sc in next 6 sts, Inc, repeat from * till round ends [56]
Rd 11 – 12: sc around [56]
Rd 13: *sc in next 7 sts, Inc, repeat from * till round ends [63]
Rd 14 – 17: sc around [63]
Rd 18: *sc in next 8 sts, Inc, repeat from * till round ends [70]
Rd 19 – 22: sc around [70]
Rd 23: *sc in next 9 sts, Inc, repeat from * till round ends [77]
Rd 24 – 32: sc around [77]
Rd 33: *sc in next 10 sts, Inc, repeat from * till round ends [84]
Rd 34 – 47: sc around [84]
Rd 48: *sc in next 10 sts, Dec, repeat from * till round ends [77]
Rd 49: sc around [77]
Rd 50: *sc in next 9 sts, Dec, repeat from * till round ends [70]
Rd 51: sc around [70]
Rd 52: *sc in next 8 sts, Dec, repeat from * till round ends [63]
Rd 53: *sc in next 7 sts, Dec, repeat from * till round ends [56]
Rd 54: *sc in next 6 sts, Dec, repeat from * till round ends [49]
Rd 55: *sc in next 5 sts, Dec, repeat from * till round ends [42]
Rd 56: *sc in next 4 sts, Dec, repeat from * till round ends [35]
-Fill up with beans or rice
Rd 57: *sc in next 3 sts, Dec, repeat from * till round ends [28]
Rd 58: *sc in next 2 sts, Dec, repeat from * till round ends [21]
Rd 59: *sc in next 1 sts, Dec, repeat from * till round ends [14]
-Fill up with more beans or rice
Rd 60: Dec till round ends [7]
-Cast off & weave in ends
Try to fill up with as much beans/ rice as possible, it will affect the shape if it is too loose.
Wings (2 pieces)
Use yellow yarn with 3.5mm crochet hook,
Rd 1: Magic Ring [6]
Rd 2: *sc, Inc, repeat from * till round ends [9]
Rd 3: sc around [9]
Rd 4: *sc in next 2 sts, Inc, repeat from * till round ends [12]
Rd 5 -6: sc around [12]
Rd 7: *sc, Inc, repeat from * till round ends [18]
Rd 8 – 9: sc around [18]
Rd 10: *sc in next 4 sts, Dec, repeat from * till round ends [15]
Rd 11 – 12: sc around [15]
-Leave a tail for assembling later and cast off
Eyes (2 pieces)
Use white lace yarn with 0.85mm hook,
Work in crochet rounds,
Rd 1: Magic Ring, sl st [6]
Rd 2: ch 1, 2sc in same st, 2sc in each st around, sl st [12]
Rd 3: ch 1, sc in same st, Inc, *sc in next st, Inc, repeat from * till round ends, sl st [18]
-Leave a tail for assembling later and cast off
Use black embroidery thread to sew a knot stitch onto the middle part the eye:
-
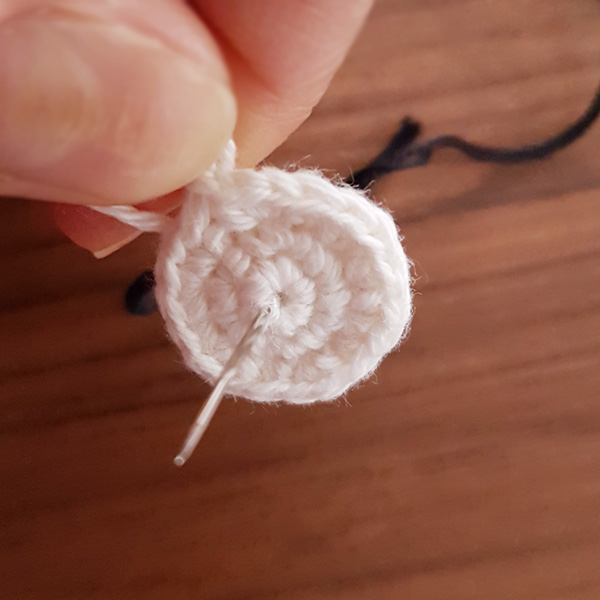
- Insert the needle at the edge of the loop
-
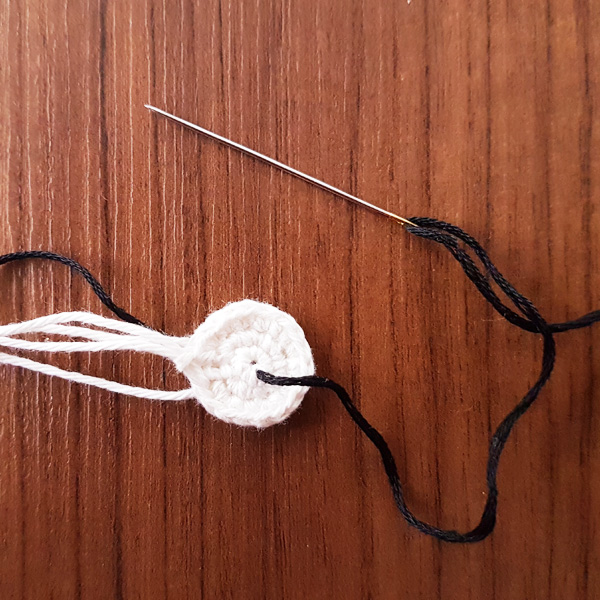
- Pull the thread through
-
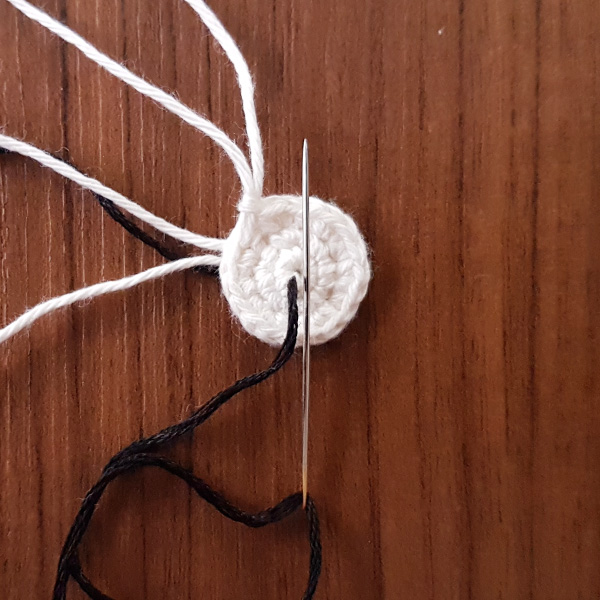
- Thread against the needle
-
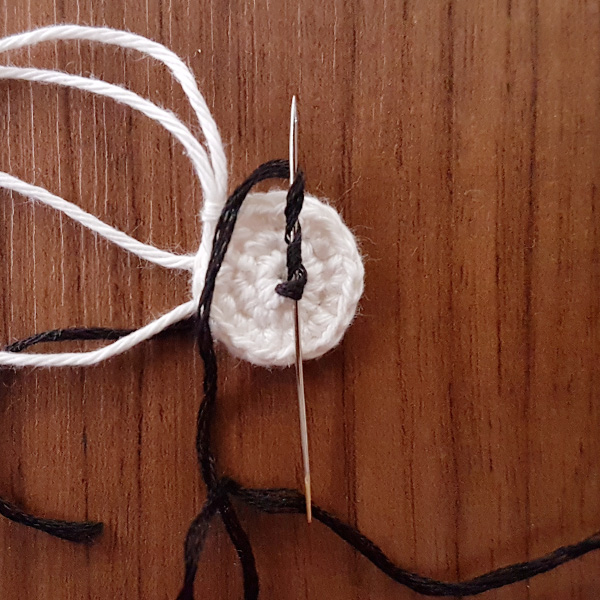
- Wrap the thread around the needle 3 times
-

- Pull up the needle
-
- Push down the knot at the bottom
-
- Insert the needle into the other side of the edge
-
- Pull the needle from the back
Leaf
Use green yarn, start with 2.5mm crochet hook,
Work in crochet rounds,
Rd 1: Magic Ring, sl st [5]
Rd 2 – 5: ch 1, sc in same st, sc around, sl st [5]
-Change crochet hook to 3.5mm
Rd 6: ch 1, blsc in same st, blsc around, sl st [5]
Rd 7: ch 1, 2sc in same st, 2sc in each st around, sl st [10]
Rd 8: ch 1, sc in same st, Inc, *sc, Inc, repeat from * till round ends [15]
Rd 9: ch 1, sc in same st, sc, Inc, * sc in next 2 sts, Inc, repeat from * till round ends, sl st [20]
Rd 10: ch 1, sc in same st, sc in next 2 sts, Inc, *sc in next 3 sts, Inc, repeat from * till round ends, sl st [25]
Rd 11: ch 1, sc in same st, sc in next 3 sts, Inc, *sc in next 4 sts, Inc, repeat from * till round ends, sl st [30]
Rd 12: ch 1, sc in same st, sc in next 3 sts, Inc, *sc in next 4 sts, Inc, repeat from * till round ends, sl st [36]
Rd 13: ch 1, sc in same st, 2hdc in each of next 4 sts, hdc in next 3 sts, sc in next 5 sts, hdc in next 2 sts, dc in next 2 sts, 2tr in next st, dc in next 2 sts, hdc in next 2 sts, sc in next 6 sts, hdc in next 3 sts, 2hdc in each of next 4 sts, sc, sl st [45]
Rd 14: ch 1, skip 1st st, 2hdc in each of next 21 sts, ch 2, sl st into 2nd ch from hook, 2hdc in each of next 20 sts, skip last st, sl st [82]
-Leave a tail for assembling and cast off
Beak
Use pumpkin orange yarn with 3.5mm crochet hook,
Work in crochet rounds,
Rd 1: Magic Ring, sl st [4]
Rd 2: ch 1, sc in same st, Inc, *sc, Inc, repeat from * till round ends, sl st [6]
Rd 3: ch 1, 2sc in same st, 2sc in each st around, sl st [12]
Rd 4: ch 1, 2sc in same st, sc, Inc, Inc, sc in next 4 sts, Inc, Inc, sc, Inc, sl st [18]
Rd 5: ch 1, sc in next 5 sts, Inc, sc in next 6 sts, Inc, sc in next 5 sts, sl st [20]
Rd 6: ch 1, sc in same st, sc around, sl st [20]
Rd 7: ch 1, sc in same st, sc in next 3 sts, Inc, Inc, sc in next 8 sts, Inc, Inc, sc in next 4 sts, sl st [24]
-Leave a tail for assembling later and cast off
!! For the beak
> the side with the tail facing downward;
> Fill up the beak with some polyester filling while sewing it onto the body to give it a steady appearance.
When all parts are ready, assemble them all on the main body.
Last but not least, use black embroidery thread to sew the nostrils onto the middle upper part of the beak.
 Happy Crocheting!!
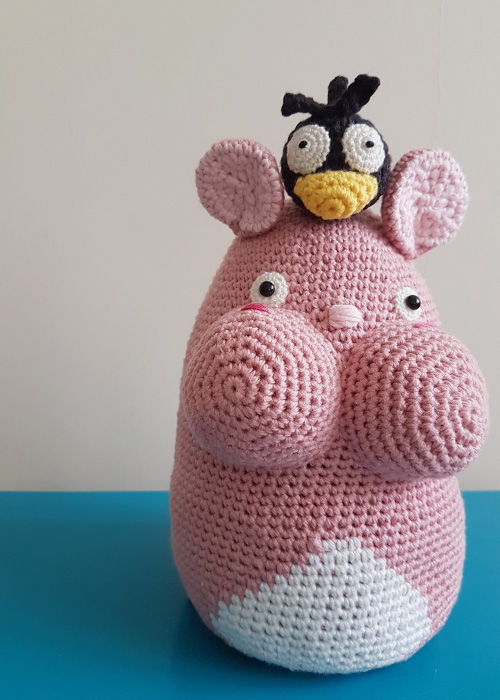
Studio Ghibli Boh Door Stopper (Free Crochet Pattern)
In case you haven’t seen this Japanese animated film, named “Spirited Away”, Boh was a large baby, I mean really HUGE, then one day he got shrank by his aunt and turned into a small grey mouse-like creature. After I have made the No-Face door stopper, No-Face looked so lonely standing by the door itself. Therefore, I planned to make it some friends, Boh & Ootori- Sama.
Notes
-Hooks: 3.5mm (6/0 JNP standard hook Or E4 US standard hook); And 0.85mm (0.9mm JNP lace hook Or US steel hook 13)
-Cotton Yarns: Dirty Pink, Pink, White, Black & Yellow; Lace Yarn: White
– Embroidery Thread: Black, Shape Pink & Pink
-Tapestry Needle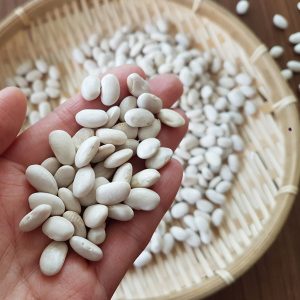
-Sewing Needle
-Scissors
-Stitch Marker
-Polyester filling
– A pair of plastic eyes (small size)
-Beans or Rice (White bean is using in this project, about 1.5kg)
-This pattern is worked in both Crochet Rounds and Spiral Rounds
Abbreviation:
ch(s)= Chain(s)
st(s)= Stitch(es)
sl st= Slip Stitch
sc= Single Crochet
Inc= 2sc in next st
Dec= Join next 2 single crochet together
Head & Body
Use dirty pink yarn & 3.5mm crochet hook,
Rd 1: Magic Ring (7)
Rd 2: 2sc in each st around (14)
Rd 3: *sc, Inc, repeat from * till round ends (21)
Rd 4: *sc in next 2 sts, Inc, repeat from * till round ends (28)
Rd 5: *sc in next 3 sts, Inc, repeat from * till round ends (35)
Rd 6: sc around (35)
Rd 7: *sc in next 4 sts, Inc, repeat from * till round ends (42)
Rd 8: sc around (42)
Rd 9: *sc in next 5 sts, Inc, repeat from * till round ends (49)
Rd 10 – 11: sc around (49)
Rd 12: *sc in next 6 sts, Inc, repeat from * till round ends (56)
Rd 13 – 14: sc around (56)
Rd 15: *sc in next 7 sts, Inc, repeat from * till round ends (63)
Rd 16 – 17: sc around (63)
Rd 18: *sc in next 8 sts, Inc, repeat from * till round ends (70)
Rd 19 – 22: sc around (70)
Rd 23: *sc in next 9 sts, Inc, repeat from * till round ends (77)
Rd 24 – 37: sc around (77)
Rd 38: *sc in next 10 sts, Inc, repeat from * till round ends (84)
Rd 39: sc around (84)
ATTENTION!!
{change w color} will be used to indicate changing dirty pink yarn into white yarn
{change dp color} will be used to indicate changing white yarn into dirty pink yarn
Rd 40: sc in next 41 sts, {change w color}, sc in next 3 sts, {change dp yarn}, sc in next 40 sts (84)
Rd 41: sc in next 40 sts, {change w color}, sc in next 5 sts, {change dp yarn}, sc in next 39 sts (84)
Rd 42: sc in next 39 sts, {change w color}, sc in next 7 sts, {change dp yarn}, sc in next 38 sts (84)
Rd 43: sc in next 38 sts, {change w color}, sc in next 9 sts, {change dp yarn}, sc in next 37 sts (84)
Rd 44: sc in next 37 sts, {change w color}, sc in next 11 sts, {change dp yarn}, sc in next 36 sts (84)
Rd 45: sc in next 36 sts, {change w color}, sc in next 13 sts, {change dp yarn}, sc in next 35 sts (84)
Rd 46: sc in next 35 sts, {change w color}, sc in next 15 sts, {change dp yarn}, sc in next 34 sts (84)
Rd 47 – 48: sc in next 34 sts, {change w color}, sc in next 17 sts, {change dp yarn}, sc in next 33 sts (84)
Rd 49 – 50: sc in next 33 sts, {change w color}, sc in next 19 sts, {change dp yarn}, sc in next 32 sts (84)
Rd 51: sc in next 34 sts, {change w color}, sc in next 17 sts, {change dp yarn}, sc in next 33 sts (84)
Rd 52: sc in next 35 sts, {change w color}, sc in next 15 sts, {change dp yarn},, sc in next 34 sts (84)
Rd 53: *sc in next 10 sts, Dec*, repeat ** 2 times, sc, {change w color}, sc in next 9 sts , Dec, sc, {change dp yarn}, sc in next 9 sts, Dec, *sc in next 10 sts, Dec*, repeat ** (77)
Rd 54: sc in next 35 sts, {change w yarn}, sc in next 9 sts, {change dp yarn}, sc in next 33 sts (77)
Rd 55: *sc in next 9 sts, Dec, repeat from * till round ends (70)
Rd 56: *sc in next 8 sts, Dec, repeat from * till round ends (63)
Rd 57: *sc in next 7 sts, Dec, repeat from * till round ends (56)
Rd 58: *sc in next 6 sts, Dec, repeat from * till round ends (49)
Rd 59: *sc in next 5 sts, Dec, repeat from * till round ends (42)
Rd 60: *sc in next 4 sts, Dec, repeat from * till round ends (35)
-Fill up with beans or rice
Rd 61: *sc in next 3 sts, Dec, repeat from * till round ends (28)
Rd 62: *sc in next 2 sts, Dec, repeat from * till round ends (21)
Rd 63: *sc in next 1 sts, Dec, repeat from * till round ends (14)
-Fill up with more beans or rice
Rd 64: Dec till round ends (7)
-Cast off & weave in ends
Try to fill up with as much beans/ rice as possible, it will affect the shape if it is too loose.
Cheeks (2 pieces)
Use dirty pink yarn,
Rd 1: Magic Ring (7)
Rd 2: 2sc in each st around (14)
Rd 3: *sc, Inc, repeat from * till round ends (21)
Rd 4: *sc in next 2 sts, Inc, repeat from * till round ends (28)
Rd 5: *sc in next 3 sts, Inc, repeat from * till round ends (35)
Rd 6: sc around (35)
Rd 7: *sc in next 4 sts, Inc, repeat from * till round ends (42)
Rd 8 – 10: sc around (42)
-Leave a tail for assembling later, cast off
Eyes for Boh (2 Pieces)
Use white lace yarn & 0.85mm crochet hook,
Work in crochet rounds,
Rd 1: Magic Ring, sl st (7)
Rd 2: ch 1, 2sc in same st, 2sc in each st around, sl st (14)
-Leave a tail for sewing onto the face later, cast off
-Pin the plastic eyes into the loop of the middle part of the eyes and set them aside for later use
Ears (2 pieces)
Start with dirty pink yarn & 3.5mm crochet hook,
Rd 1: Magic Ring (7)
Rd 2: 2sc in each st around (14)
Rd 3: *sc, Inc, repeat from * till round ends (21)
Rd 4: sc around (21)
Rd 5: *sc in next 2 sts, Inc, repeat from * till round ends (28)
Rd 6: sc around (28)
-Change yarn color from dirty pink to pink
-Leave a tail of dirty pink yarn for assembling later then cast off
Rd 7: sc around (28)
Rd 8: *sc in next 2 sts, Dec, repeat from * till round ends (21)
Rd 9: *sc in next st, Dec, repeat from * till round ends (14)
Rd 10: Dec till round ends (7)
-Cast off & weave in ends
Assemble all parts together.
For the ears,
Pink yarn is facing outward (facing you and turn 45 degree outward) and remember to leave enough space between the eras for Yu-Bird;
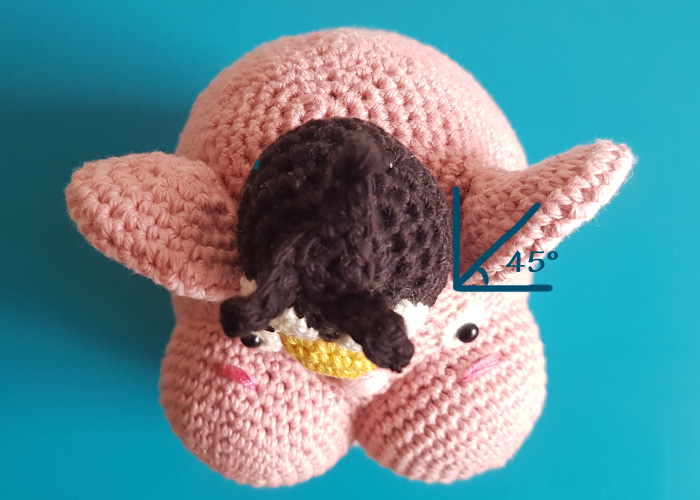 For the cheeks,
Begin with sewing 2/3 of the cheek onto the left/right hand side of the face, then filling up with polyester filling;
Use light pink embroidery thread sew a nose onto the face between the cheeks and shape pink thread to sew the blushes onto the cheeks.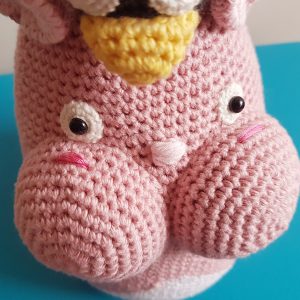
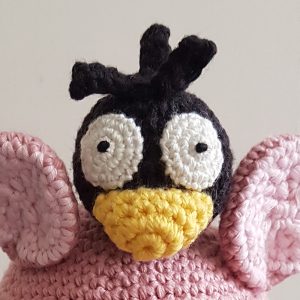
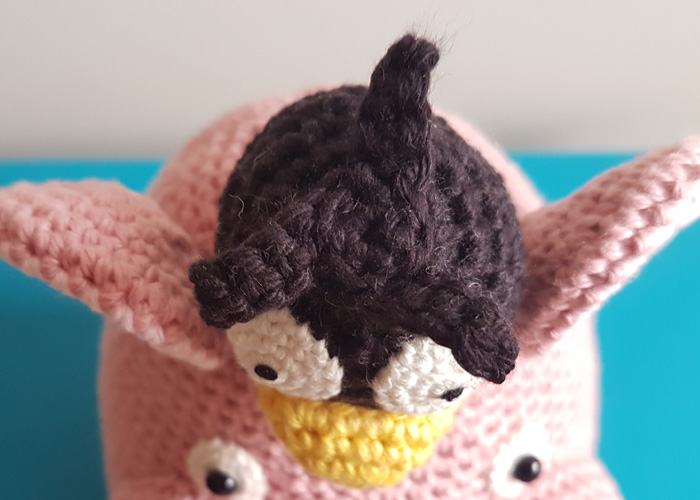
Yu-Bird (Yubaba’s Bird)
 Head & Body
Use black yarn with 3.5mm crochet hook,
Rd 1: Magic Ring (7)
Rd 2: 2sc in each st around (14)
Rd 3: *sc in next st, Inc, repeat from * till round ends (21)
Rd 4: sc around (21)
Rd 5: *sc in next 2 sts, Inc, repeat from * till round ends (28)
Rd 6 – 9: sc around (28)
Rd 10: *sc in next 2 sts, Dec, repeat from * till round ends (21)
Rd 11: *sc in next st, Dec, repeat from * till round ends (14)
-Fill up with polyester filling
Rd 12: Dec till round ends (7)
-Cast off & weave in ends
Hair
Use black yarn with 3.5mm crochet hook,
Magic Ring (6), sl st into 1st st of Magic Ring to end round,
Step 1: ch 5, sc into 2nd ch from hook, sc in next 3 sts, sl st into 2nd st of magic Ring,
Step 2: sl st into next st, ch 5, sc into 2nd ch from hook, sc in next 3 sts, sl st into 4th st of Magic Ring,
Step 3: sl st into next st, ch 5, sc into 2nd ch from hook, sc in next 3 sts, sl st into 6th st of Magic Ring,
Step 4: sl st into 1st st of Magic Ring to end round
-Tie off and leave a tail
-
- Step 1
-

- Step 2
-
- Step 3
-
- Step 4
Side A facing upward, sew hair onto the top of the head of Yu-Bird
Beak
Use yellow yarn with 3.5mm crochet hook,
Rd 1: Magic Ring (6)
Rd 2: 2sc in each st around (12)
Rd 3: sc around (12)
Rd 4: *sc in next st, Inc, repeat from * till round ends (18)
-Leave a tail for assembling later and cast off
Eyes for Yu-bird (2 pieces)
Use white lace yarn with 0.85mm lace crochet hook,
Work in crochet rounds,
Rd 1: Magic Ring, sl st (6)
Rd 2: ch 1, 2sc in same st, 2sc in each st around, sl st (12)
Rd 3: ch 1, sc in same st, Inc, *sc in next st, Inc, repeat from * till round ends, sl st (18)
-Leave a tail for assembling later and cast off
Use black embroidery thread to sew a knot stitch onto the middle part of the eye:
-
- Insert the needle at the edge of the loop
-
- Pull the thread through
-
- Thread against the needle
-
- Wrap the thread around the needle 3 times
-
- Pull up the needle
-
- Push down the knot at the bottom
-
- Insert the needle into the other side of the edge
-
- Pull the needle from the back
It’s done!
Assemble all parts together –>Fill up the beak with some polyester filling while sewing it onto the body to give it a steady appearance.
At the end, attach Yu-Bird on the top of the head of Boh between the ears.
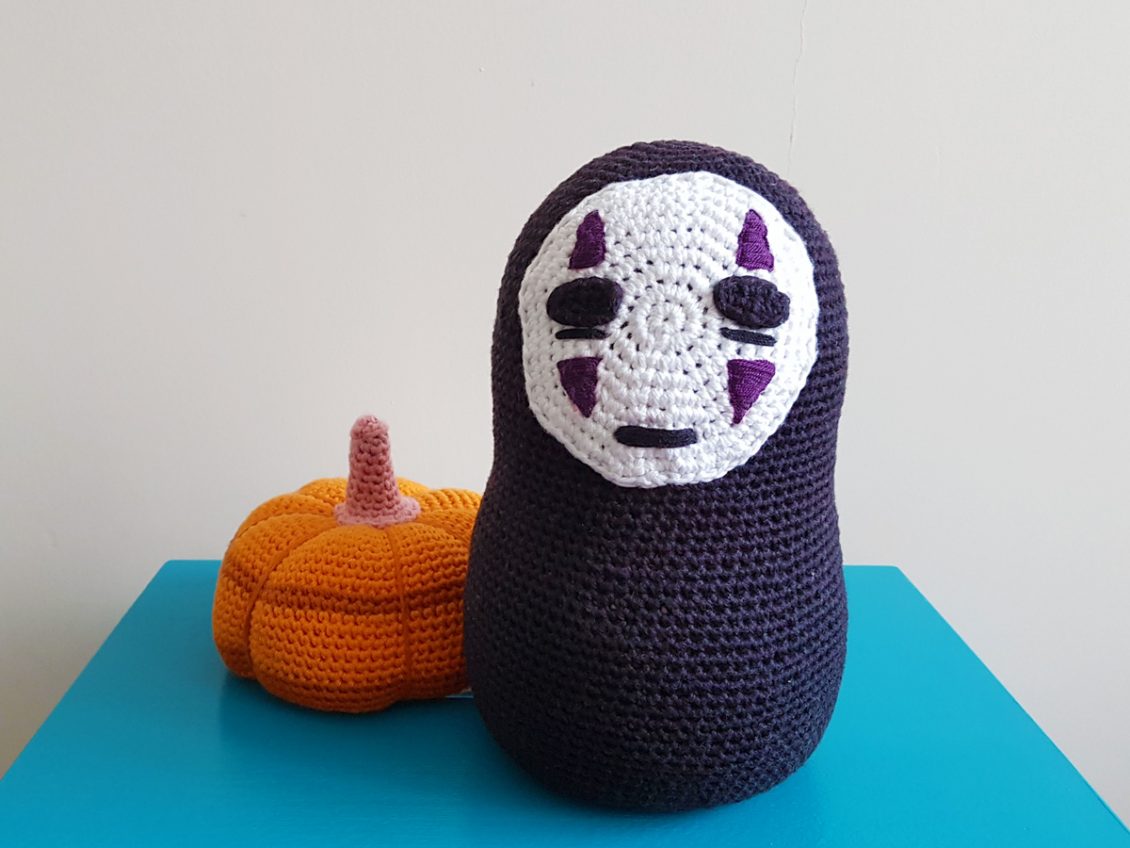
Studio Ghibli No-Face Crochet Door Stopper (Free Crochet Pattern)
No-Face (Kaonashi) is a spirit in a famous Japanese animated film – Spirited Away, produced by Studio Ghibli.
The idea of the door stopper came up in my mind because I recently moved into a new apartment and noticed that the doors got easily slammed by the wind whenever the windows were open, causing a loud noise. I didn’t want to get any complaints from my neighbors, so I thought I better come up with a solution ASAP. And besides the slamming door problem, Halloween was approaching, it was a good time to decorate the house! Then I remembered this No-Face spirit from one of my favorite Studio Ghibli animated films (I love their animated films so much!!), Spirited Away, and I think its image is a great match for the Halloween theme. So I put these 2 ideas together and created this “No-Face Door Stopper”.
Notes
-Hooks: 3.5mm (6/0 JNP standard hook Or E4 US standard hook)
-Cotton Yarns: White & Black
– Embroidery Thread: Purple & Black
-Tapestry Needle
-Sewing Needle
-Scissors
-Stitch Marker
-Fabric Marker
-Beans or Rice (White bean is using in this project, about 1.5kg)
-This pattern is worked in both Crochet Rounds and Spiral Rounds
Abbreviation:
ch(s)= Chain(s)
st(s)= Stitch(es)
sl st= Slip Stitch
sc= Single Crochet
Inc= 2sc in next st
Dec= Join next 2 single crochet together
Head & Body
Use black yarn,
Rd 1: Magic Ring (7)
Rd 2: 2sc in each st around (14)
Rd 3: *sc, Inc, repeat from * till round ends (21)
Rd 4: *sc in next 2 sts, Inc, repeat from * till round ends (28)
Rd 5: *sc in next 3 sts, Inc, repeat from * till round ends (35)
Rd 6: sc around (35)
Rd 7: *sc in next 4 sts, Inc, repeat from * till round ends (42)
Rd 8: sc around (42)
Rd 9: *sc in next 5 sts, Inc, repeat from * till round ends (49)
Rd 10: sc around (49)
Rd 11: *sc in next 6 sts, Inc, repeat from * till round ends (56)
Rd 12: sc around (56)
Rd 13: *sc in next 7 sts, Inc, repeat from * till round ends (63)
Rd 14: sc around (63)
Rd 15: *sc in next 8 sts, Inc, repeat from * till round ends (70)
Rd 16– 34: sc around (70)
Rd 35: *sc in next 9 sts, Inc, repeat from * till round ends (77)
Rd 36 – 37: sc around (77)
Rd 38: *sc in next 10 sts, Inc, repeat from * till round ends (84)
Rd 39 – 55: sc around (84)
Rd 56: *sc in next 10 sts, Dec, repeat from * till round ends (77)
Rd 57: sc around (77)
Rd 58: *sc in next 9 sts, Dec, repeat from * till round ends (70)
Rd 59: *sc in next 8 sts, Dec, repeat from * till round ends (63)
Rd 60: *sc in next 7 sts, Dec, repeat from * till round ends (56)
Rd 61: *sc in next 6 sts, Dec, repeat from * till round ends (49)
Rd 62: *sc in next 5 sts, Dec, repeat from * till round ends (42)
Rd 63: *sc in next 4 sts, Dec, repeat from * till round ends (35)
-Fill up with beans or rice
Rd 64: *sc in next 3 sts, Dec, repeat from * till round ends (28)
Rd 65: *sc in next 2 sts, Dec, repeat from * till round ends (21)
Rd 66: *sc in next st, Dec, repeat from * till round ends (14)
-Fill up with more beans/rice
Rd 67: Dec till round ends (7)
-Cast off & weave in ends
Try to fill up with as much beans/ rice as possible, it will affect the shape if it is too loose.
Face
Use white yarn,
Work in crochet rounds,
Rd 1: Magic Ring, sl st (8)
Rd 2: ch 1, 2sc in each st around, sl st (16)
Rd 3: ch 1, sc in same st, Inc, *sc in next st, Inc, repeat from * till round ends, sl st (24)
Rd 4: ch 1, sc in same st, sc in next st, Inc ,*sc in next 2sts, Inc, repeat from * till round ends, sl st (32)
Rd 5: ch 1, sc in same st, sc in next 2 sts, Inc, *sc in next 3sts, Inc, repeat from * till round ends, sl st (40)
Rd 6: ch 1, sc in same st, sc in next 3 sts, Inc,*sc in next 4sts, Inc, repeat from * till round ends, sl st (48)
Rd 7:ch 1, sc in same st, sc in next 4 sts, Inc,*sc in next 5sts, Inc, repeat from * till round ends, sl st (56)
Rd 8: ch 1, sc in same st, sc in next 5 sts, Inc,*sc in next 6sts, Inc, repeat from * till round ends, sl st (64)
Rd 9: ch 1, sc in same st, sc in next 6 sts, Inc,*sc in next 7sts, Inc, repeat from * till round ends, sl st (72)
-Leave a long tail for sewing the face onto the head
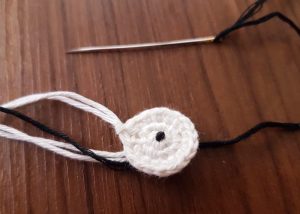
Eyes (2 pieces)
Use black yarn,
ch 5,
sc into the 2nd ch from hook, sc in next 3 chs, 3sc in next ch, sc in next 3 chs, sl st (9)
-Leave a tail, cast off
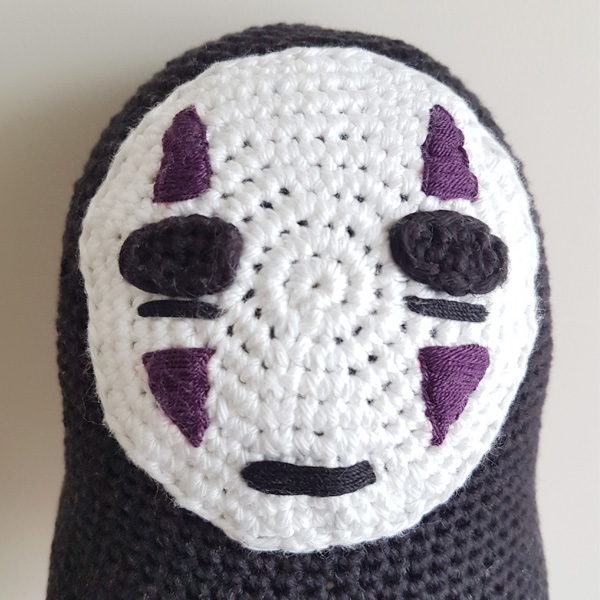 Assemble the eyes on the face.
Use the fabric marker to mark 4 triangles, 2 above the eyes & 2 below the eyes.
Get the purple embroidery thread ready, follow the marks and embroider the triangles.
Next, use black embroidery thread to embroider the mouth and the lines below the eyes.
Last step, sew the face onto the head.
Please feel free to contact me if you have any questions about the pattern.
And it would be super nice if you can share with me your finished product of this pattern!!
Happy Crochet!!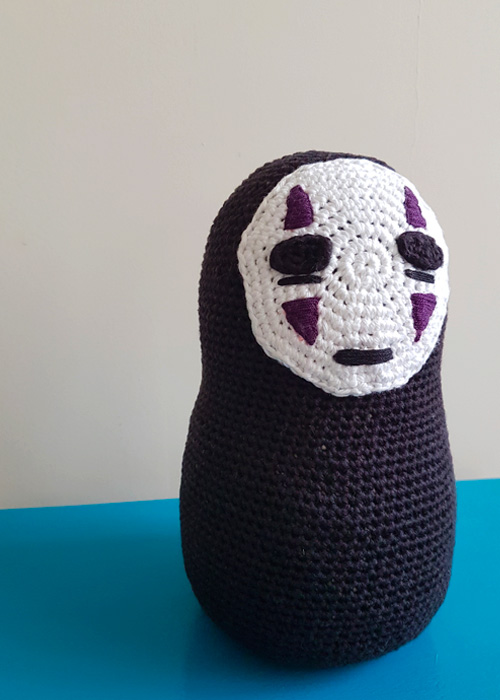
There are two more patterns in this Spirited Away door stopper set, you can find them here: Boh & Ootori-Sama.
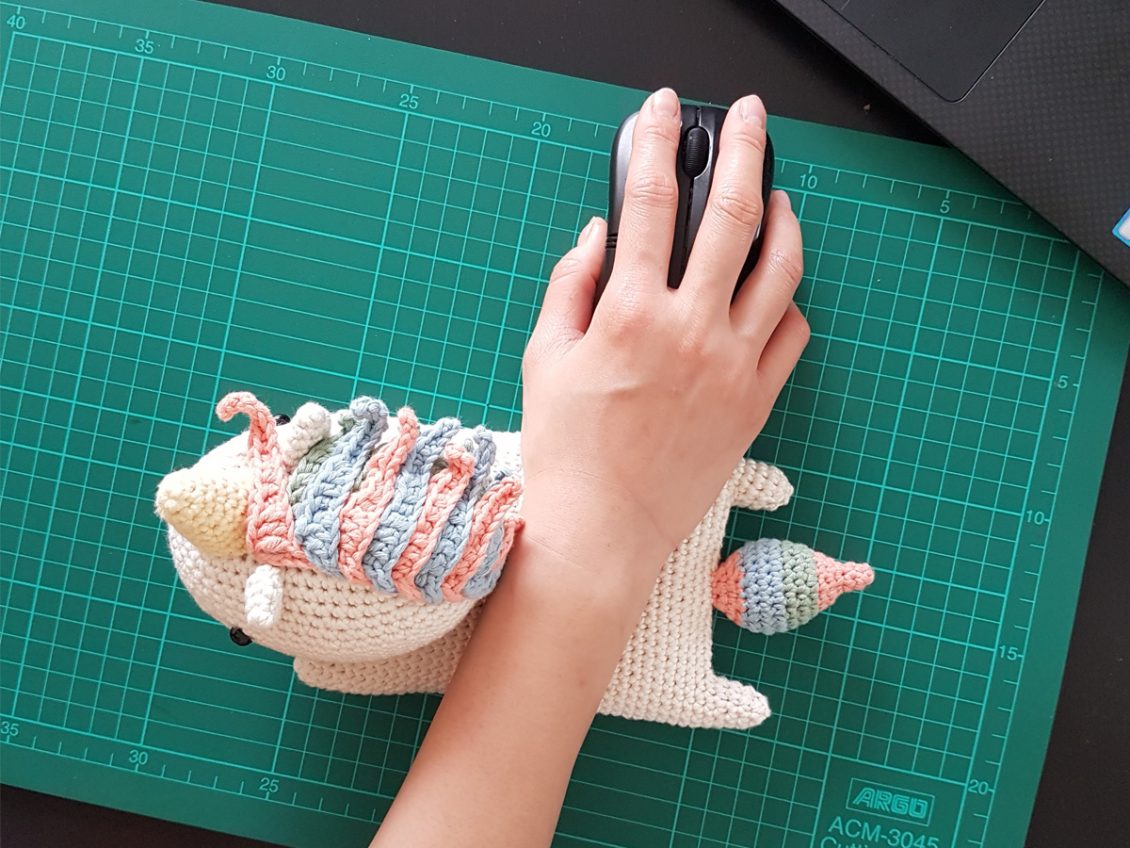
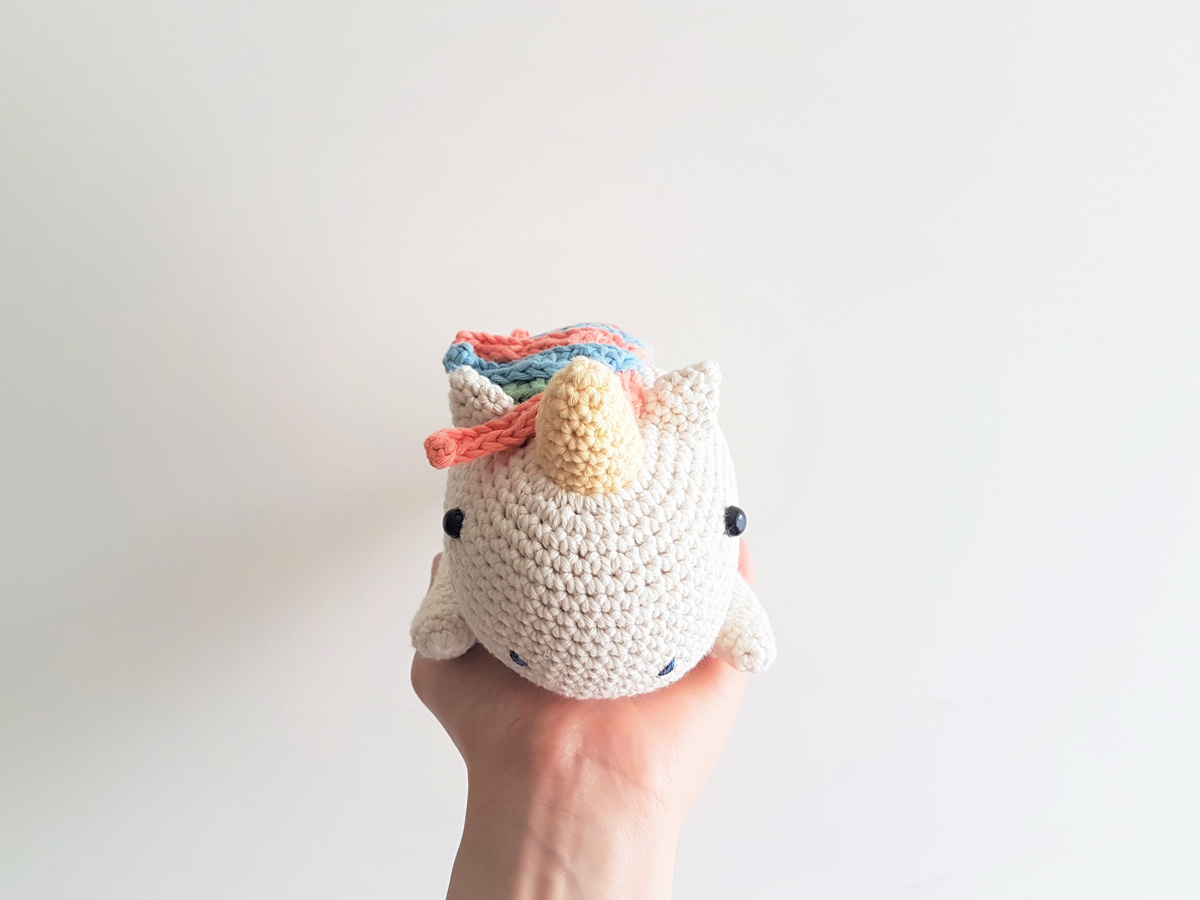
Unicorn Crochet Wrist Rest Cushion (Free Crochet Pattern)
Most of us spend many hours on the computer and wrist pain can be quite common if you don’t have a way to to rest your wrist in a comfortable position. Instead of buying a generic mouse pad from the store, I decided to make my own wrist cushion. I love unicorns (who doesnt?!) so I thought it would make a cute companion to my mouse 🙂
Notes
-Hooks: 3.0mm (5/0 JNP standard hook) Or C2/D3 (US standard hook)
-Cotton Yarns (Fibra Natura Cottonwood Yarn): Cream, Janene (Light Yellow), Monica (Light Pink), Blue & Austin (Light Green)
– A pair of plastic eyes
-Polyester filling
-Tapestry Needle
-Scissors
-Stitch Marker
-This pattern is worked in Spiral Rounds
Abbreviations
ch(s)= Chain(s)
st(s)= Stitch(es)
sl st= Slip Stitch
sc= Single Crochet
hdc= Half Double Crochet
dc= Double Crochet
tr= Treble Crochet
Dec= Join next 2 single crochet together
Head
Use creamy color yarn,
ch 11,
[For round 1, we’re going to crochet on the both sides of the foundation chain]
Round 1: 2sc into 2nd ch from hook, sc in next 8 chs, 6sc in next ch, sc in next 8 chs, 3sc in last ch (27)
Round 1
Round 2: 2sc in each of the next 2 sts, sc in next 9sts, 2sc in each of the next 4 sts, sc in next 10 sts, 2sc in each of the next 2 sts (35)
Round 3: 2sc in each of the next 2 sts, sc in next 13sts, 2sc in each of the next 4 sts, sc in next 14 sts, 2sc in each of the next 2sts (43)
Round 4: 2sc in next st, sc in next 19 sts, 2sc in each of the next 2 sts, sc in next 20 sts, 2sc in next st (47)
Round 5: sc around (47)
Round 6: *sc in next 3 sts, 2sc in next st*, repeat ** 1 time, sc in next 7 sts, 2sc in next st, sc in next 3 sts, 2sc in next st, sc in next 6 sts, 2sc in next st, sc in next 3 sts, 2sc in next st, sc in next 8 sts, *2sc in next st, sc in next 3 sts*, repeat ** 1 time (55)
Round 7: sc around (55)
Round 8: sc in next 5 sts, 2sc in next st, sc in next 3 sts, 2sc in next st, sc in next 7 sts, 2sc in next st, sc in next 3 sts, 2sc in next st, sc in next 10 sts, 2sc in next st, sc in next 3 sts, 2sc in next st, sc in next 8 sts, 2sc in next st, sc in next 3 sts, 2sc in next st, sc in next 5 sts (63)
Round 9-16: sc around (63)
-Insert plastic eyes between Round 9 and 10, 22 sts between 2 eyes
Round 17: *sc in next 7 sts, Dec, repeat from * till round ends (56)
Round 18: sc around (56)
Round 19: *sc in next 6 sts, Dec, repeat from * till round ends (49)
Round 20: *sc in next 5 sts, Dec, repeat from * till round ends (42)
Round 21: *sc in next 4 sts, Dec, repeat from * till round ends (35)
Round 22: *sc in next 3 sts, Dec, repeat from * till round ends (28)
Round 23: *sc in next 2 sts, Dec, repeat from * till round ends (21)
-Stuff filling
Round 24: *sc, Dec, repeat from * till round ends (14)
Round 25: *Dec, repeat * till round ends (7)
-Cast off, weave in ends
Horn
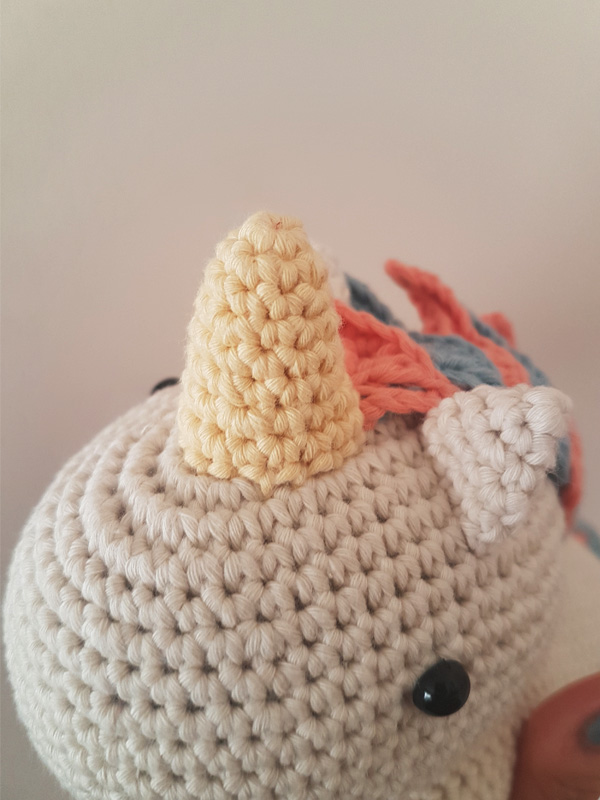
Use light yellow yarn,
Round 1: Magic Ring (6)
Round 2: *sc, 2sc in next st, repeat from * till round ends (9)
Round 3: sc around (9)
Round 4: *sc in next 2 sts, 2sc in next st, repeat * till round ends (12)
Round 5-6: sc around (12)
Round 7: *sc in next 2 sts, 2sc in next st, repeat * till round ends (16)
Round 8: sc around (16)
-Leave a tail and cast off
-Assembling on the top of the head
Body & Arms & Legs
Remain using creamy color yarn,
Start with the arms,
Arm A & B
Arm A
Round 1: Magic Ring (6)
Round 2: *sc, 2sc in next st, repeat * till round ends (9)
Round 3-4: sc around (9)
-Cast off
Arm B
The first 4 rounds are the same as Arm A but add 1 more round at the end of Arm B:
Round 1: Magic Ring (6)
Round 2: *sc, 2sc in next st, repeat * till round ends (9)
Round 3-5: sc around (9)
When Arm B is completed, do NOT cast off the yarn, we will continue to work on the body…
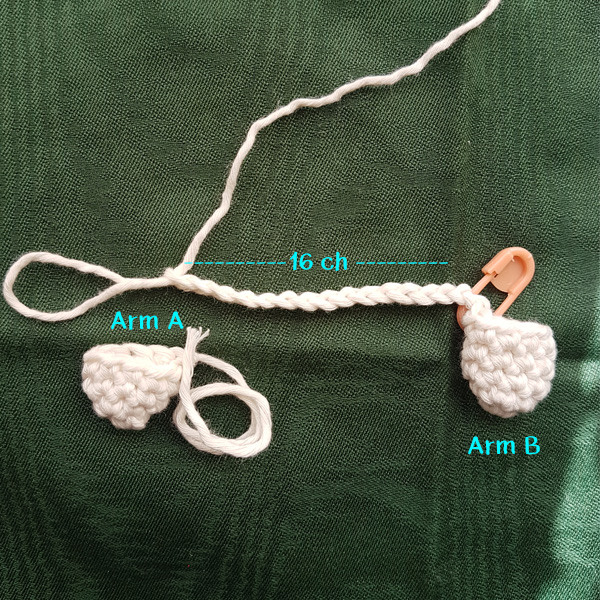

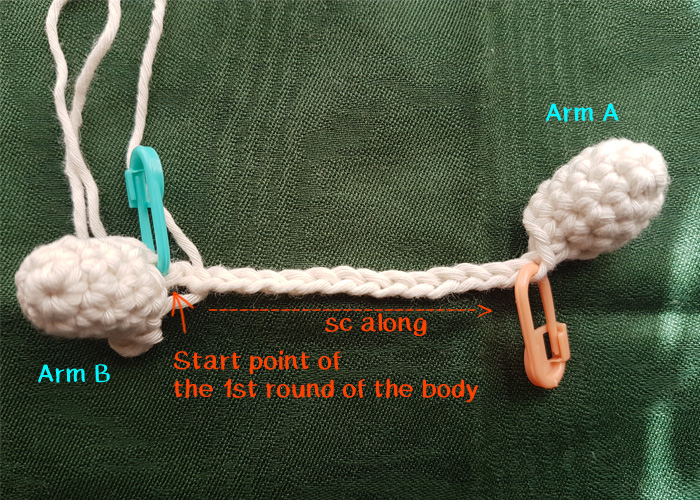
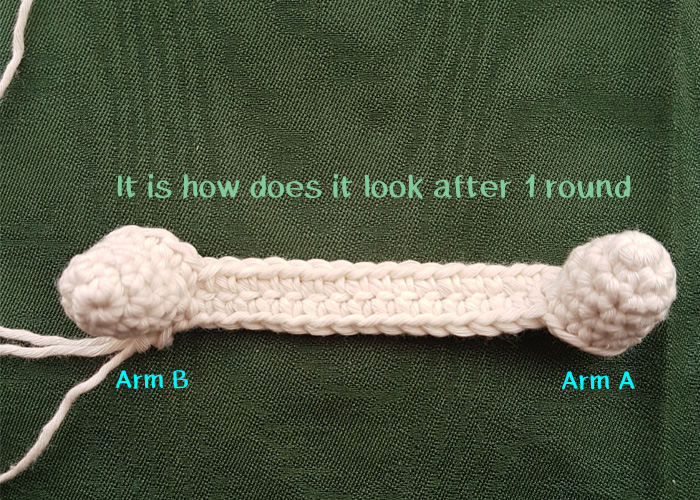
Body
After completing the last sc of the last round of Arm B, ch 16, then bring back Arm A and crocheting 9 sc around Arm A to connect both parts together.
Now, we can start the 1st round of the body.
sc along the chain (16 sc) & the arm (2nd arm,9 sc), sc the other side of the chain (16 sc) & the arm (1st arm, 9 sc) (50)
Round 2-35: sc around (50)
You can add more rounds to make the body longer, which means to make more room for your wrist to place.
Legs
sc in next 6 sts after the last round of the body,

Then sc in next 9 sts, these 9 sts is the first leg.
Join the last sc of the leg into the 1st stitch of the leg, then continue the leg by crocheting 3 more 9sc rounds, then closing the leg by *sc, Dec, repeat * till round ends (6)

-Cast off, weave in ends
The second leg will be on the other end.
Leave 16 sts between 2 legs and count 9 sts on the other end.
Start with new yarn (same color), sc in those 9 sts.
Join the last sc of the leg into the 1st stitch of the leg, then continue crocheting 3 more 9sc rounds, then closing the leg by *sc, Dec, repeat * till round ends (6)
-Cast off
-Stuff the filling
Don’t stuff too much filling, just a thin layer which can support your wrist and make you feel comfortable.

Cut a long yarn and close the body.
Tail
Start with light pink yarn,
Round 1: Magic Ring (4)
Round 2: *sc, 2sc in next st, repeat * till round ends (6)
Round 3: sc around
Round 4: *sc, 2sc in next st, repeat * till round ends (9)
Round 5: *sc in next 2 sts, 2sc in next st, repeat * till round ends (12)
Round 6: sc around (12)
– Change yarn to light green color
Round 7: *sc in next st, 2sc in next st, repeat * till round ends (18)
Round 8-9: sc around (18)
-Change yarn to light blue color
Round 10: *sc in next 2 sts, 2sc in next st, repeat * till round ends (24)
Round 11: sc around (24)
Round 12: *sc in next 2 sts, Dec, repeat * till round ends (18)
-Change yarn to light pink color
Round 13: *sc in next st, Dec, repeat * till round ends (12)
Round 14: *Dec, repeat * till round ends (6)
-Leave a long tail and cast off
-Assembling the tail to body between the legs
Hair
3 different colors for hair, light pink, light blue and light green.
Light Green Hair
Use light green yarn,
ch 30,
sl st in the 3rd ch from hook, sc in next 3 chs, hdc in next 3 chs, dc in next 3 chs, skip next ch, sl st;
*skip next ch, sl st, ch 12, sl st in the 3rd ch from hook, sc in next 3 chs, hdc in next 3 chs, dc in next 3 chs, skip next ch, sl st in next ch, repeat * till the end of the chain.
-Leave a long tail and cast off
Light Pink & Blue Hair
Same pattern instruction for light pink and blue hair but except light blue hair has to do 4 extra chains,
Use light pink/blue yarn,
ch 28/ ch 32,
sl st in the 3rd ch from hook, sc in next 3 chs, hdc in next 2 chs, dc in next 2 chs, skip next ch, sl st, skip next ch, sl st;
ch 10, sl st in the 3rd ch from hook, sc in next 3 chs, hdc in next 2 chs, dc in next 2 chs, (skip next ch, sl st) x 2
ch 12, sl st in the 3rd ch from hook, sc in next 3 chs, hdc in next 3 chs, dc in next 3 chs, (skip next ch, sl st) x 2
ch 14, sl st in the 3rd ch from hook, sc in next 3 chs, hdc in next 4 chs, dc in next 4 chs, (skip next ch, sl st) x 2
ch 16, sl st in the 3rd ch from hook, sc in next 4 chs, hdc in next 4 chs, dc in next 4 chs, skip next ch, sl st
*For light blue hair, it will have 4 chains leftover at the end.
-Leave a long tail and cast off
-Assembling the hairs
1, Sew light green hair on the head, behind the horn
2, Put the light pink hair on the top of the light blue hair
3, Hold the longest pink hair and bring the blue hair from the bottom to the top, like making hair braid,
4, Then, bring the pink hair from the bottom to the top,
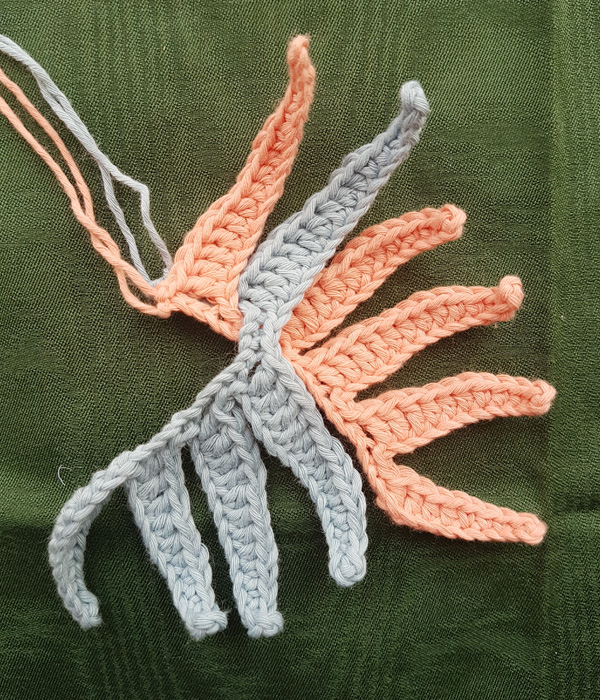

5, Alternatively bring either light pink or light blue hair from the bottom to the top till the end,
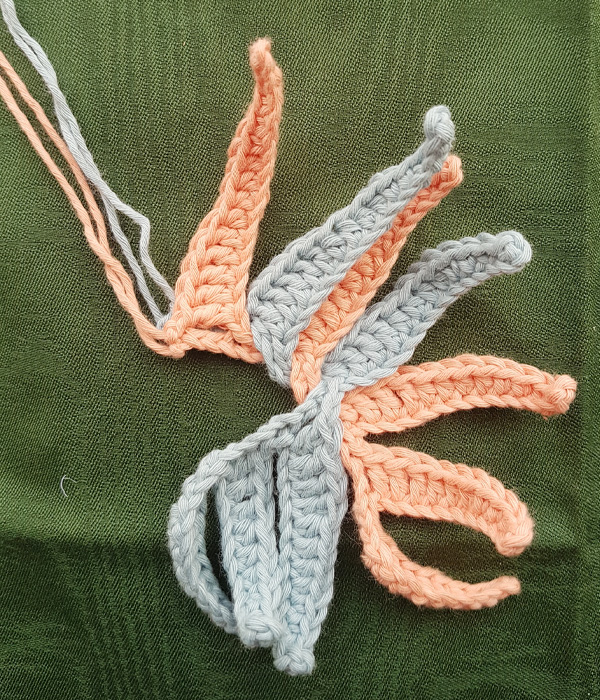
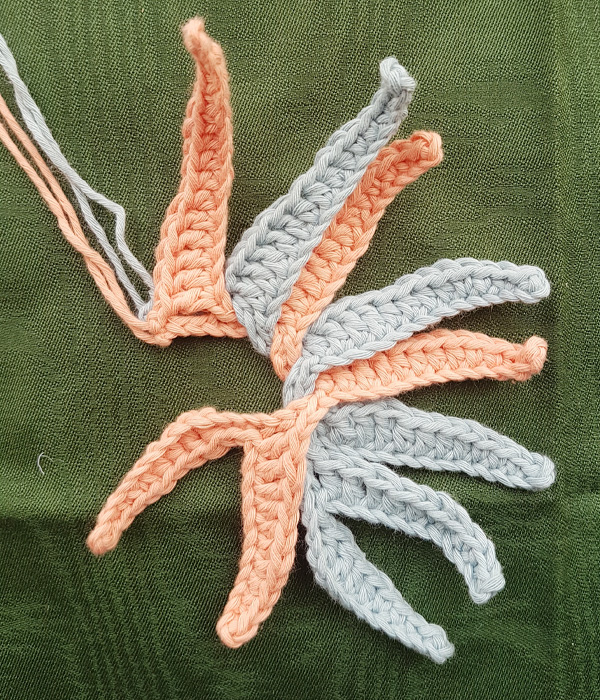

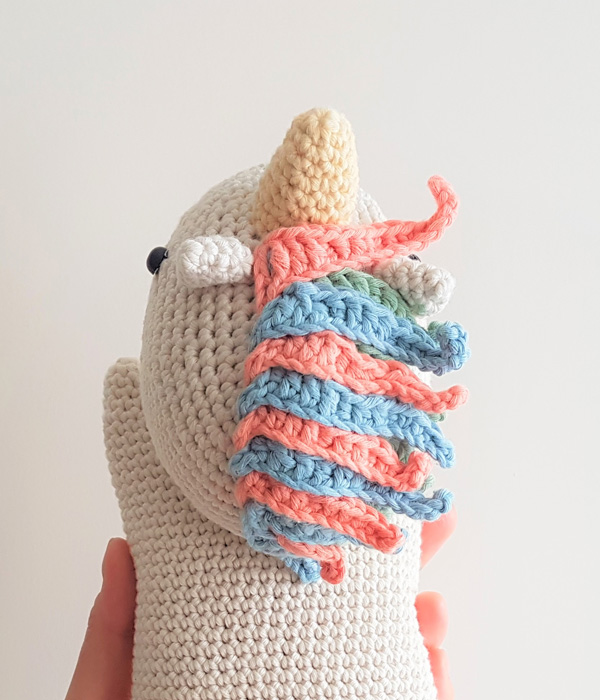
6, Attach the light pink and light blue hair braid on the top of the light green hair.
Ears (2 pieces)
Use creamy color yarn,
Round 1: Magic Ring (4)
Round 2: *sc, 2sc in next st, repeat * till round ends (6)
Round 3: *sc, 2sc in next st, repeat * till round ends (9)
Round 4-5: sc around (9)
-Leave a tail and cast off
-Assembling on the head, 2 sides behind the horn
Finally, sew 2 nostrils at the tip part of the head.
And here is your Unicorn Wrist Rest Cushion.

Popular Posts
 Unicorn Crochet Wrist Rest Cushion (Free Crochet Pattern)
  Crochet Magic Ring for Beginner
  Jasmine Crochet Pattern
  Lion Head for Lion Dance (Free Crochet Pattern)
  Crochet Round: Magic Ring ends with Slip Stitch
 Products
-
 Year of the Ox - Mr. Ox C...
$5.00
Year of the Ox - Mr. Ox C...
$5.00
-
 Twitter Bird Crochet Pattern
$2.00
Twitter Bird Crochet Pattern
$2.00
-
 Mulan Crochet Pattern
$5.00
Mulan Crochet Pattern
$5.00
-
 Jasmine Crochet Pattern
$5.00
Jasmine Crochet Pattern
$5.00
-
 Ariel Crochet Pattern
$5.00
Ariel Crochet Pattern
$5.00