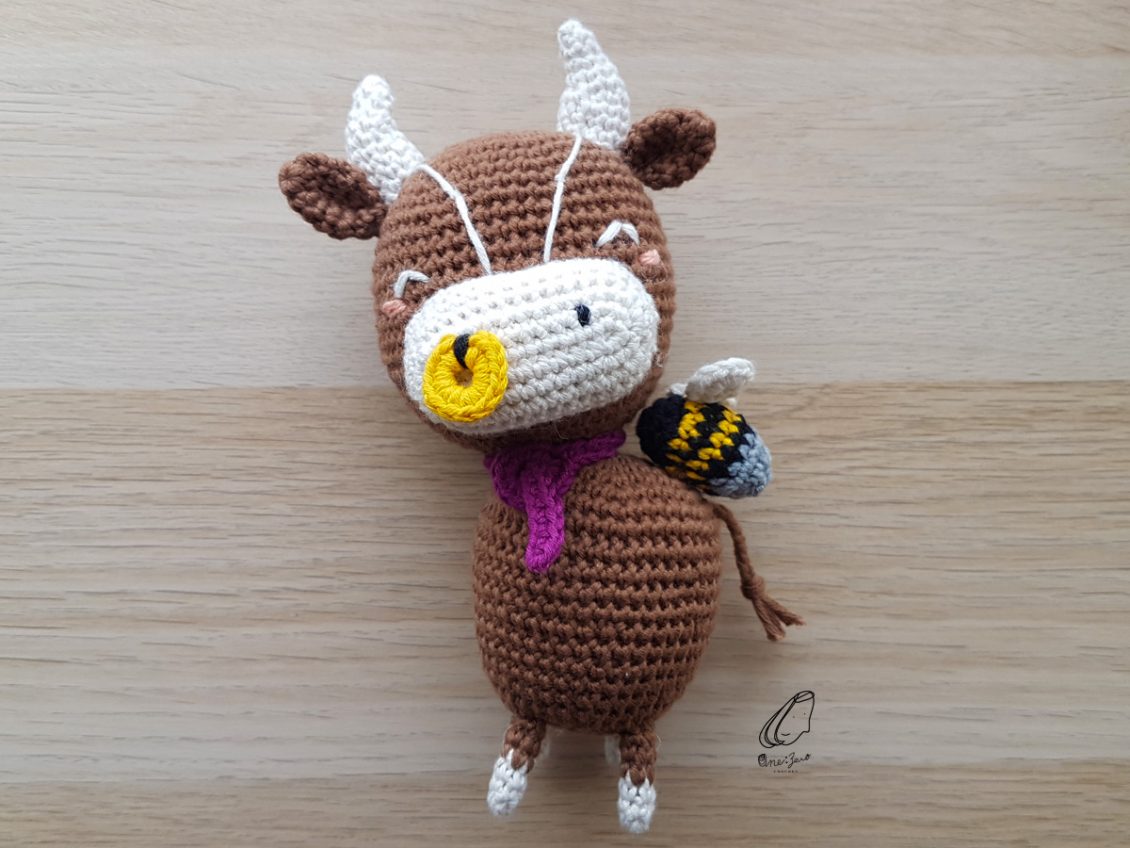


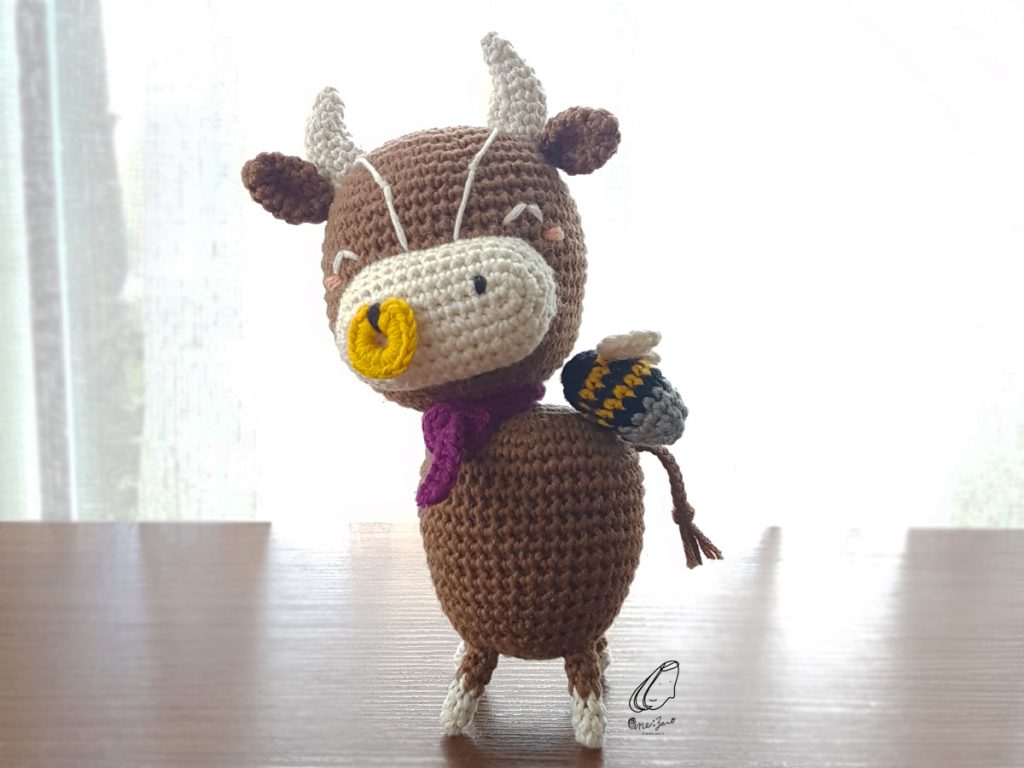
Do you know what are the Chinese Zodiac Animals? In the Lunar calendar, there are 12 zodiac animals, in order, they’re the Rat, Ox, Tiger, Rabbit, Dragon, Snake, Horse, Sheep, Monkey, Rooster, Dog & Pig. Each of them takes turns to represent the year and each year will be characterized by that assigned animal’s attributes in a 12-year cycle. And this year 2021 is the year of the Ox!
Unfortunately, the region I’m staying in doesn’t celebrate Lunar New Year and there isn’t really any new year decorations I can get here. So I came up with the idea to create Mr. Ox and have him celebrate the new year with me!
Mr. Ox is made out of cotton yarn with 2.5mm crochet hook. This pattern is suitable for intermediate-level crocheters. However, if you’re a beginner with basic crochet skill knowledge like magic ring, single crochet, half double crochet, Increase and decrease etc., and have done a few crochet projects, perhaps, you would like to try out something more challenging… then how about Mr. Ox?
You can now find Year of the Ox – Mr. Ox downloadable PDF crochet pattern in my shop and One Zero Crochet Etsy shop! This pattern contains 18-page detailed instructions with lots of step-by-step pictures to guide you through this crochet project. You’ll get the pattern immediately right after the payment confirmation.
If you have any questions about the pattern, don’t hesitate to contact me!
Happy niú (Chinese pinyin=Ox) Year!!
Materials
2.5mm crochet hook
Size 3 light worsted cotton yarn: Red, White, Yellow, Beige
Tapestry needle
Polyester filling
scissors
Stitch Marker
Abbreviations
MR = magic ring
ch = chain
ard =around
st(s) =stitch(es)
sc = Single Crochet
hdc = half double crochet
dc = double crochet
sl st = slip stitch
Inc = 2sc in next stitch
Dec = join next 2 stitches together

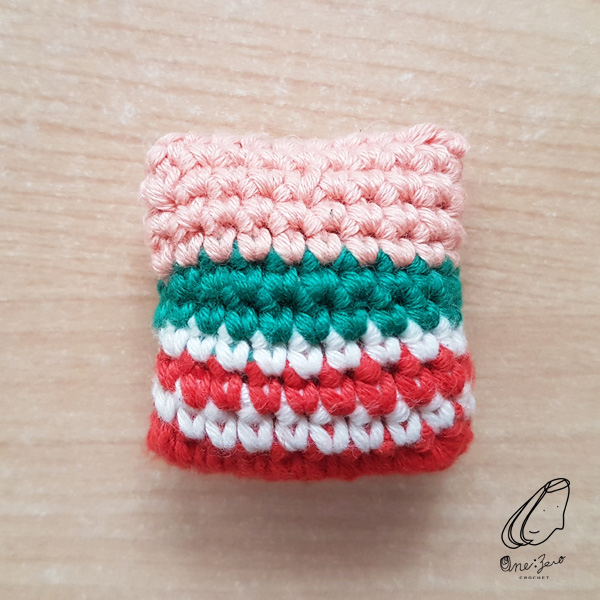
Head & Body
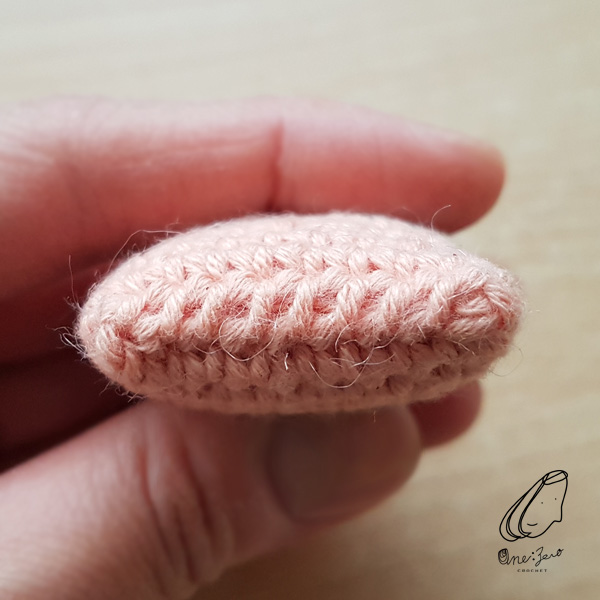
Start with red yarn,
ch 11,
R 1: skip first ch from hook, sc in next 9 back loops of chain, 2sc in last ch, turn clockwise, sc in next 9 front loops of chain [we’re going to crochet on both sides of the foundation chain](20)
Change color to white
R 2: sc ard (20)
Change color back to red
R 3: sc ard (20)
Change color to white
R 4: sc ard (20)
Change color to green
R 5 – 6: sc ard (20)
Change color to beige
R 7 – 10: sc ard (20)
Leave a tail and cast off.
Stuff some polyester filling.
Use tapestry needle, whip stitch across to close the top of the head.
[you may do a few sl st to travel back to the start point of the round]
Weave in ends.
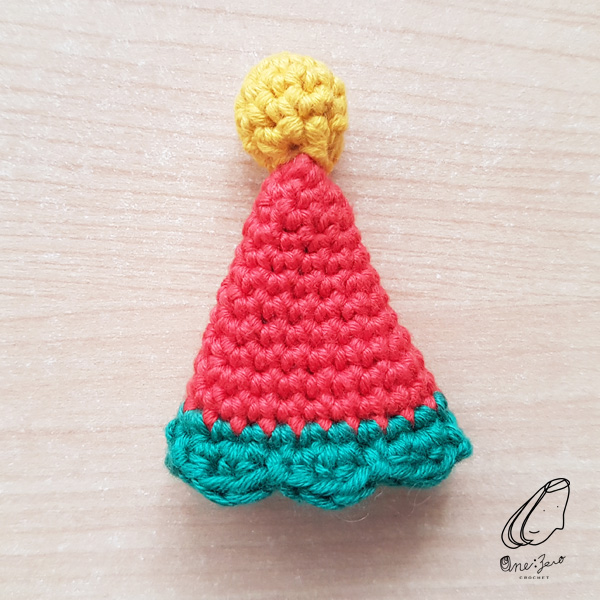
Hat
Use red yarn,
R 1: MR (4)
R 2: {sc, Inc} ard (6)
R 3: {sc, Inc} ard (9)
R 4: sc ard (9)
R 5: {sc 2, Inc} ard (12)
R 6: sc ard (12)
R 7: {sc 3, Inc} ard (15)
R 8: sc ard (15)
R 9: {sc 4, Inc} ard (18)
R 10: sc ard (18)
R 11: {sc 5, Inc} ard (21)
R 12: sc ard (21)
Change color to green
R 13: sc ard (21)
R 14: {hdc, 2dc, sl st} x 7
Secure the end by making a knot, leave a tail for assembly later, and cast off.
“Pompom” on the top of the hat
Use yellow yarn,
R 1: MR (5)
R 2: 2sc in each st (10)
R 3 – 4: sc ard (10)
R 5: Dec ard (5)
Stuff filling, leave a tail for assembly later and cast off.
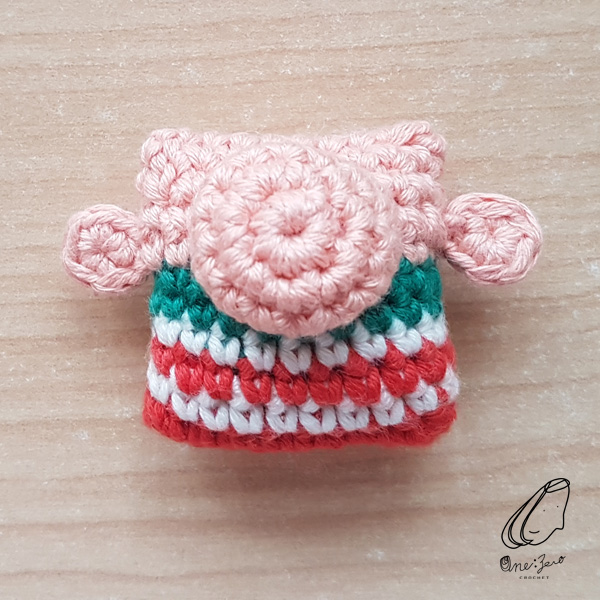
Ear (Make 2)
Magic ring (5), sl st,
Leave a tail and cast off.
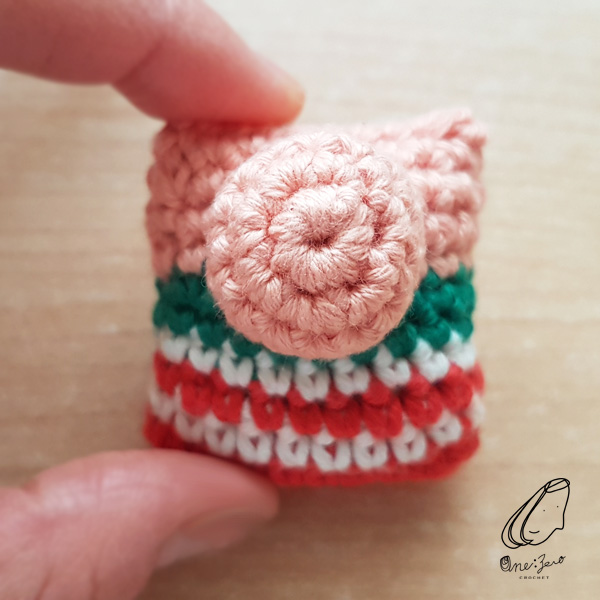
Nose
Use beige yarn,
R 1: MR (7)
R 2: 2sc in each st ard (14)
R 3 – 4: sc ard (14)
Leave a tail for assembly later, and cast off.
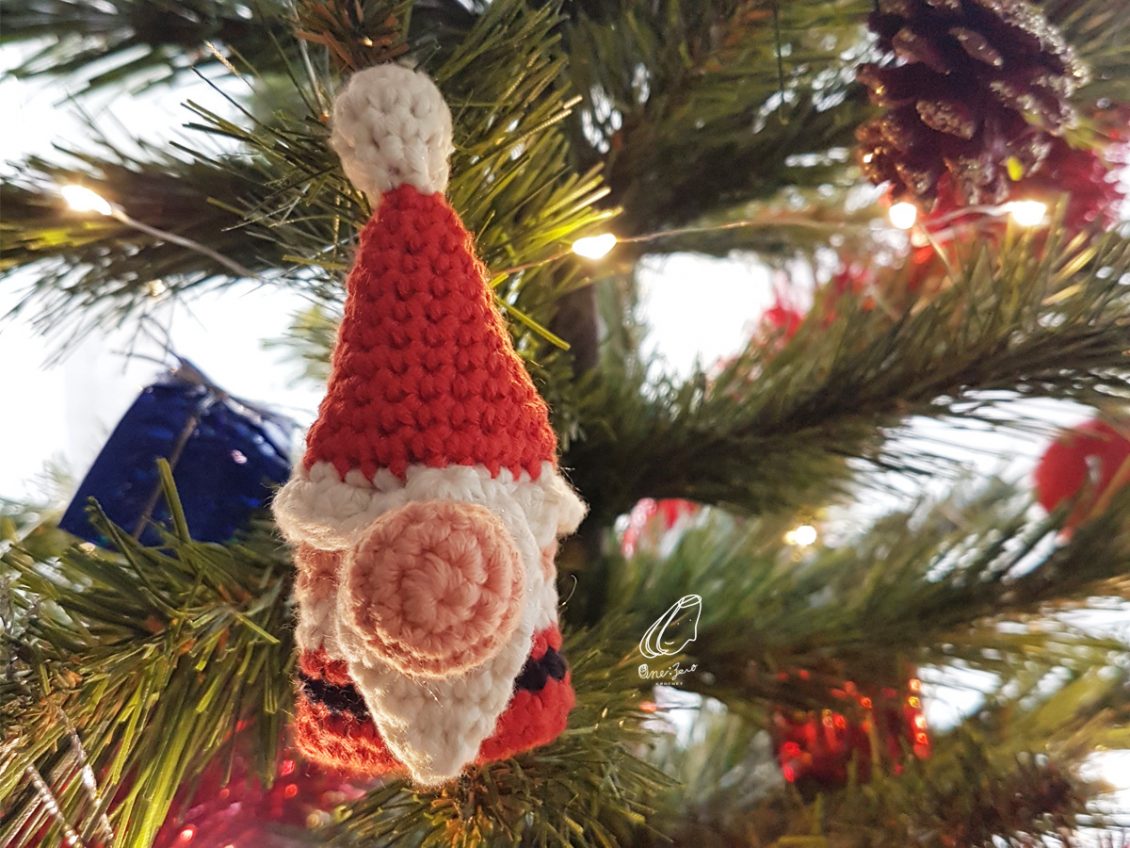
If you’ve missed the Santa Claus Christmas Ornament free pattern, click HERE to check it out! Merry Christmas!!
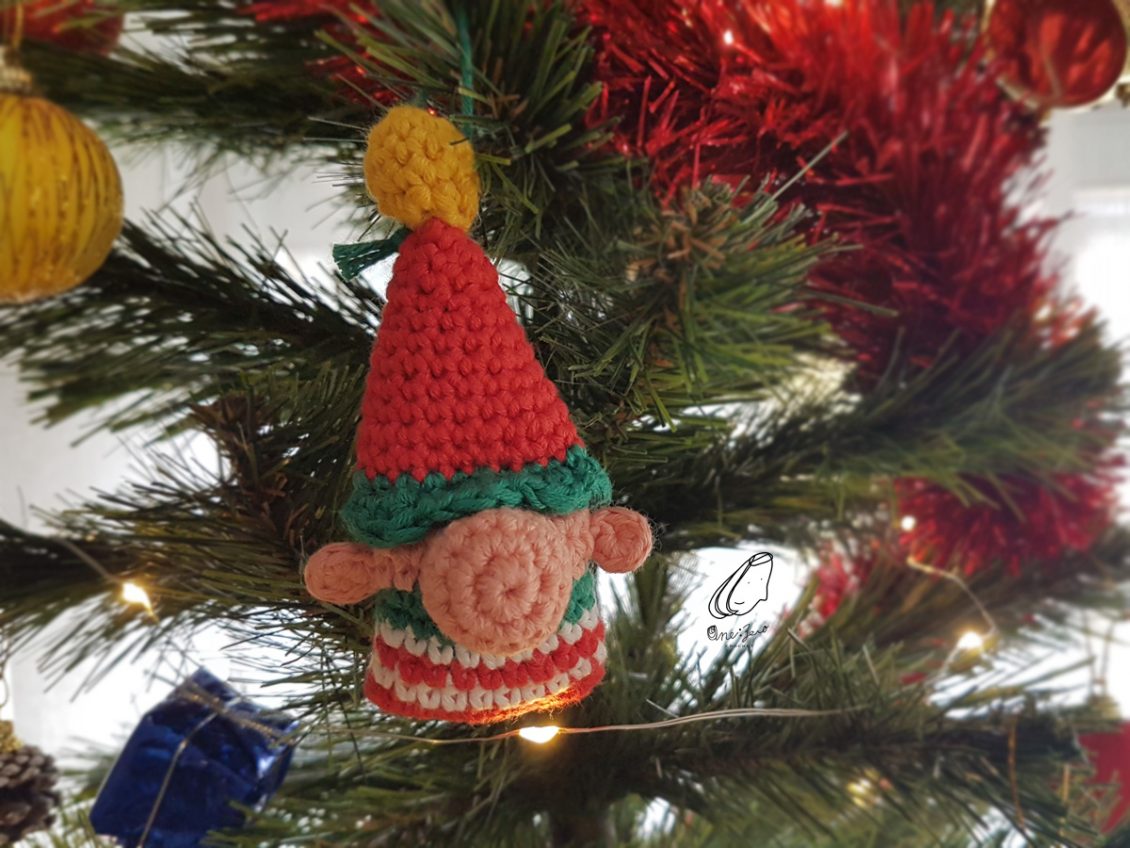
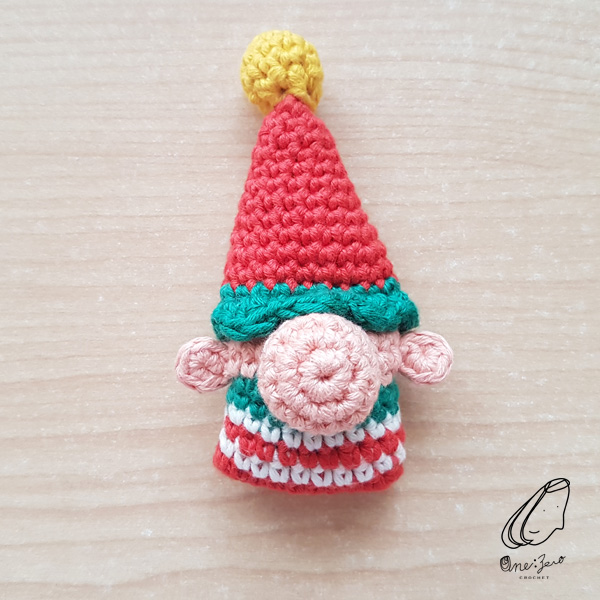
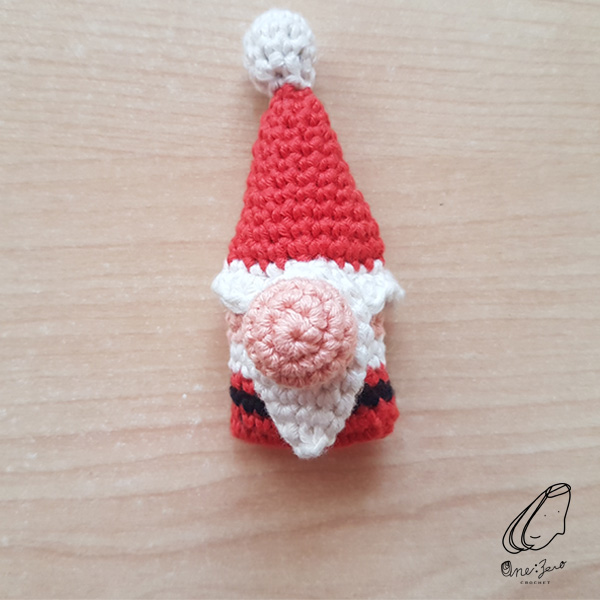
Christmas is around the corner but with my little girl taking up most of my time I haven’t had much time to decorate our Christmas tree this year. After putting on the standard factory-made ornaments, I felt like there was something missing… Perhaps some handmade crochet ornaments would give some character to the tree but with little free time, I needed something simple and fast. So that’s how I came up with this last-minute Santa Claus Christmas crochet ornament!
If like me you’ve left your Christmas tree decoration to the last second and need a little something to make your tree standout, you can make your own one now by following the Santa Clause Christmas Ornament free pattern below and the Mini Elf Christmas Ornament HERE! Happy Crochet and wish you a wonderful holiday season!
Materials
2.5mm crochet hook
Size 3 light worsted cotton yarn: Red, White, Black, Beige
Tapestry needle
Polyester filling
scissors
Stitch Marker
Abbreviations
MR = magic ring
ch = chain
ard =around
st(s) =stitch(es)
sc = Single Crochet
hdc = half double crochet
dc = double crochet
sl st = slip stitch
Inc = 2sc in next stitch
Dec = join next 2 stitches together
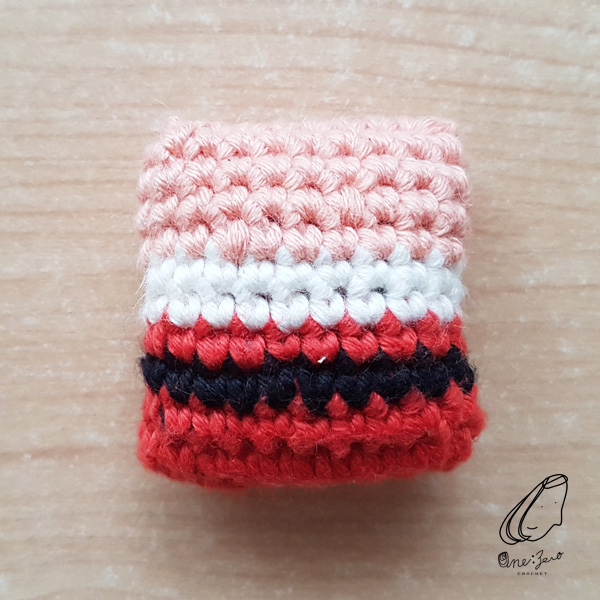
Head & Body
Start with red yarn,
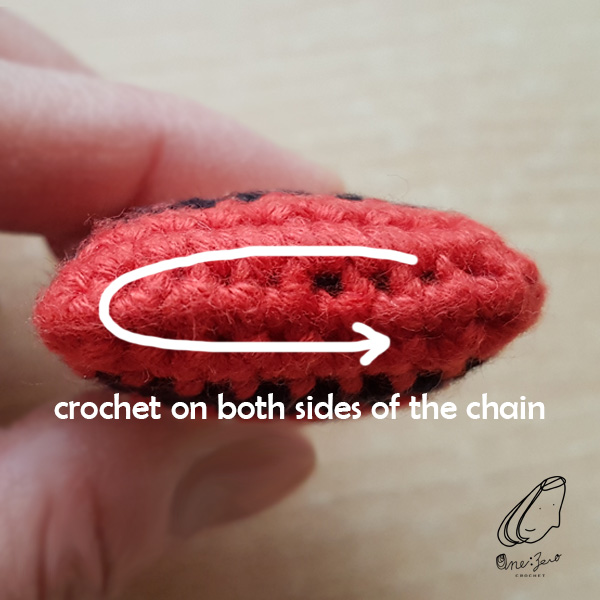
ch 11,
R 1: skip first ch from hook, sc in next 9 back loops of chain, 2sc in last ch, turn clockwise, sc in next 9 front loops of ch [we’re going to crochet on both sides of the foundation chain, as shown in the picture] (20)
R 2: sc ard (20)
Change color to black
R 3: sc ard (20)
Change color back to red
R 4: sc ard (20)
Change color to white
R 5 – 6: sc ard (20)
Change color to beige
R 7 – 10: sc ard (20)
Leave a tail and cast off.
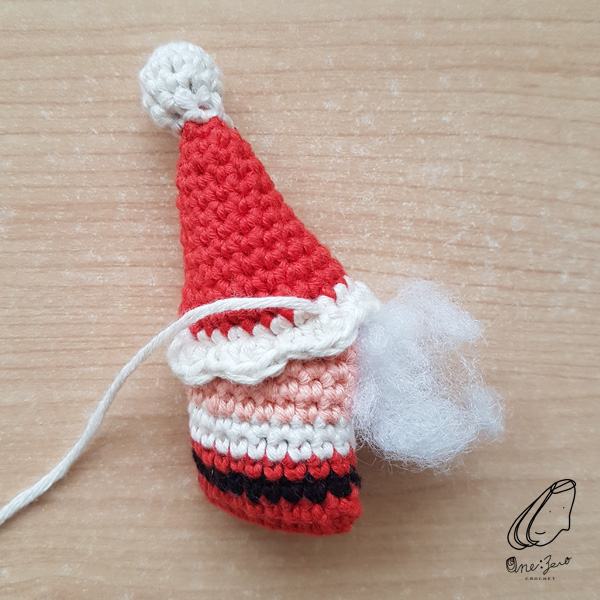
Stuff polyester filling.
Use tapestry needle, whip stitch across to close the top of the head.
[you may need to do a few sl st to travel back to the start point of the round]
Weave in ends.
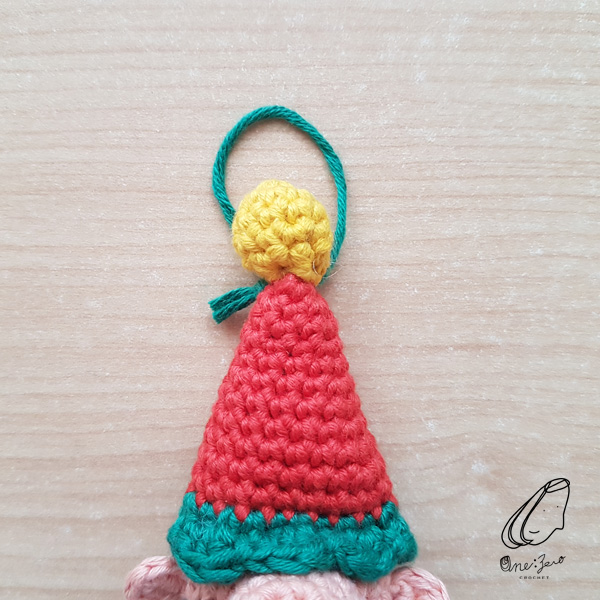
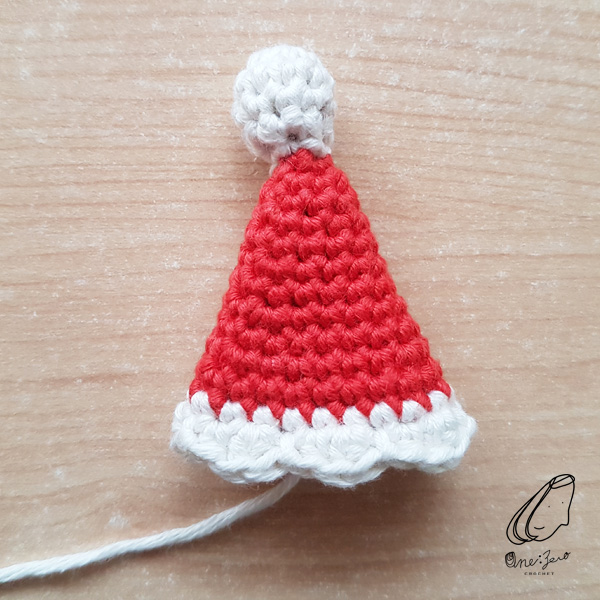
Hat
Use red yarn,
R 1: MR (4)
R 2: {sc, Inc} ard (6)
R 3: {sc, Inc} ard (9)
R 4: sc ard (9)
R 5: {sc 2, Inc} ard (12)
R 6: sc ard (12)
R 7: {sc 3, Inc} ard (15)
R 8: sc ard (15)
R 9: {sc 4, Inc} ard (18)
R 10: sc ard (18)
R 11: {sc 5, Inc} ard (21)
R 12: sc ard (21)
Change color to white
R 13: sc ard (21)
R 14: {hdc, 2dc, sl st} x 7
Secure the end by making a knot, leave a tail for assembly later, and cast off.
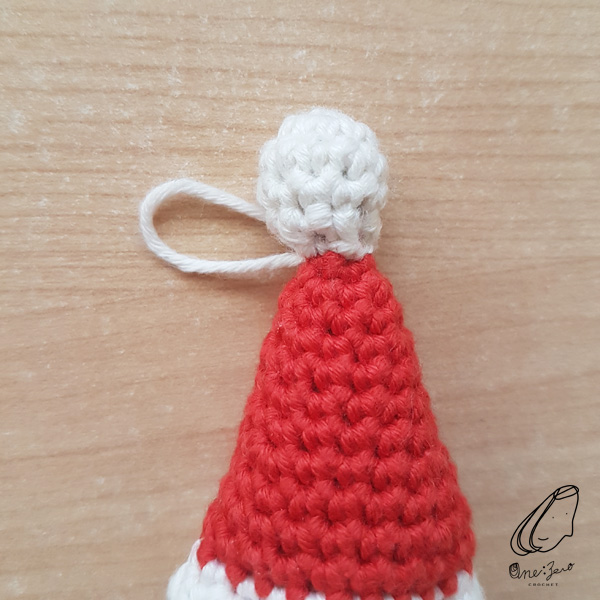
“Pompom” on the top of the hat
Use white yarn,
R 1: MR (5)
R 2: 2sc in each st (10)
R 3 – 4: sc ard (10)
R 5: Dec ard (5)
Stuff filling, leave a tail for assembly later and cast off.
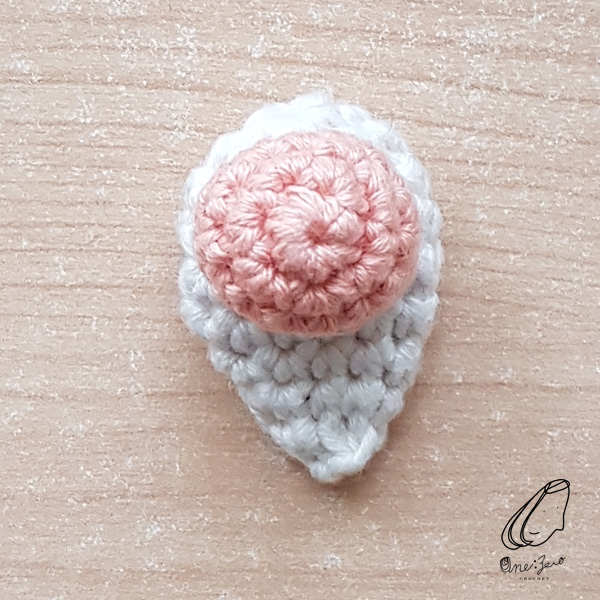
Beard
Use white yarn,
R 1: MR (7)
R 2: 2sc in each st (14)
R 3 – 5: sc ard (14)
R 6: {Dec, sc 5} x 2 (12)
R 7: {Dec , sc 4} x 2 (10)
R 8: {Dec, sc 3} x 2 (8)
R 9: Dec ard (4)
Close the end, cast off, and weave in ends.
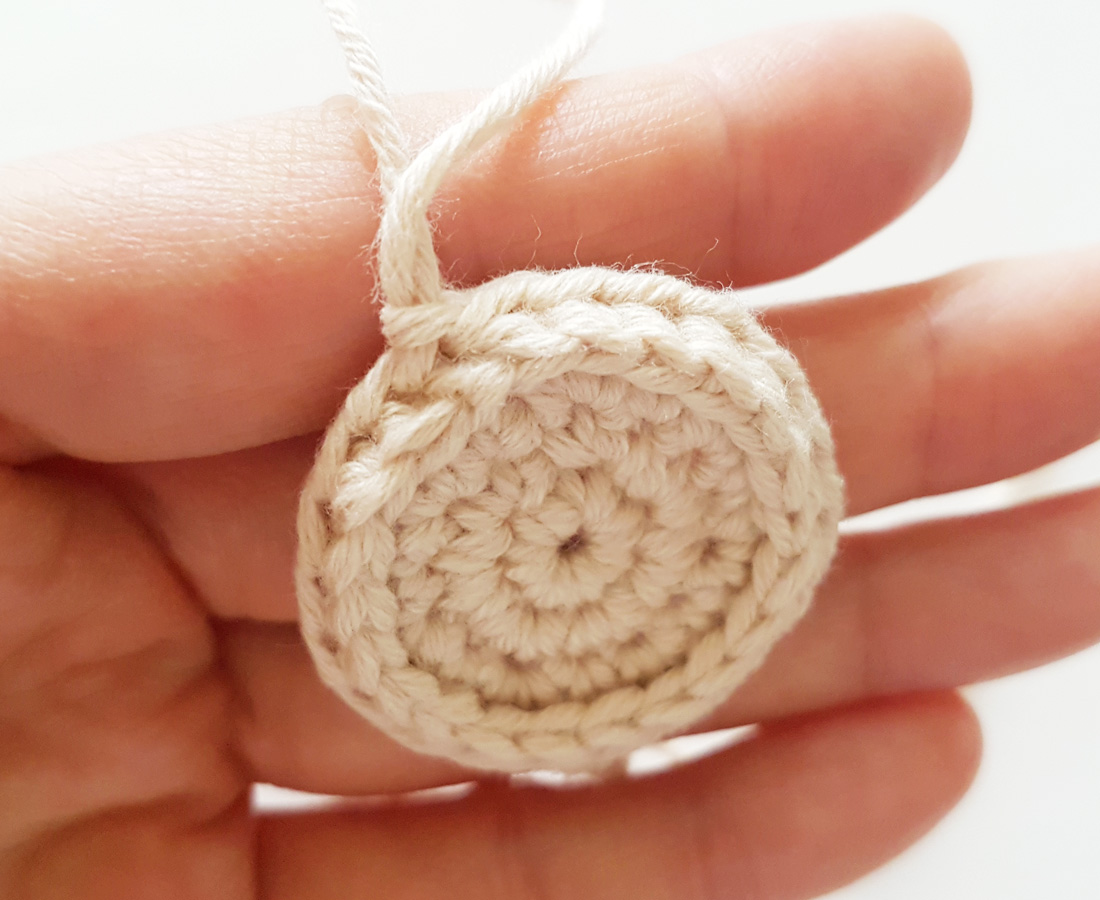
Nose
Use beige yarn,
R 1: MR (7)
R 2: 2sc in each st ard (14)
R 3 – 4: sc ard (14)
Leave a tail for assembly later, and cast off.
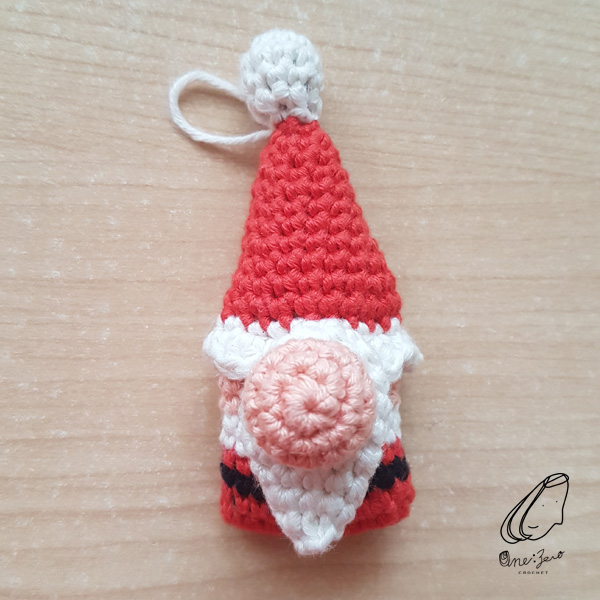
Merry Christmas & Happy New Year!!
As to welcome a new member of the house, I’ve been busy decorating the baby room. To color up the baby room and the very white plain baby crib, I’ve crocheted a {Kirika the pocket unicorn} (pattern by @amigurumei), a giraffe (I’ve modified a bit of the pattern of the unicorn to make this giraffe, so that they’re in the same style.) and a few hot air balloons in pastel tone colors. Then I used a string to hang them up to make them as the crib-side decoration.
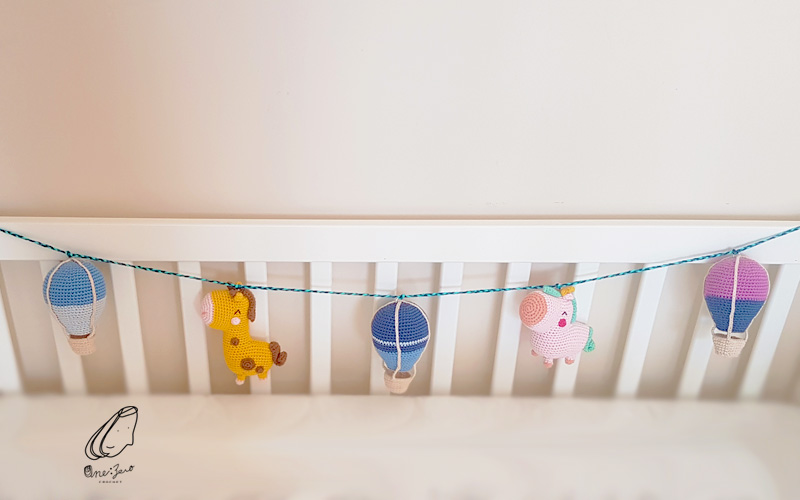
If you just have limited time and you’re looking for ideas to decorate your room or a baby room, this hot air balloon is a good option for you! Not only because it is simple and quick to make, but you can also mix and match with different colors to harmonize your room theme.
You can find the pattern below for the air balloon:
Materials
Hook: 2.5mm
Yarn: cotton Yarn [3/light]
Yarn color: Purple, Navy Blue & Beige (or whatever colors you like😉 )
Polyester filling
Stitch Marker
Tapestry needle
Scissors
Sewing pins
Abbrevations
MR = Magic Ring
ch(s) = chains
sl st = slip stitch
st(s) = stitch(es)
ard = around
sc = single crochet
BPsc = Back Post single crochet
Inc = 2sc in next st
Dec = join next 2 sc together
sc … = sc in next … sts
crochet rounds = ch 1 at the beginning of each round and sl st into the 1st st of the round.
Hot Air Balloon
Start with purple color,
R 1: MR [8]
R 2: 2sc in each st ard [16]
R 3: {sc, Inc} ard [24]
R 4: {sc 2, Inc} ard [32]
R 5: sc ard [32]
R 6: {sc 3, Inc} ard [40]
R 7: sc ard [40]
R 8: {sc 4, Inc} ard [48]
R 9: sc ard [48]
R 10: {sc 5, Inc} ard [56]
R 11 – 17: sc ard [56]
-Change color to navy blue
R 18: sc ard [56]
R 19: {sc 6, Dec} ard [49]
R 20 – 21: sc ard [49]
R 22: {sc 5, Dec} ard [42]
R 23 – 24: sc ard [42]
R 25: {sc 5, Dec} ard [36]
R 26: sc ard [36]
R 27: {sc 2, Dec} ard [27]
R 28 – 30: sc ard [27]
-Stuff polyester filling
R 31: BPsc ard [27]
R 32: {sc, Dec} ard [18]
R 33: Dec ard [9]
R 34: {sc, Dec} ard [6]
-Cast off , secure the end and weave in ends
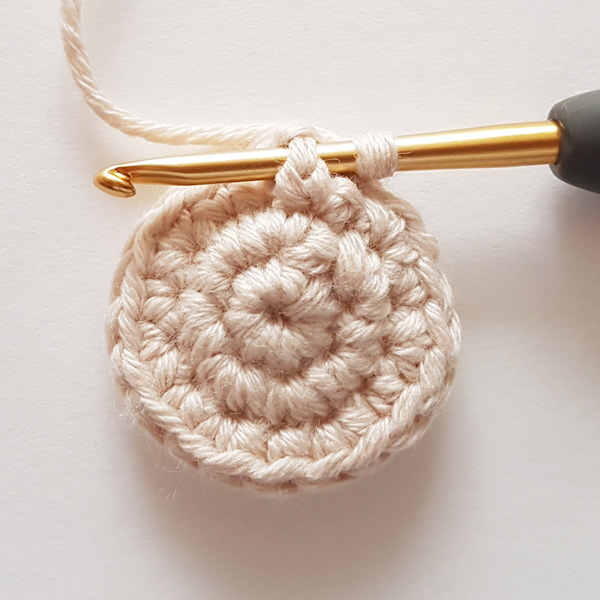
Basket
We’ll apply crochet rounds in this part of pattern,
Use beige color,
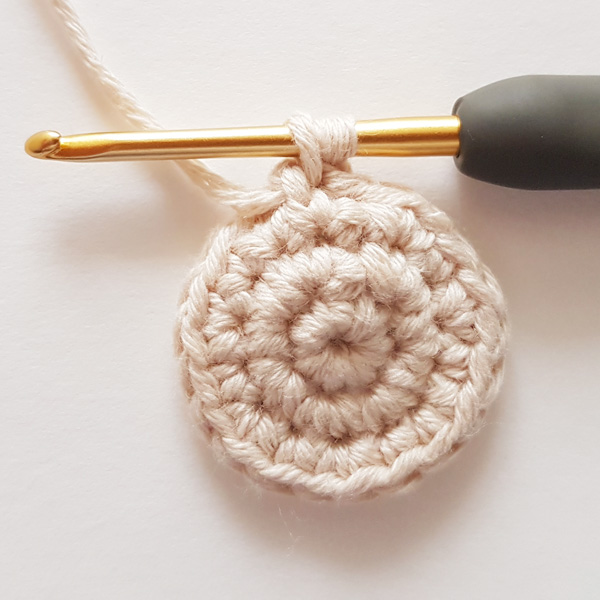
R 1: MR [7]
R 2: ch 1, 2sc in same st, 2sc in each st ard, sl st [14]
R 3: ch 1, sc in same st, Inc, {sc, Inc} ard, sl st [21]
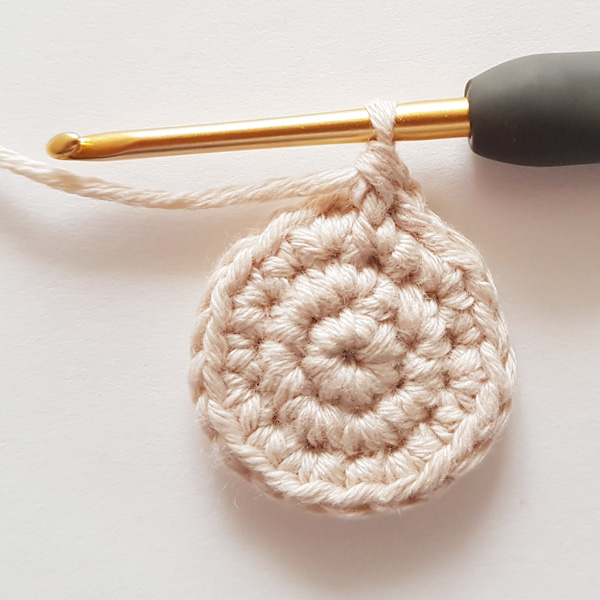
R 4: ch 1, BPsc ard, sl st [21]
R 5 – 6: ch 1, sc ard, sl st [21]
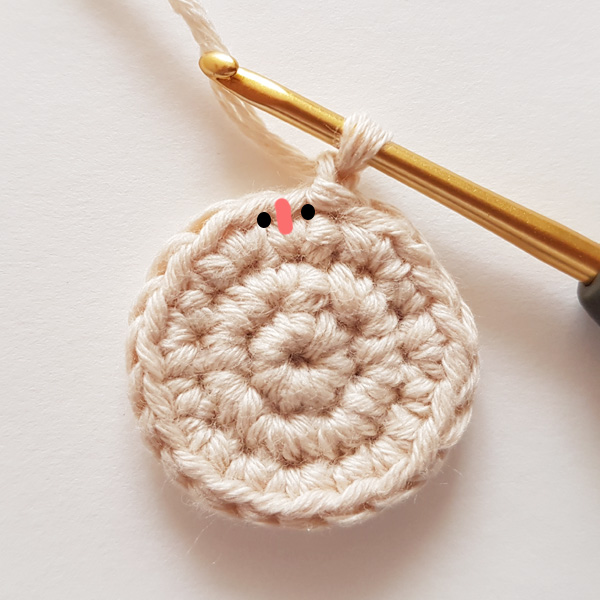
R 7: ch 1, sc in same st, sc, Inc, {sc 2, Inc} ard, sl st [28]
R 8 – 9: ch 1, sc ard, sl st [28]
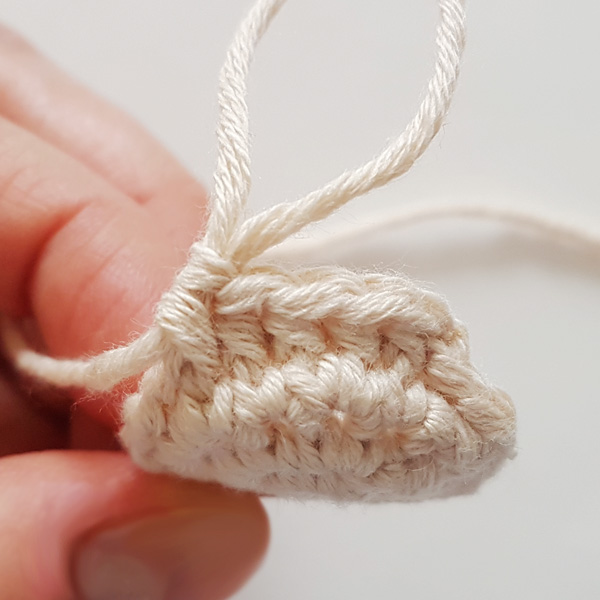
DON’T cast off the yarn,
ch 78,
Then sl st into the 15th st (count from the beginning of the round),
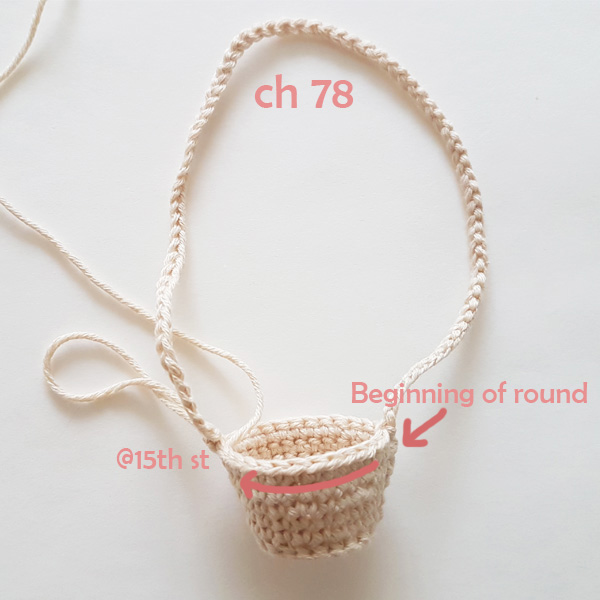
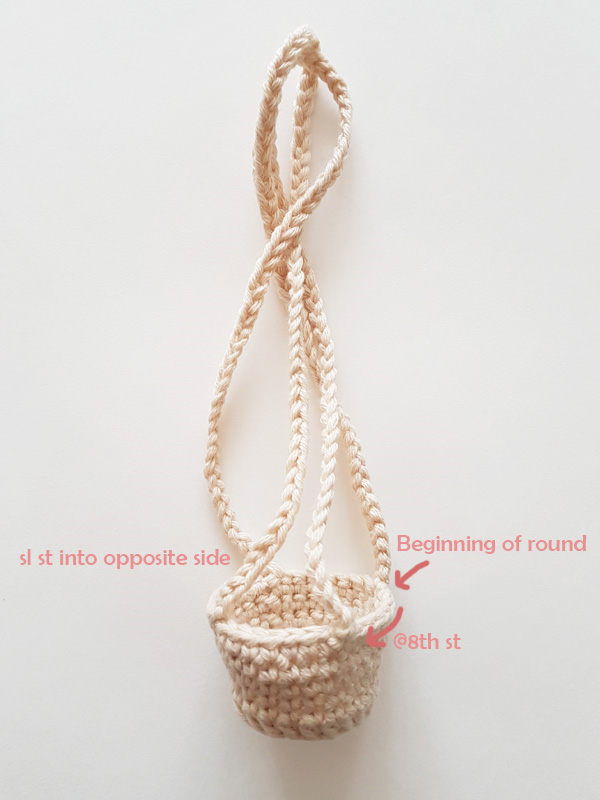
Count from the beginning of the round again, at the 8th st, start with a new beige yarn, ch 78, then sl st into the opposite side.
Finally, assemble the hot air balloon and the basket together.
It’s fast and easy to make, you can quickly make a few in a short period of time.
Happy Crochet!!
When we do the normal single crochet, it works on the top of a stitch. For the front post single crochet and the back post single crochet, it works on the post below the stitch. The pictures below are going to show you how to make the front & back post single crochet:

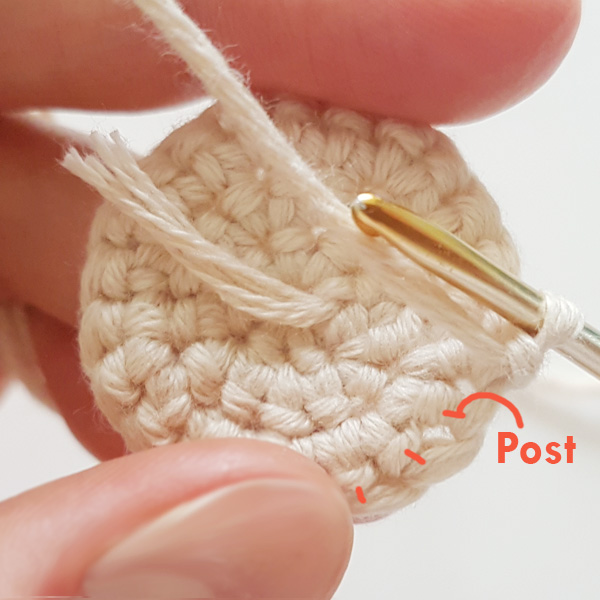
Step 3: Yarn over and pull yarn through the post
Step 4: Yarn through the loops and form a single crochet

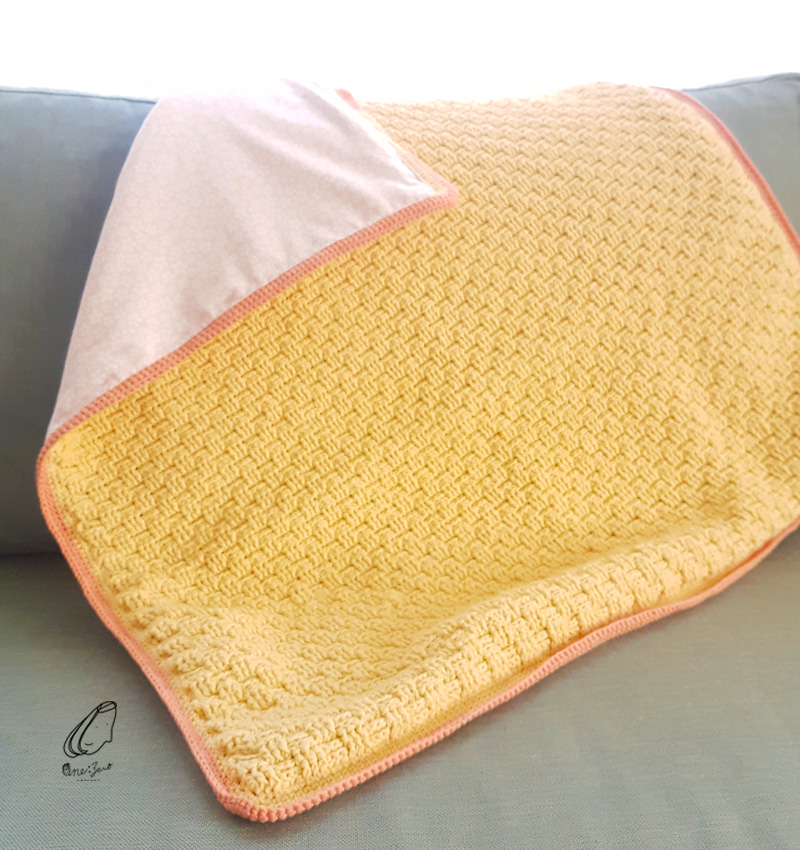
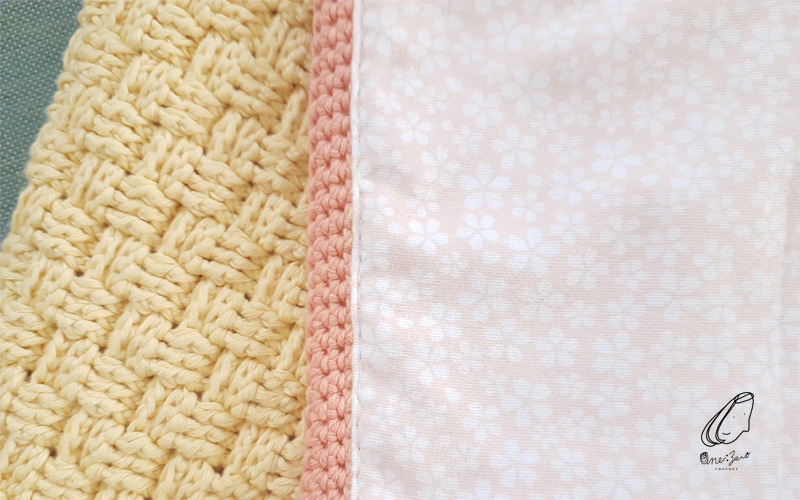
With my baby almost on the way, I’ve been meaning to finish up my basket weave stitch baby blanket which has been sitting in the drawer for a while. However, it took me some time to look for the baby-friendly materials for the lining part to complete the job.
After some search, I’ve picked this pink fabric with little white flower print on it for lining on the crochet blanket. It’s 100% cotton fabric which is very soft, breathable and machine washable. And of course, the yarn [fibranatura Cottonwood] I’ve used for the crochet blanket is also baby-friendly, it labels itself 100% organic cotton.
I’m not a quick crocheter and sometimes I work on more than one project at the same time, so I don’t remember how many weeks or months I’ve used to complete this blanket. One thing for sure is that crocheting a blanket is a wonderful thing to do during the early stages of pregnancy when you don’t feel like you have energy to do anything but mentally you would still like to do something “useful” instead of just laying down.
I don’t have a sewing machine, so I hand-sewed the lining on the crochet blanket and it did take some time (like a whole day xD), but it was all worth it! With the back up of the lining, the blanket won’t stretch out even after machine washing. I love how the blanket turned out!

*just for your own reference, general baby blanket size is about 76 x 89cm (30″ x 35″).
**If you also want to know how to do the [Basket Weave Stitch], this is the youtube link I used as the reference for my Basket Weave Stitch Baby Blanket.
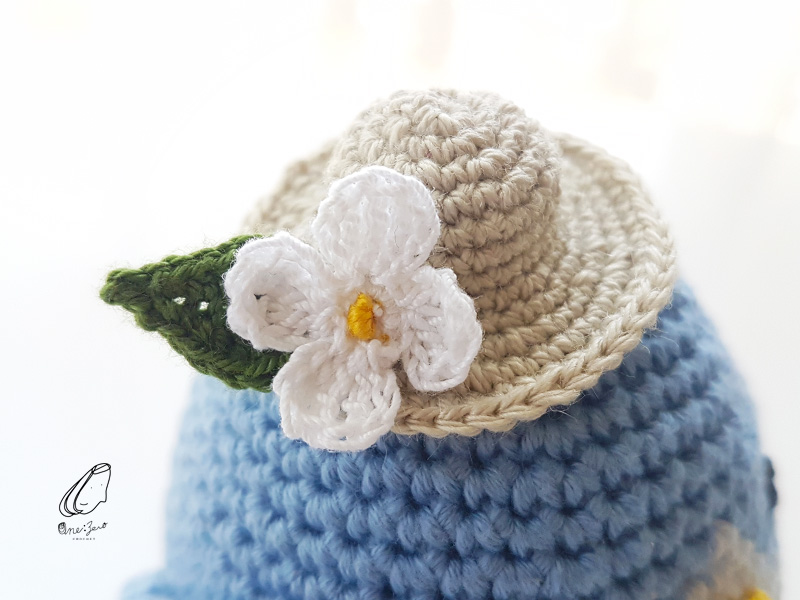
Twitter has become a worldwide tool for people to communicate with just about anyone online. I always thought the Twitter bird had a very simple but cute design and thought it would be neat to bring it to life with crochet into the 3D world. Since it’s autumn, I even gave it a cute flowery hat to match the season!
Start with sky blue yarn,
R 1: MR [7]
R 2: 2sc in each st ard [14]
R 3: {sc, Inc} ard [21]
R 4: {sc 2, Inc} ard [28]
R 5: sc ard [28]
R 6: {sc 3, Inc} ard [35]
R 7: sc ard [35]
R 8: {sc 4, Inc} ard [42]
R 9 – 10: sc ard [42]
R 11: {sc 5, Inc} ard [49]
-Add baby blue yarn from R 12
(B) = baby blue, indicate to change yarn color from sky blue to baby blue
R 12: sc 24, (B)sc, sc 24 [49]
R 13: sc 23, (B)sc 3,sc 23 [49]
R 14: {sc 6, Inc} x 3, sc, (B)sc 5, sc Inc, {sc 6, Inc} x 2, sc 5, Inc [56]
R 15: sc 23, (B)sc 9, sc 24 [56]
R 16: sc 21, (B)sc 13, sc 22 [56]
R 17: sc 20, (B)sc 15, sc 21 [56]
R 18: {sc 7, Inc} x 2, sc 3, (B)Inc, (B)sc 15, (B)Inc, sc 3, Inc, {sc 7, Inc} x 2 [63]
R 19 – 20: sc 21, (B)sc 19, sc 23 [63]
R 21: sc 3, Dec, sc 7, Dec, sc 7, (B)Dec, (B)sc 15, (B)Dec, {sc 7, Dec} x 2, sc 3, Dec [56]
R 22: sc 19, (B)sc 17, sc 20 [56]
R 23: {sc 6, Dec} x 2, sc 4, (B)Dec, (B)sc 11, (B)Dec, {sc 6, Dec} x 2, sc 3, Dec [49]
R 24: {sc 5, dec} x 2, sc 5, (B)Dec, (B)sc 8, (B)Dec, {sc 5, Dec} x 2, sc 2, Dec [42]
R 25: {sc 4, Dec} x 3, (B)sc 5, (B)Dec, {sc 4, Dec} x 2, sc 3 [35]
-Stuff filling
R 26: {sc 3, Dec} ard [28]
R 27: {sc 2, Dec} ard [21]
R 28: {sc, Dec} ard [14]
R 29: Dec ard [7]
-Stuff more filling, cast off and weave in ends
Right Wing
Use sky blue yarn and apply crochet rounds in this part
R 1: MR, sl st [7]
R 2: ch 1, 2sc in same st, 2sc in each st ard, sl st [14]
R 3: ch 1, sc in same st, Inc, {sc, Inc} ard, sl st [21]
R 4: ch 1, sc in same st, sc Inc, {sc 2, Inc} ard, sl st [28]
R 5: ch 1, sc in same st, sc 2, Inc, {sc 3, Inc} ard, sl st [35]
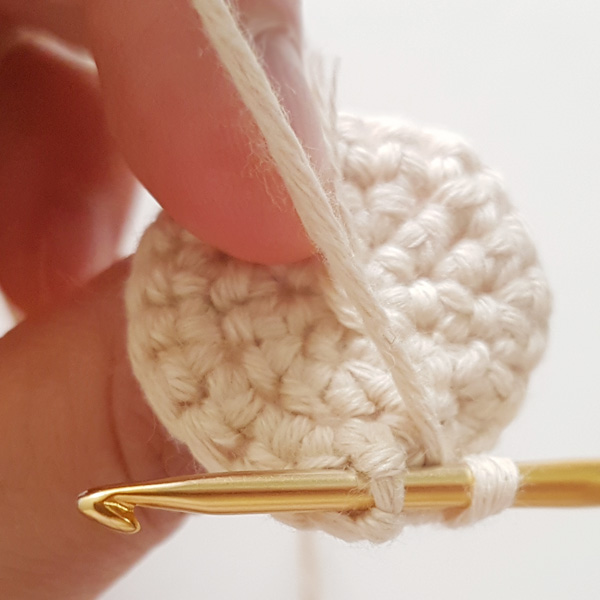
Next, fold the circle into a semicircle,

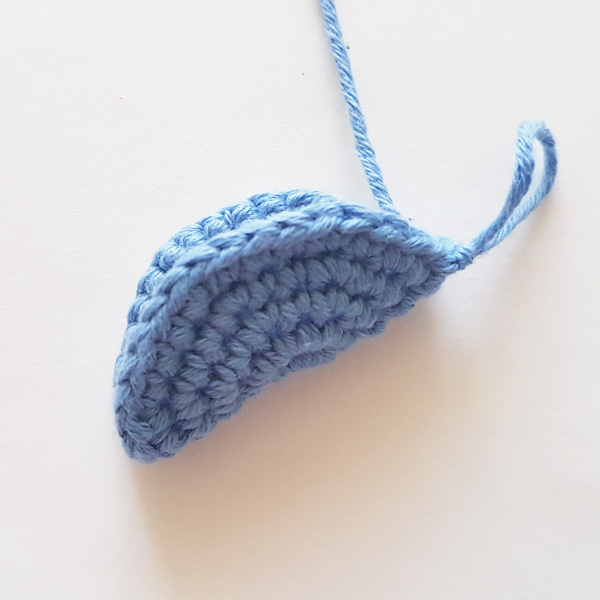
Fold the circle into a semicircle
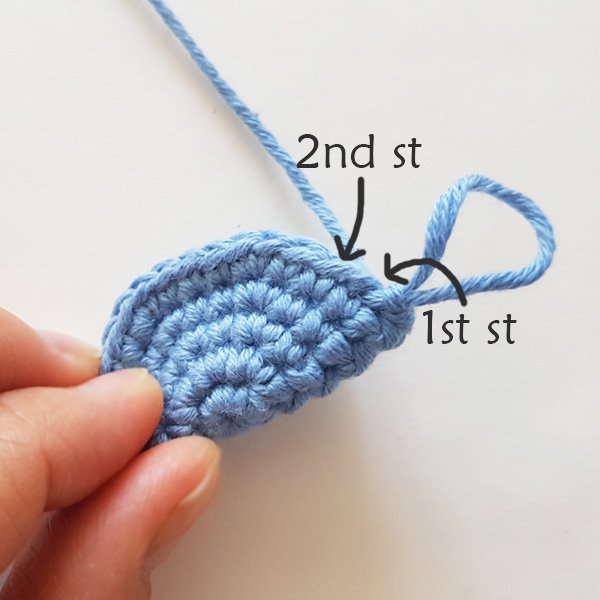
Skip 1st st
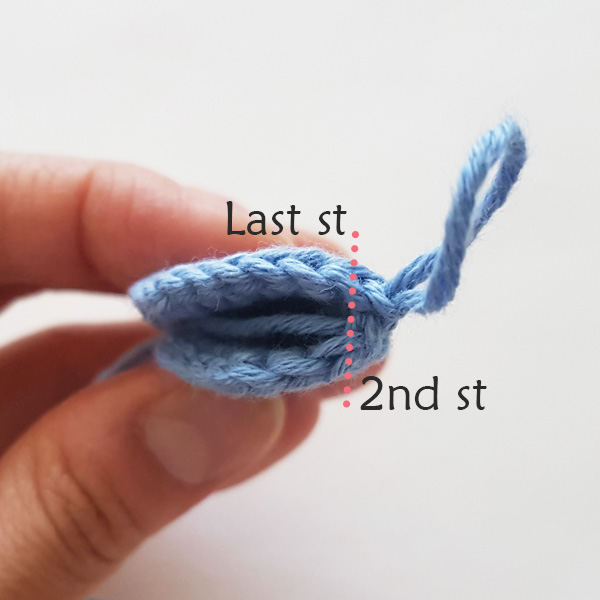
ch 1 (count as a st), hook goes through sts on both sides (e.g. 2nd st and last st, work as a pair), then make a sc
sc along the edge of the half circle [18]
**17sc plus ch 1 at the beginning
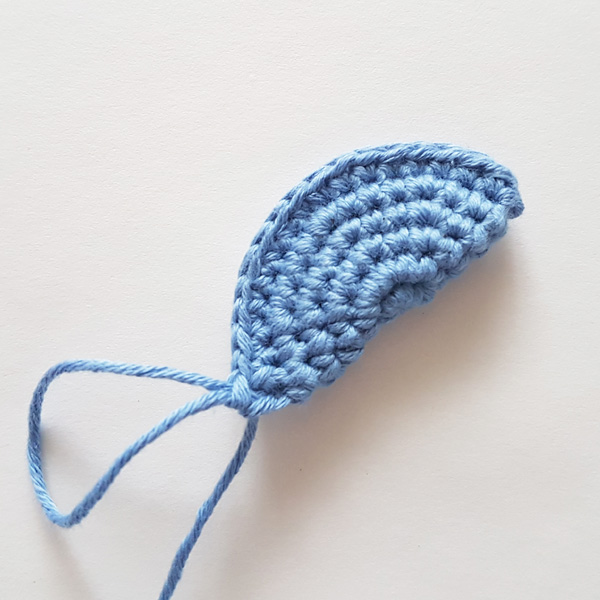
Then, turn, ch 1, sl st into next 15 sts,
ch 3, sl st into 3rd ch from hook, sl st into next st;
ch 4, sl st into 3rd ch from hook, sc in next ch, sl st into next st;
ch 5, sl st into 3rd ch from hook, sc in next 2 chs, sl st into last st
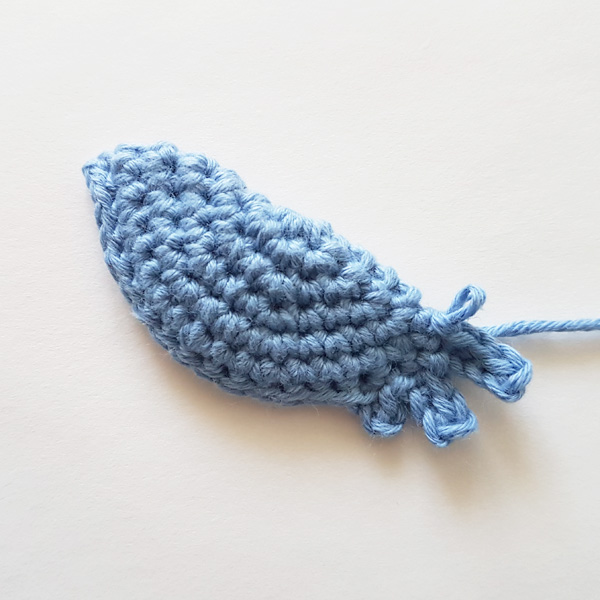
Left Wing
Use sky blue yarn and apply crochet rounds in this part
R 1: MR, sl st [7]
R 2: ch 1, 2sc in same st, 2sc in each st ard, sl st [14]
R 3: ch 1, sc in same st, Inc, {sc, Inc} ard, sl st [21]
R 4: ch 1, sc in same st, sc Inc, {sc 2, Inc} ard, sl st [28]
R 5: ch 1, sc in same st, sc 2, Inc, {sc 3, Inc} ard, sl st [35]
Then apply Step 1-5 as Right Wing,
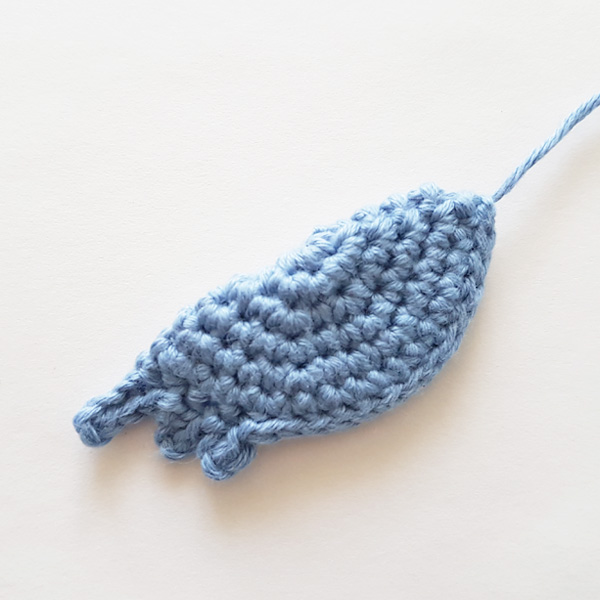
ch 5, sl st into 3rd ch from hook, sl st into next st;
ch 4, sl st into 3rd ch from hook, sl st into next st;
ch 3, sl st into 3rd ch from hook, sl st into next st;
sl st into next 14 sts
-Leave a tail and cast off
Use yellow yarn,
R 1: MR [4]
R 2: {sc, Inc} ard [6]
R 3: {sc, Inc} ard [9]
-Leave a tail and cast off
Use black lace yarn with 0.75mm hook,
MR [5],
sl st,
-Leave a tail and cast off
Use grey lace yarn with 0.75mm hook and works in crochet rounds.
R 1: MR, sl st [6]
R 2: ch 1, 2sc in same st, 2sc in each st ard, sl st [12]
R 3: ch 1, sc in same st, Inc, {sc, Inc} ard, sl st [18]
R 4: ch 1, sc in same st, sc, Inc, {sc 2, Inc} ard, sl st [24]
R 5 – 7: ch 1, sc ard, sl st [24]
R 8: ch 1, sc in same st, sc 2, Inc, {sc 3, Inc} ard, sl st [30]
R 9: ch 1, sc in same st, sc 3, Inc, {sc 4, Inc} ard, sl st [36]
R 10: ch 1, sc in same st, sc, Inc, {sc 5, Inc} x 5, sc 3, sl st [42]
R 11: ch 1, sc in same st, sc 2, Inc, {sc 6, Inc} x 5, sc 3, sl st [48]
R 12: ch 1, sc ard, sl st [48]
-Leave a tail for assembling later and cast off
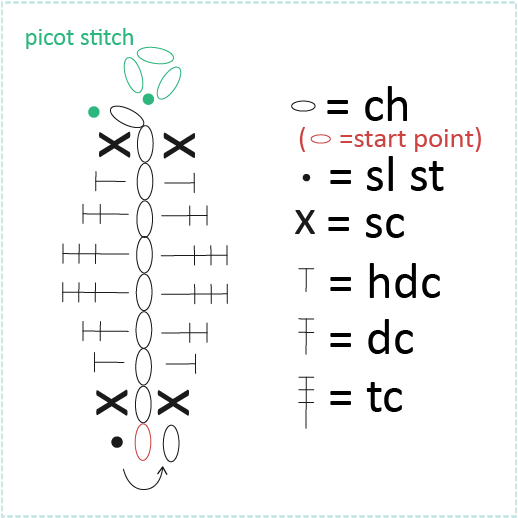
Use green lace yarn with 0.75mm hook,
leave a long tail at the beginning for final assembly.
ch 10,
sc into 2nd ch from hook, hdc, dc, tc into next 2 chs, dc, hdc, sc, sl st, ch, skip next ch, sc, hdc, dc, tc into next 2 chs, dc, hdc, sc, picot stitch
**picot stitch: ch 3, sl st into 3rd ch from hook, sl st into next st/ch
-Secure the end, cast off and weave in ends
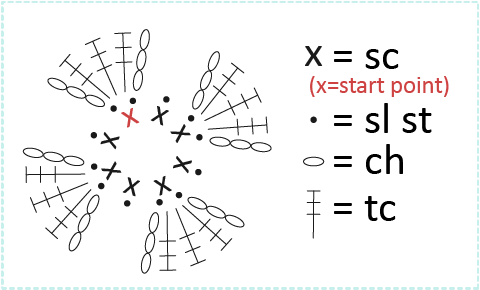
Use white lace yarn with 0.75mm hook,
Start withe a magic ring [8],
{sl st into 1st / next st, ch 3, 3 tc in same st, ch 3, sl st into same st, sl st into next st} x 4
-Secure the end, leave a tail and cast off
Happy Crochet!! 😀
**If you want to get the downloadable PDF copy, you can check out the SHOP
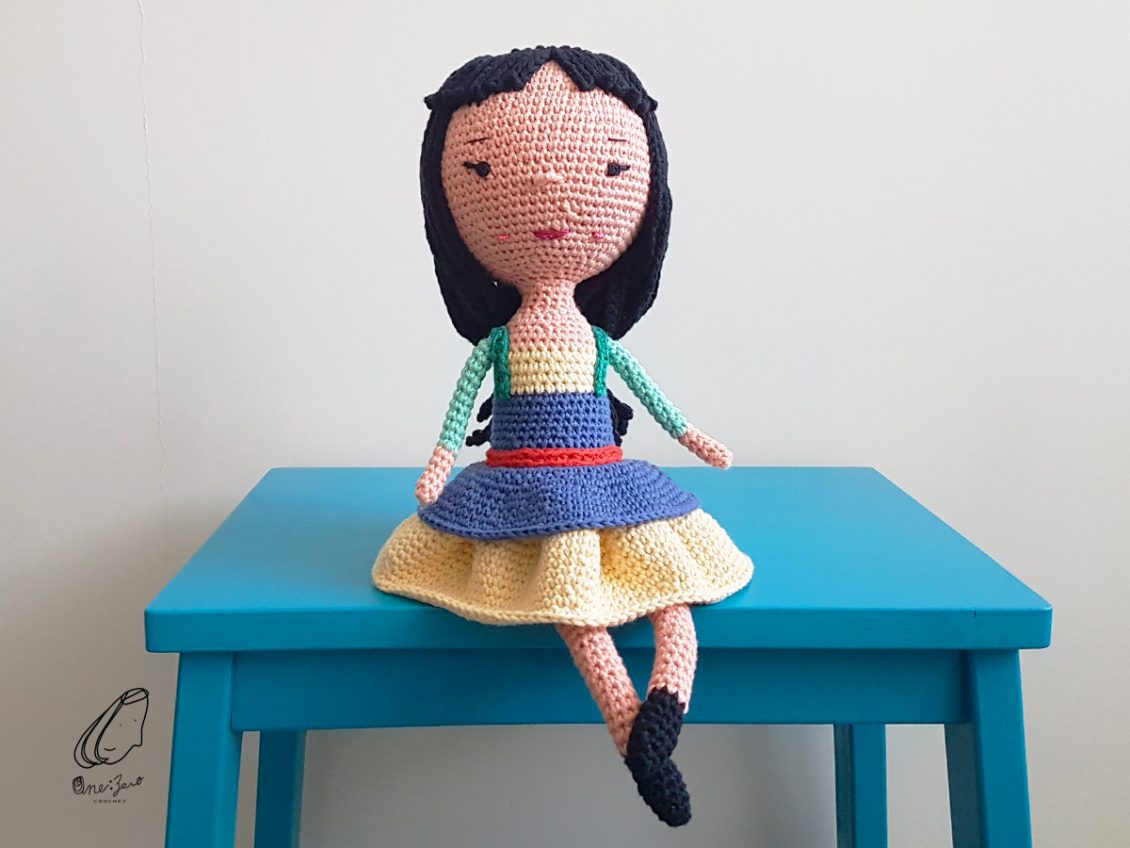
Probably last but certainly not least member of my Princess Gang (previous ones can be found here: Snow White, Cinderella, Ariel, Jasmine), I chose someone a bit different from the rest. Unlike the other princesses who have a more traditional happily-ever-after story, Mulan’s tale is one of a tough life as a strong, brave and independent heroine who fought battles and protected her aging father. She didn’t have a fancy dress or expensive jewelry but her kind beautiful heart is the best accessory to make her shine out of the crowd.
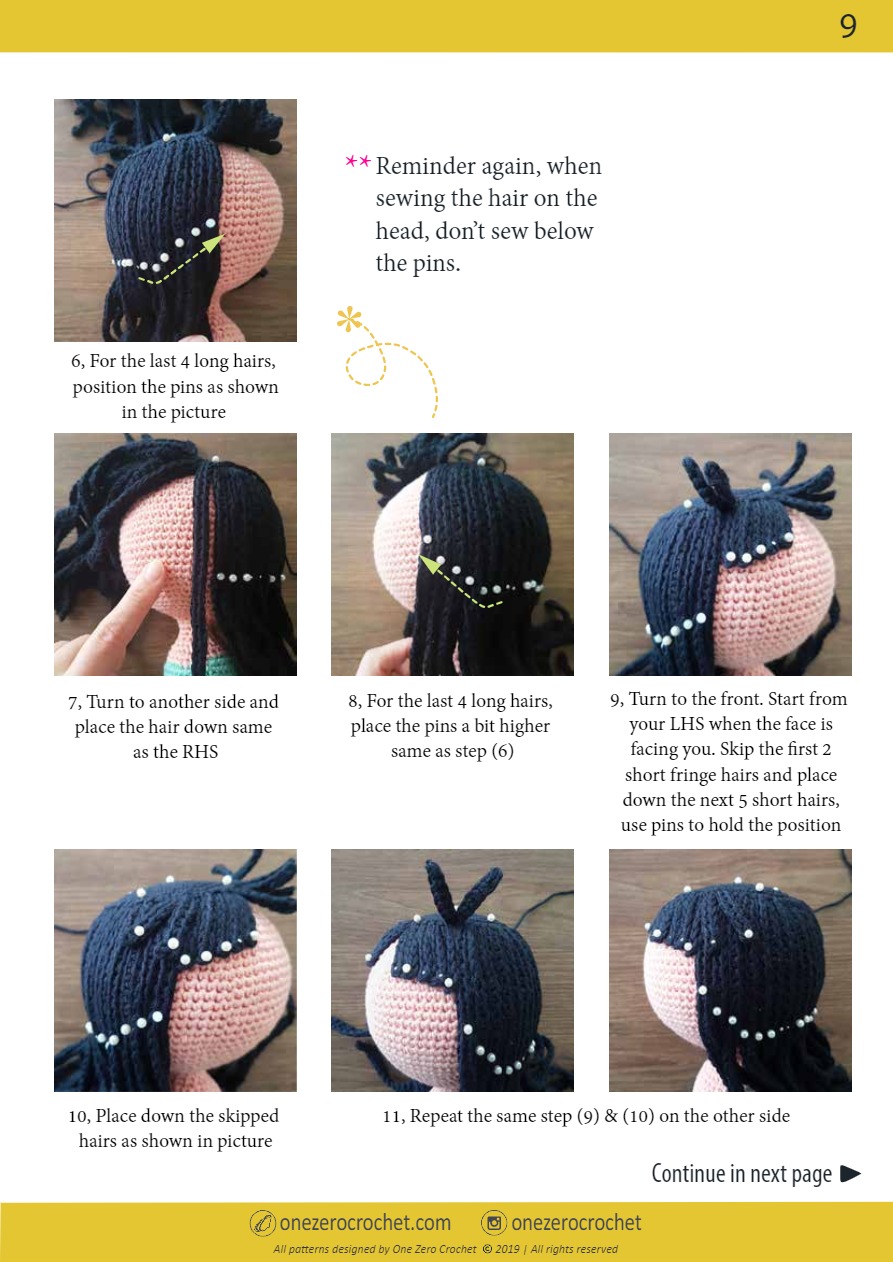
As with all the others, she was a delight to work on and using the flipbook** below, those with basic crochet skills can easily follow along and make their own Mulan doll. The yarn I mainly used is la mia Cottony (you can find it on hobiumyarns.com) with a 2.5mm hook.
This likely wraps up my Princes Gang series, I hope you enjoyed following along and if you had the chance to follow the patterns I would love to see the finals results!
**Remember to press the enlarge button at the top right!


Please don’t hesitate to contact me if you have any questions about the instructions of the pattern! Happy Crochet!!
Creating a detailed flipbook like above takes a tremendous amount of time, if you would like to support me so I can keep creating free educational patterns like this you can make a small donation at this page (you will also be emailed your own personal copy of the PDF).
Continuing my Princess gang series (check out the Snow White, Cinderella & Ariel patterns in case you miss them), this time I thought it would be a good idea to create Jasmine with the new Aladdin movie coming out.
Thus far all the princesses I’ve crocheted have been wearing dresses, so it was interesting to create Jasmine’s trousers style outfit! And of course, I’ve made her jewelry to match with her gorgeous and glamorous appearance as well.
If you’re interested in making one for yourself, this pattern is easy to follow and suitable for crocheters who have basic crochet skills. You can find the full Jasmine crochet pattern below in flipbook format (remember to press the enlarge button at the top right)!


Please follow onezerocrochet on Instagram and give me a like if you enjoy my work!
Please don’t hesitate to contact me if you have any questions about the instructions of the pattern!
Enjoy your crochet times!
Creating a detailed flipbook like above takes a tremendous amount of time, if you would like to support me so I can keep creating free educational patterns like this you can make a small donation at this page (you will also be emailed your own personal copy of the PDF).
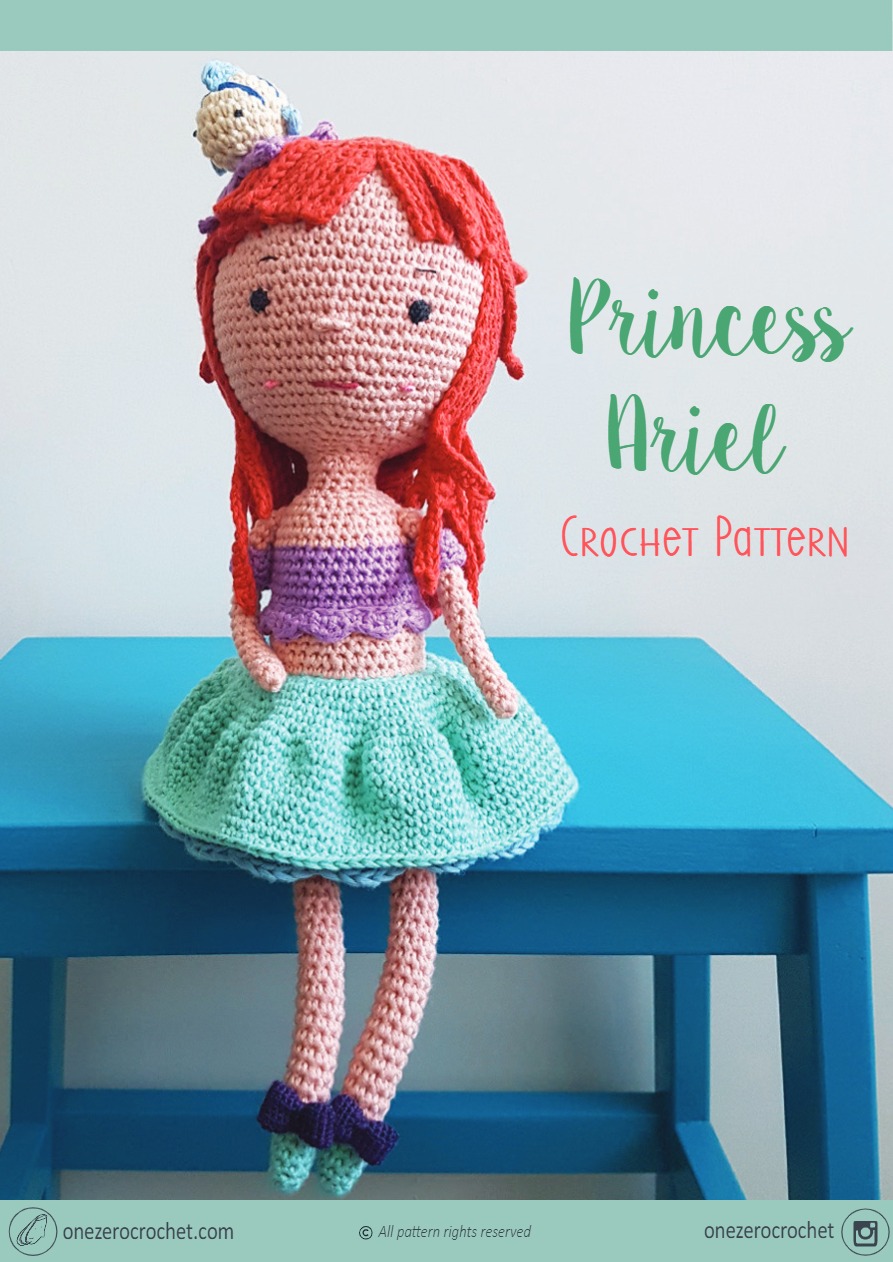
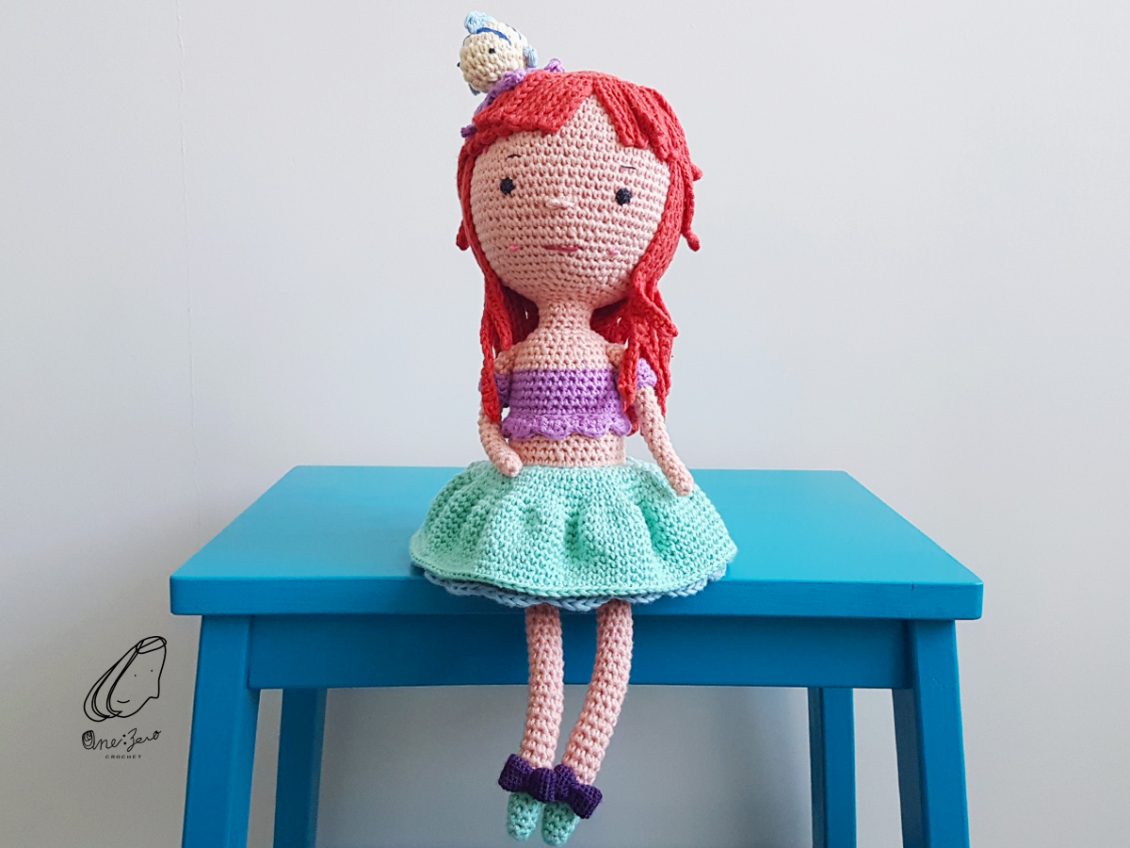
In case you haven’t followed my previous post Cinderella Crochet Pattern, in the previous post I mentioned that I had decided to create a “Princess Gang” after my very first princess amigurumi, Snow White, so that she won’t be sitting alone on the shelf. For the newest member, I have decided to go with the princess of the sea, Ariel!! I know Ariel in most peoples’ minds have the mermaid look which has a shinny, flexible long tail, swimming freely in the ocean. But this time, I gave Ariel a pair of legs..and the best part is she didn’t even need to exchange her voice for it! 😉
You can find the full Ariel crochet pattern below in flipbook format, press the top right button to enlarge it!


Creating a detailed flipbook like above takes a tremendous amount of time, if you would like to support me so I can keep creating free educational patterns like this you can make a small donation at this page (you will also be emailed your own personal copy of the PDF).
Stay tuned for the next princess #princessgang
Thank you so much, and please don’t hesitate to get in touch with me if you have any issues following the instructions in the pattern.

 Year of the Ox - Mr. Ox C...
$5.00
Year of the Ox - Mr. Ox C...
$5.00
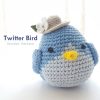 Twitter Bird Crochet Pattern
$2.00
Twitter Bird Crochet Pattern
$2.00
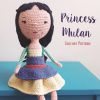 Mulan Crochet Pattern
$5.00
Mulan Crochet Pattern
$5.00
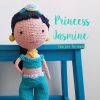 Jasmine Crochet Pattern
$5.00
Jasmine Crochet Pattern
$5.00
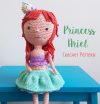 Ariel Crochet Pattern
$5.00
Ariel Crochet Pattern
$5.00

 Unicorn Crochet Wrist Rest Cushion (Free Crochet Pattern)
  Crochet Magic Ring for Beginner
  Jasmine Crochet Pattern
  Lion Head for Lion Dance (Free Crochet Pattern)
  Crochet Round: Magic Ring ends with Slip Stitch