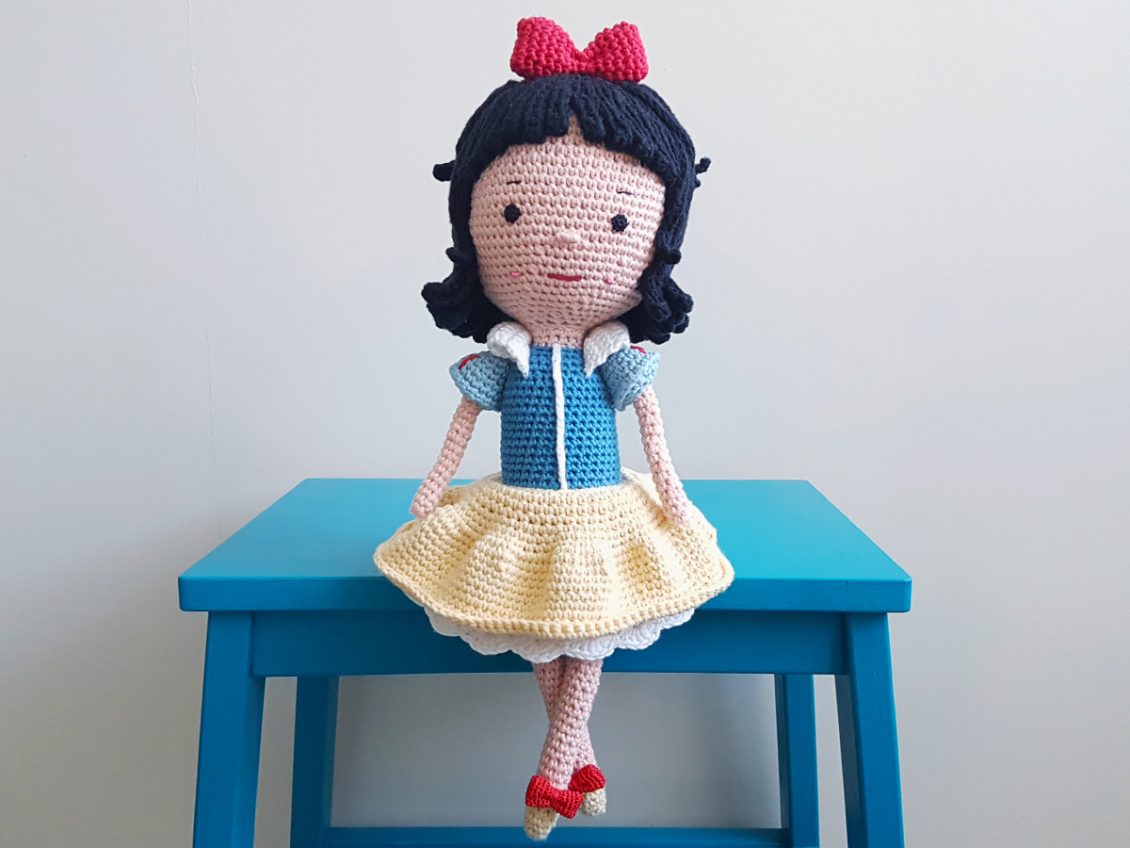


Based on a 19th century German fairy tale, and later popularized by Disney, Snow White has stood the test of time as one of the most iconic female characters in pop culture. She is personally my favorite among all Princesses and for that reason I was inspired to bring her to life with this crochet creation. I hope you enjoy following this pattern as much as I enjoyed making it. Here is the full pattern in flipbook format (don’t forget to press the enlarge button on the top right):


Creating a detailed flipbook like above takes a tremendous amount of time, if you would like to support me so I can keep creating free educational patterns like this you can make a small donation at this page (you will also be emailed your own personal copy of the PDF).
Thank you so much, and please don’t hesitate to get in touch with me if you have any issues following the instructions in the pattern.
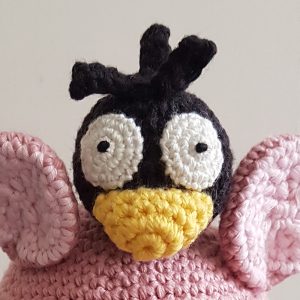
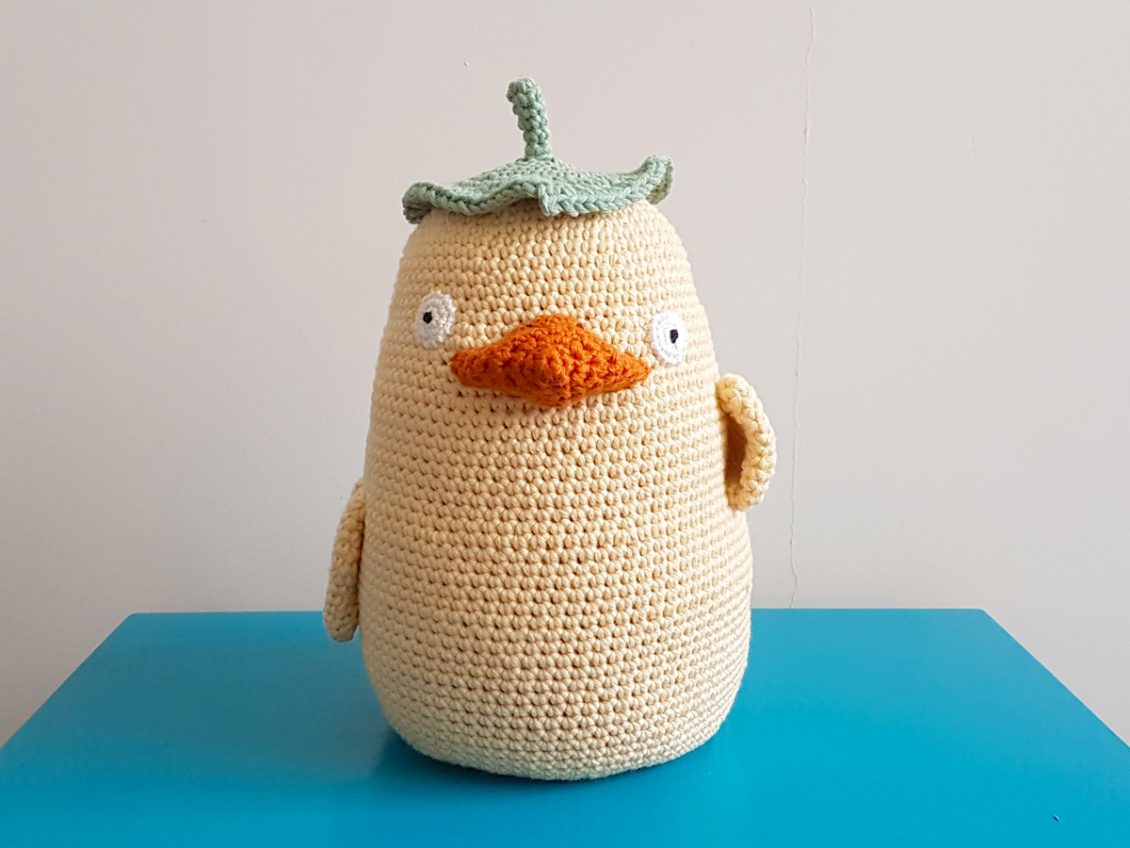
After making No-Face & Boh, I have decided to make Ootori-Sama to complete my Spirited Away Door Stopper set. Ootori-Sama, sometimes referred as ‘the yellow duck’, are the clients of the Bathhouse in Spirited Away. They are minor characters in the film but they can be your major door guard at home!
-Hooks: 3.5mm (6/0 JNP standard hook Or E4 US standard hook); And 2.5mm (4/0 JNP standard hook Or B1/C2 US standard hook ); And 0.85mm (0.9mm JNP lace hook Or US steel hook 13)
-Cotton Yarns: Yellow, Pumpkin Orange & Green; Lace Yarn: White
– Embroidery Thread: Black
-Tapestry Needle
-Sewing Needle
-Scissors
-Stitch Marker
-Polyester filling
-Beans or Rice (White bean is using in this project, about 1.5kg)
-This pattern is worked in both Crochet Rounds and Spiral Rounds
ch(s)= Chain(s)
st(s)= Stitch(es)
sl st= Slip Stitch
sc= Single Crochet
hdc= Half Double Crochet
dc= Double Crochet
tr= Treble Crochet
Inc= 2sc in next st
Dec= Join next 2 single crochet together
blsc = back loop single crochet
Use yellow yarn with 3.5mm crochet hook,
Rd 1: Magic Ring [7]
Rd 2: 2sc in each st around [14]
Rd 3: *sc, Inc, repeat from * till round ends [21]
Rd 4: *sc in next 2 sts, Inc, repeat from * till round ends [28]
Rd 5: *sc in next 3 sts, Inc, repeat from * till round ends [35]
Rd 6: *sc in next 4 sts, Inc, repeat from * till round ends [42]
Rd 7: sc around [42]
Rd 8: *sc in next 5 sts, Inc, repeat from * till round ends [49]
Rd 9: sc around [49]
Rd 10: *sc in next 6 sts, Inc, repeat from * till round ends [56]
Rd 11 – 12: sc around [56]
Rd 13: *sc in next 7 sts, Inc, repeat from * till round ends [63]
Rd 14 – 17: sc around [63]
Rd 18: *sc in next 8 sts, Inc, repeat from * till round ends [70]
Rd 19 – 22: sc around [70]
Rd 23: *sc in next 9 sts, Inc, repeat from * till round ends [77]
Rd 24 – 32: sc around [77]
Rd 33: *sc in next 10 sts, Inc, repeat from * till round ends [84]
Rd 34 – 47: sc around [84]
Rd 48: *sc in next 10 sts, Dec, repeat from * till round ends [77]
Rd 49: sc around [77]
Rd 50: *sc in next 9 sts, Dec, repeat from * till round ends [70]
Rd 51: sc around [70]
Rd 52: *sc in next 8 sts, Dec, repeat from * till round ends [63]
Rd 53: *sc in next 7 sts, Dec, repeat from * till round ends [56]
Rd 54: *sc in next 6 sts, Dec, repeat from * till round ends [49]
Rd 55: *sc in next 5 sts, Dec, repeat from * till round ends [42]
Rd 56: *sc in next 4 sts, Dec, repeat from * till round ends [35]
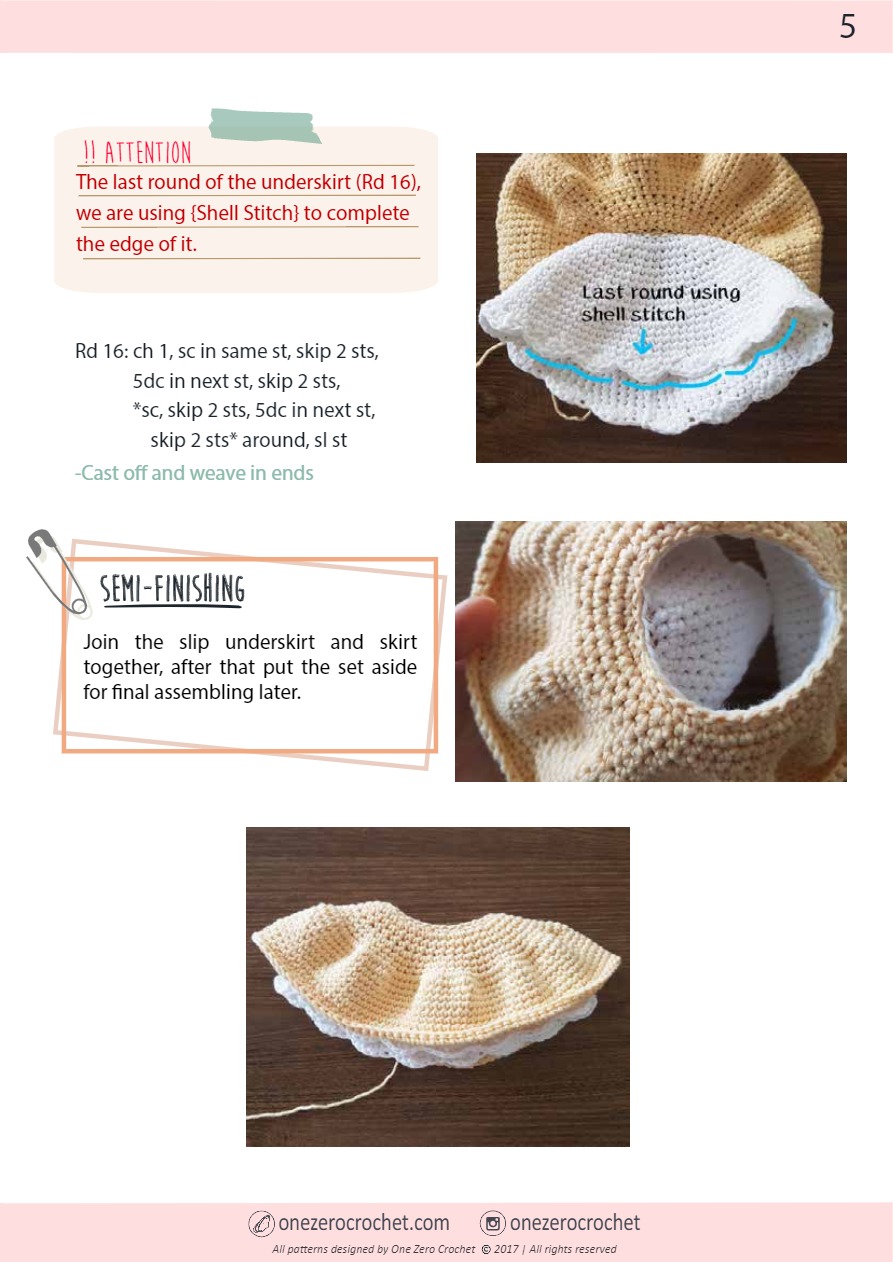
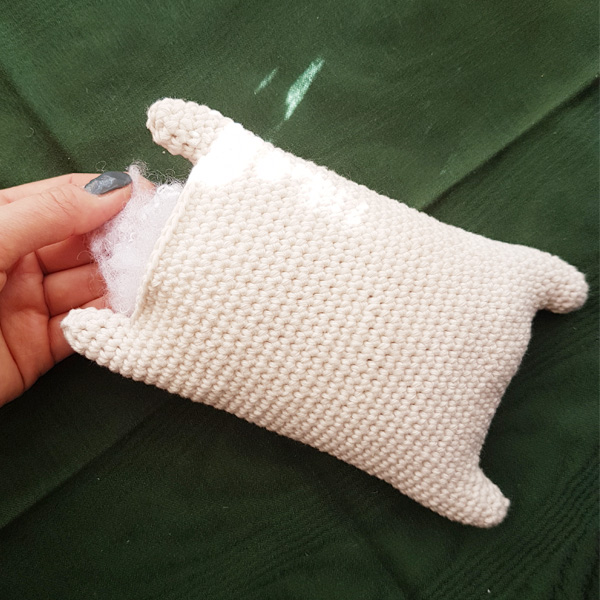
-Fill up with beans or rice
Rd 57: *sc in next 3 sts, Dec, repeat from * till round ends [28]
Rd 58: *sc in next 2 sts, Dec, repeat from * till round ends [21]
Rd 59: *sc in next 1 sts, Dec, repeat from * till round ends [14]
-Fill up with more beans or rice
Rd 60: Dec till round ends [7]
-Cast off & weave in ends
Try to fill up with as much beans/ rice as possible, it will affect the shape if it is too loose.
Use yellow yarn with 3.5mm crochet hook,
Rd 1: Magic Ring [6]
Rd 2: *sc, Inc, repeat from * till round ends [9]
Rd 3: sc around [9]
Rd 4: *sc in next 2 sts, Inc, repeat from * till round ends [12]
Rd 5 -6: sc around [12]
Rd 7: *sc, Inc, repeat from * till round ends [18]
Rd 8 – 9: sc around [18]
Rd 10: *sc in next 4 sts, Dec, repeat from * till round ends [15]
Rd 11 – 12: sc around [15]
-Leave a tail for assembling later and cast off
Use white lace yarn with 0.85mm hook,
Work in crochet rounds,
Rd 1: Magic Ring, sl st [6]
Rd 2: ch 1, 2sc in same st, 2sc in each st around, sl st [12]
Rd 3: ch 1, sc in same st, Inc, *sc in next st, Inc, repeat from * till round ends, sl st [18]
-Leave a tail for assembling later and cast off
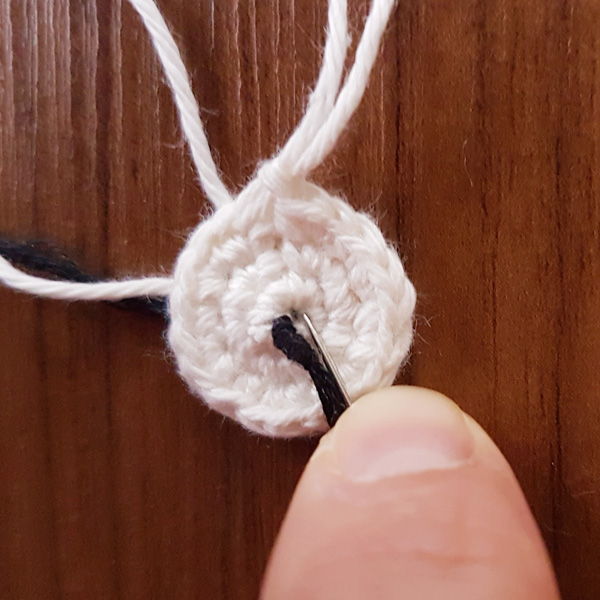
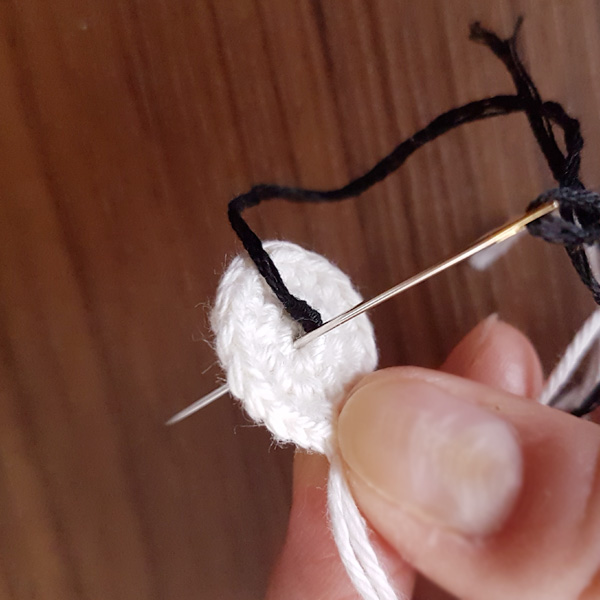
Use black embroidery thread to sew a knot stitch onto the middle part the eye:

Use green yarn, start with 2.5mm crochet hook,
Work in crochet rounds,
Rd 1: Magic Ring, sl st [5]
Rd 2 – 5: ch 1, sc in same st, sc around, sl st [5]
-Change crochet hook to 3.5mm
Rd 6: ch 1, blsc in same st, blsc around, sl st [5]
Rd 7: ch 1, 2sc in same st, 2sc in each st around, sl st [10]
Rd 8: ch 1, sc in same st, Inc, *sc, Inc, repeat from * till round ends [15]
Rd 9: ch 1, sc in same st, sc, Inc, * sc in next 2 sts, Inc, repeat from * till round ends, sl st [20]
Rd 10: ch 1, sc in same st, sc in next 2 sts, Inc, *sc in next 3 sts, Inc, repeat from * till round ends, sl st [25]
Rd 11: ch 1, sc in same st, sc in next 3 sts, Inc, *sc in next 4 sts, Inc, repeat from * till round ends, sl st [30]
Rd 12: ch 1, sc in same st, sc in next 3 sts, Inc, *sc in next 4 sts, Inc, repeat from * till round ends, sl st [36]
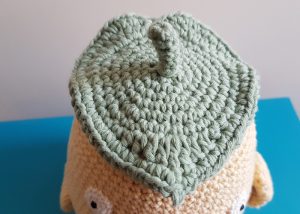
Rd 13: ch 1, sc in same st, 2hdc in each of next 4 sts, hdc in next 3 sts, sc in next 5 sts, hdc in next 2 sts, dc in next 2 sts, 2tr in next st, dc in next 2 sts, hdc in next 2 sts, sc in next 6 sts, hdc in next 3 sts, 2hdc in each of next 4 sts, sc, sl st [45]
Rd 14: ch 1, skip 1st st, 2hdc in each of next 21 sts, ch 2, sl st into 2nd ch from hook, 2hdc in each of next 20 sts, skip last st, sl st [82]
-Leave a tail for assembling and cast off
Use pumpkin orange yarn with 3.5mm crochet hook,
Work in crochet rounds,
Rd 1: Magic Ring, sl st [4]
Rd 2: ch 1, sc in same st, Inc, *sc, Inc, repeat from * till round ends, sl st [6]
Rd 3: ch 1, 2sc in same st, 2sc in each st around, sl st [12]
Rd 4: ch 1, 2sc in same st, sc, Inc, Inc, sc in next 4 sts, Inc, Inc, sc, Inc, sl st [18]
Rd 5: ch 1, sc in next 5 sts, Inc, sc in next 6 sts, Inc, sc in next 5 sts, sl st [20]
Rd 6: ch 1, sc in same st, sc around, sl st [20]
Rd 7: ch 1, sc in same st, sc in next 3 sts, Inc, Inc, sc in next 8 sts, Inc, Inc, sc in next 4 sts, sl st [24]
-Leave a tail for assembling later and cast off
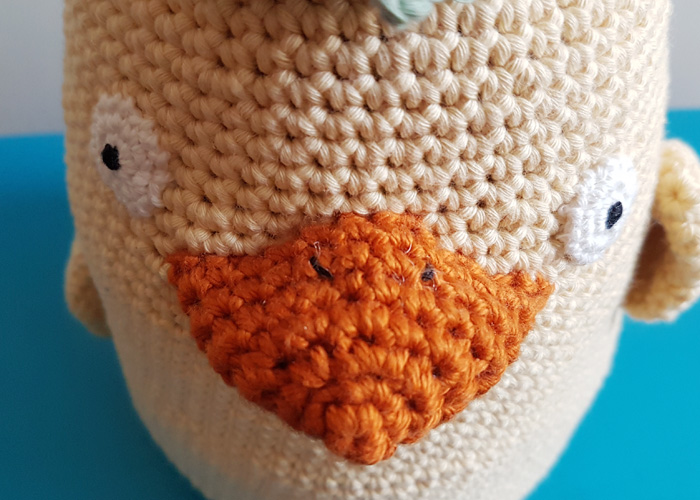
!! For the beak
> the side with the tail facing downward;
> Fill up the beak with some polyester filling while sewing it onto the body to give it a steady appearance.
When all parts are ready, assemble them all on the main body.
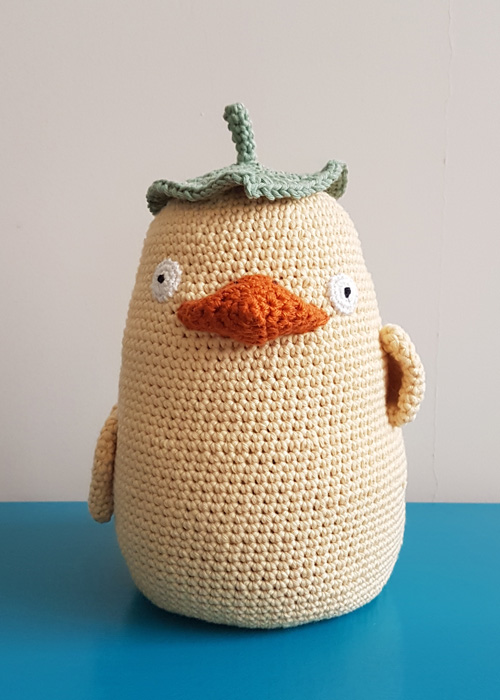
Last but not least, use black embroidery thread to sew the nostrils onto the middle upper part of the beak.
 Happy Crocheting!!
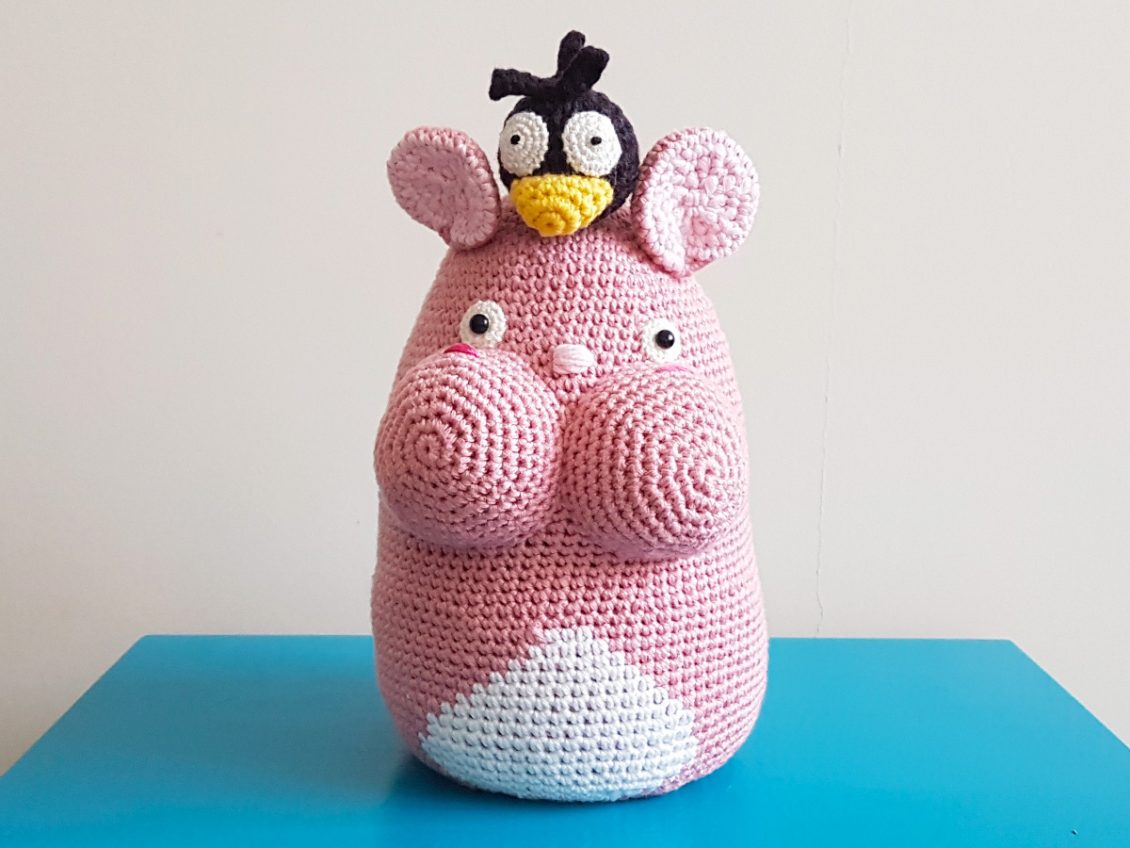
In case you haven’t seen this Japanese animated film, named “Spirited Away”, Boh was a large baby, I mean really HUGE, then one day he got shrank by his aunt and turned into a small grey mouse-like creature. After I have made the No-Face door stopper, No-Face looked so lonely standing by the door itself. Therefore, I planned to make it some friends, Boh & Ootori- Sama.
-Hooks: 3.5mm (6/0 JNP standard hook Or E4 US standard hook); And 0.85mm (0.9mm JNP lace hook Or US steel hook 13)
-Cotton Yarns: Dirty Pink, Pink, White, Black & Yellow; Lace Yarn: White
– Embroidery Thread: Black, Shape Pink & Pink
-Tapestry Needle
-Sewing Needle
-Scissors
-Stitch Marker
-Polyester filling
– A pair of plastic eyes (small size)
-Beans or Rice (White bean is using in this project, about 1.5kg)
-This pattern is worked in both Crochet Rounds and Spiral Rounds
ch(s)= Chain(s)
st(s)= Stitch(es)
sl st= Slip Stitch
sc= Single Crochet
Inc= 2sc in next st
Dec= Join next 2 single crochet together
Use dirty pink yarn & 3.5mm crochet hook,
Rd 1: Magic Ring (7)
Rd 2: 2sc in each st around (14)
Rd 3: *sc, Inc, repeat from * till round ends (21)
Rd 4: *sc in next 2 sts, Inc, repeat from * till round ends (28)
Rd 5: *sc in next 3 sts, Inc, repeat from * till round ends (35)
Rd 6: sc around (35)
Rd 7: *sc in next 4 sts, Inc, repeat from * till round ends (42)
Rd 8: sc around (42)
Rd 9: *sc in next 5 sts, Inc, repeat from * till round ends (49)
Rd 10 – 11: sc around (49)
Rd 12: *sc in next 6 sts, Inc, repeat from * till round ends (56)
Rd 13 – 14: sc around (56)
Rd 15: *sc in next 7 sts, Inc, repeat from * till round ends (63)
Rd 16 – 17: sc around (63)
Rd 18: *sc in next 8 sts, Inc, repeat from * till round ends (70)
Rd 19 – 22: sc around (70)
Rd 23: *sc in next 9 sts, Inc, repeat from * till round ends (77)
Rd 24 – 37: sc around (77)
Rd 38: *sc in next 10 sts, Inc, repeat from * till round ends (84)
Rd 39: sc around (84)
ATTENTION!!
{change w color} will be used to indicate changing dirty pink yarn into white yarn
{change dp color} will be used to indicate changing white yarn into dirty pink yarn
Rd 40: sc in next 41 sts, {change w color}, sc in next 3 sts, {change dp yarn}, sc in next 40 sts (84)
Rd 41: sc in next 40 sts, {change w color}, sc in next 5 sts, {change dp yarn}, sc in next 39 sts (84)
Rd 42: sc in next 39 sts, {change w color}, sc in next 7 sts, {change dp yarn}, sc in next 38 sts (84)
Rd 43: sc in next 38 sts, {change w color}, sc in next 9 sts, {change dp yarn}, sc in next 37 sts (84)
Rd 44: sc in next 37 sts, {change w color}, sc in next 11 sts, {change dp yarn}, sc in next 36 sts (84)
Rd 45: sc in next 36 sts, {change w color}, sc in next 13 sts, {change dp yarn}, sc in next 35 sts (84)
Rd 46: sc in next 35 sts, {change w color}, sc in next 15 sts, {change dp yarn}, sc in next 34 sts (84)
Rd 47 – 48: sc in next 34 sts, {change w color}, sc in next 17 sts, {change dp yarn}, sc in next 33 sts (84)
Rd 49 – 50: sc in next 33 sts, {change w color}, sc in next 19 sts, {change dp yarn}, sc in next 32 sts (84)
Rd 51: sc in next 34 sts, {change w color}, sc in next 17 sts, {change dp yarn}, sc in next 33 sts (84)
Rd 52: sc in next 35 sts, {change w color}, sc in next 15 sts, {change dp yarn},, sc in next 34 sts (84)
Rd 53: *sc in next 10 sts, Dec*, repeat ** 2 times, sc, {change w color}, sc in next 9 sts , Dec, sc, {change dp yarn}, sc in next 9 sts, Dec, *sc in next 10 sts, Dec*, repeat ** (77)
Rd 54: sc in next 35 sts, {change w yarn}, sc in next 9 sts, {change dp yarn}, sc in next 33 sts (77)
Rd 55: *sc in next 9 sts, Dec, repeat from * till round ends (70)
Rd 56: *sc in next 8 sts, Dec, repeat from * till round ends (63)
Rd 57: *sc in next 7 sts, Dec, repeat from * till round ends (56)
Rd 58: *sc in next 6 sts, Dec, repeat from * till round ends (49)
Rd 59: *sc in next 5 sts, Dec, repeat from * till round ends (42)
Rd 60: *sc in next 4 sts, Dec, repeat from * till round ends (35)
-Fill up with beans or rice
Rd 61: *sc in next 3 sts, Dec, repeat from * till round ends (28)
Rd 62: *sc in next 2 sts, Dec, repeat from * till round ends (21)
Rd 63: *sc in next 1 sts, Dec, repeat from * till round ends (14)
-Fill up with more beans or rice
Rd 64: Dec till round ends (7)
-Cast off & weave in ends
Try to fill up with as much beans/ rice as possible, it will affect the shape if it is too loose.
Use dirty pink yarn,
Rd 1: Magic Ring (7)
Rd 2: 2sc in each st around (14)
Rd 3: *sc, Inc, repeat from * till round ends (21)
Rd 4: *sc in next 2 sts, Inc, repeat from * till round ends (28)
Rd 5: *sc in next 3 sts, Inc, repeat from * till round ends (35)
Rd 6: sc around (35)
Rd 7: *sc in next 4 sts, Inc, repeat from * till round ends (42)
Rd 8 – 10: sc around (42)
-Leave a tail for assembling later, cast off
Use white lace yarn & 0.85mm crochet hook,
Work in crochet rounds,
Rd 1: Magic Ring, sl st (7)
Rd 2: ch 1, 2sc in same st, 2sc in each st around, sl st (14)
-Leave a tail for sewing onto the face later, cast off
-Pin the plastic eyes into the loop of the middle part of the eyes and set them aside for later use
Start with dirty pink yarn & 3.5mm crochet hook,
Rd 1: Magic Ring (7)
Rd 2: 2sc in each st around (14)
Rd 3: *sc, Inc, repeat from * till round ends (21)
Rd 4: sc around (21)
Rd 5: *sc in next 2 sts, Inc, repeat from * till round ends (28)
Rd 6: sc around (28)
-Change yarn color from dirty pink to pink
-Leave a tail of dirty pink yarn for assembling later then cast off
Rd 7: sc around (28)
Rd 8: *sc in next 2 sts, Dec, repeat from * till round ends (21)
Rd 9: *sc in next st, Dec, repeat from * till round ends (14)
Rd 10: Dec till round ends (7)
-Cast off & weave in ends
Assemble all parts together.
For the ears,
Pink yarn is facing outward (facing you and turn 45 degree outward) and remember to leave enough space between the eras for Yu-Bird;
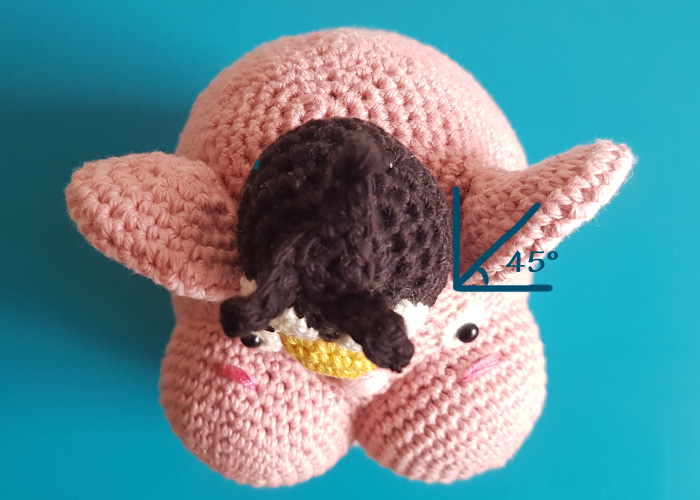 For the cheeks,
Begin with sewing 2/3 of the cheek onto the left/right hand side of the face, then filling up with polyester filling;
Use light pink embroidery thread sew a nose onto the face between the cheeks and shape pink thread to sew the blushes onto the cheeks.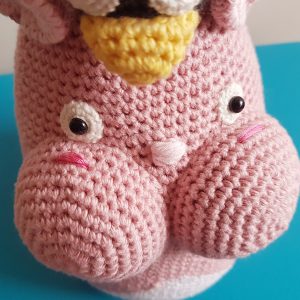
 Head & Body
Use black yarn with 3.5mm crochet hook,
Rd 1: Magic Ring (7)
Rd 2: 2sc in each st around (14)
Rd 3: *sc in next st, Inc, repeat from * till round ends (21)
Rd 4: sc around (21)
Rd 5: *sc in next 2 sts, Inc, repeat from * till round ends (28)
Rd 6 – 9: sc around (28)
Rd 10: *sc in next 2 sts, Dec, repeat from * till round ends (21)
Rd 11: *sc in next st, Dec, repeat from * till round ends (14)
-Fill up with polyester filling
Rd 12: Dec till round ends (7)
-Cast off & weave in ends
Use black yarn with 3.5mm crochet hook,
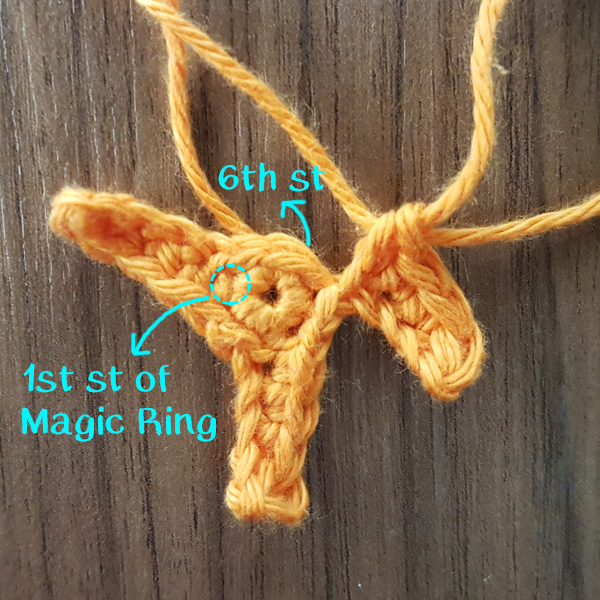
Magic Ring (6), sl st into 1st st of Magic Ring to end round,
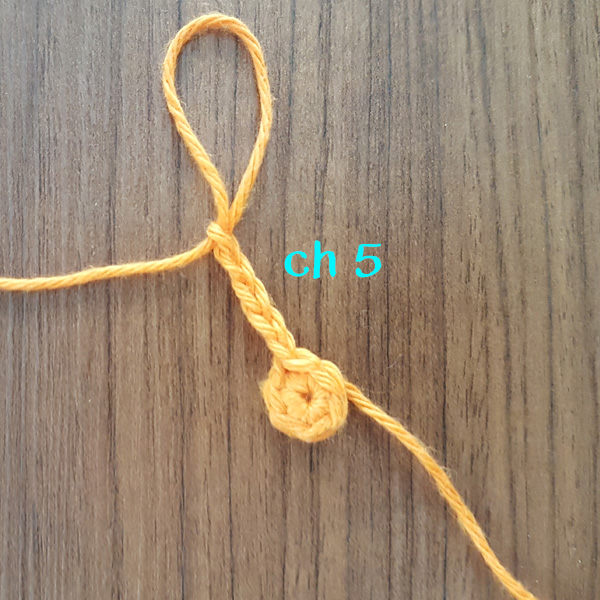
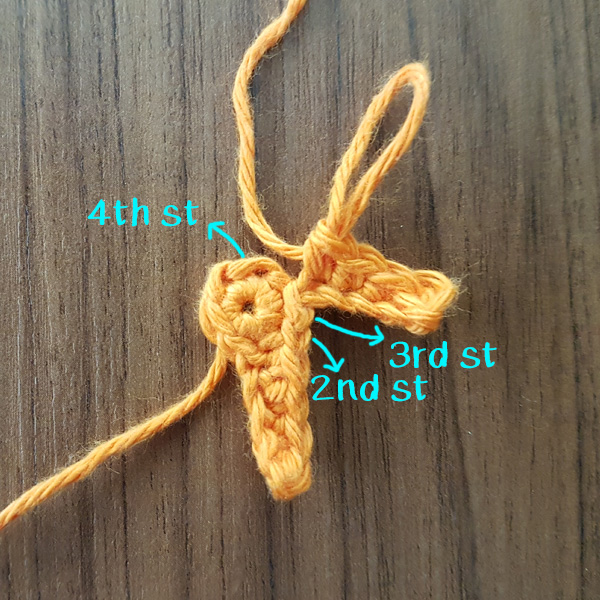
Step 1: ch 5, sc into 2nd ch from hook, sc in next 3 sts, sl st into 2nd st of magic Ring,
Step 2: sl st into next st, ch 5, sc into 2nd ch from hook, sc in next 3 sts, sl st into 4th st of Magic Ring,
Step 3: sl st into next st, ch 5, sc into 2nd ch from hook, sc in next 3 sts, sl st into 6th st of Magic Ring,
Step 4: sl st into 1st st of Magic Ring to end round
-Tie off and leave a tail

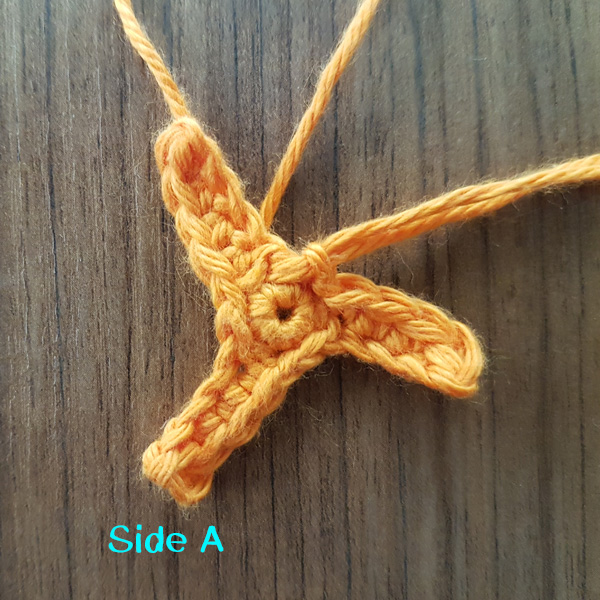
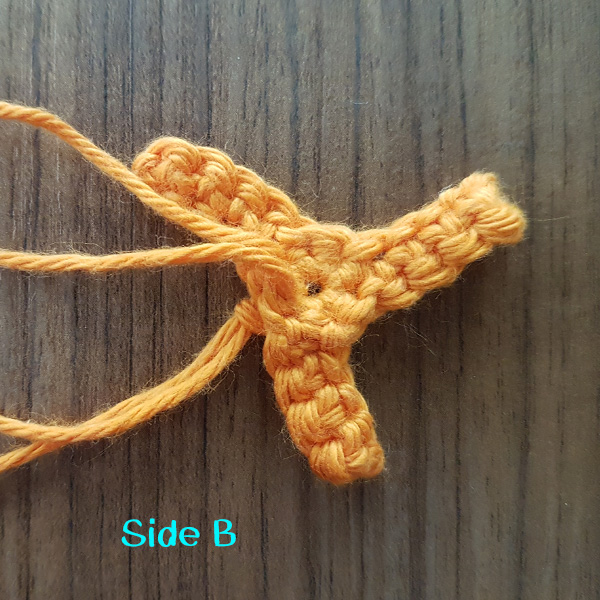
Side A facing upward, sew hair onto the top of the head of Yu-Bird
Use yellow yarn with 3.5mm crochet hook,
Rd 1: Magic Ring (6)
Rd 2: 2sc in each st around (12)
Rd 3: sc around (12)
Rd 4: *sc in next st, Inc, repeat from * till round ends (18)
-Leave a tail for assembling later and cast off
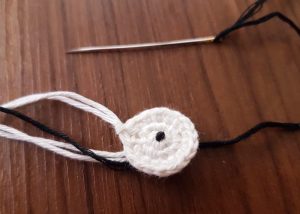
Use white lace yarn with 0.85mm lace crochet hook,
Work in crochet rounds,
Rd 1: Magic Ring, sl st (6)
Rd 2: ch 1, 2sc in same st, 2sc in each st around, sl st (12)
Rd 3: ch 1, sc in same st, Inc, *sc in next st, Inc, repeat from * till round ends, sl st (18)
-Leave a tail for assembling later and cast off
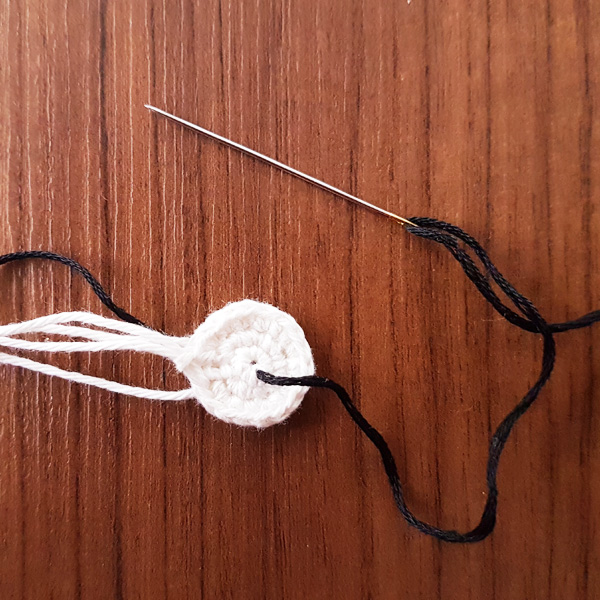
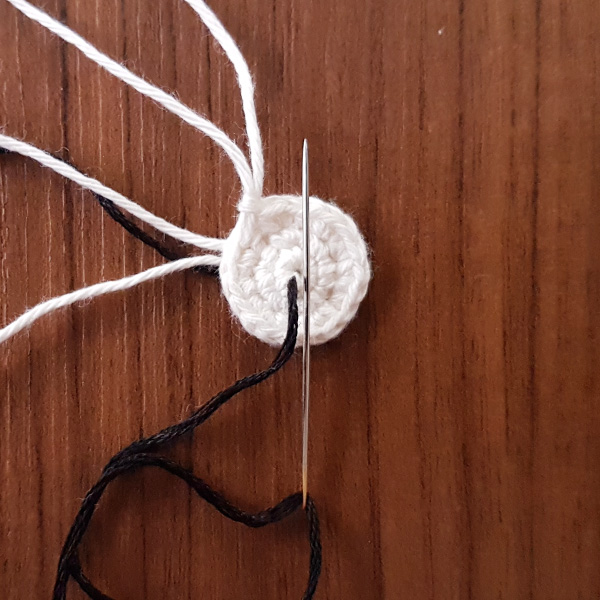
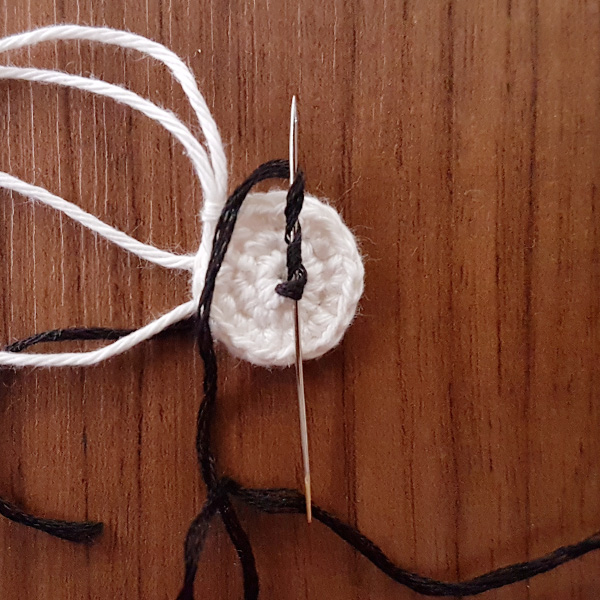
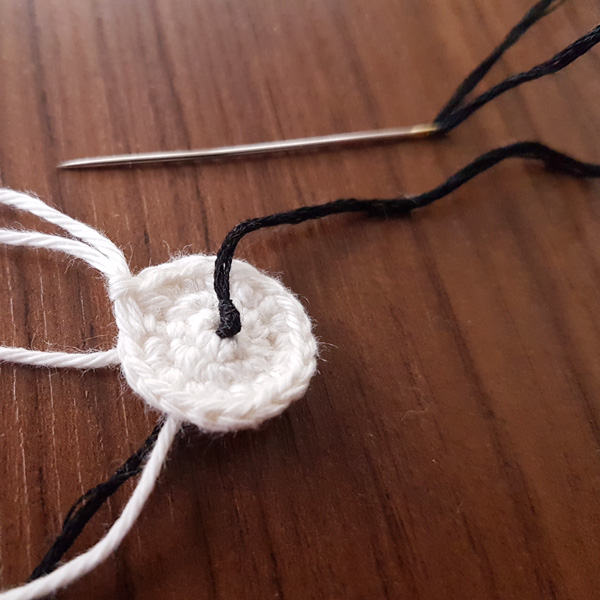
Use black embroidery thread to sew a knot stitch onto the middle part of the eye:
It’s done!
Assemble all parts together –>Fill up the beak with some polyester filling while sewing it onto the body to give it a steady appearance.
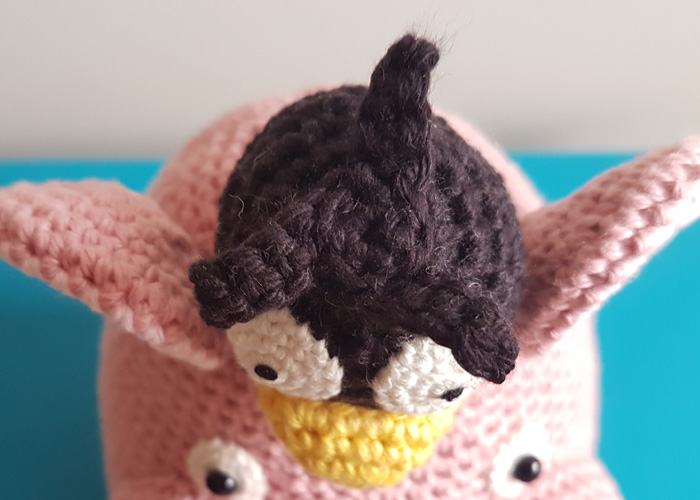
At the end, attach Yu-Bird on the top of the head of Boh between the ears.
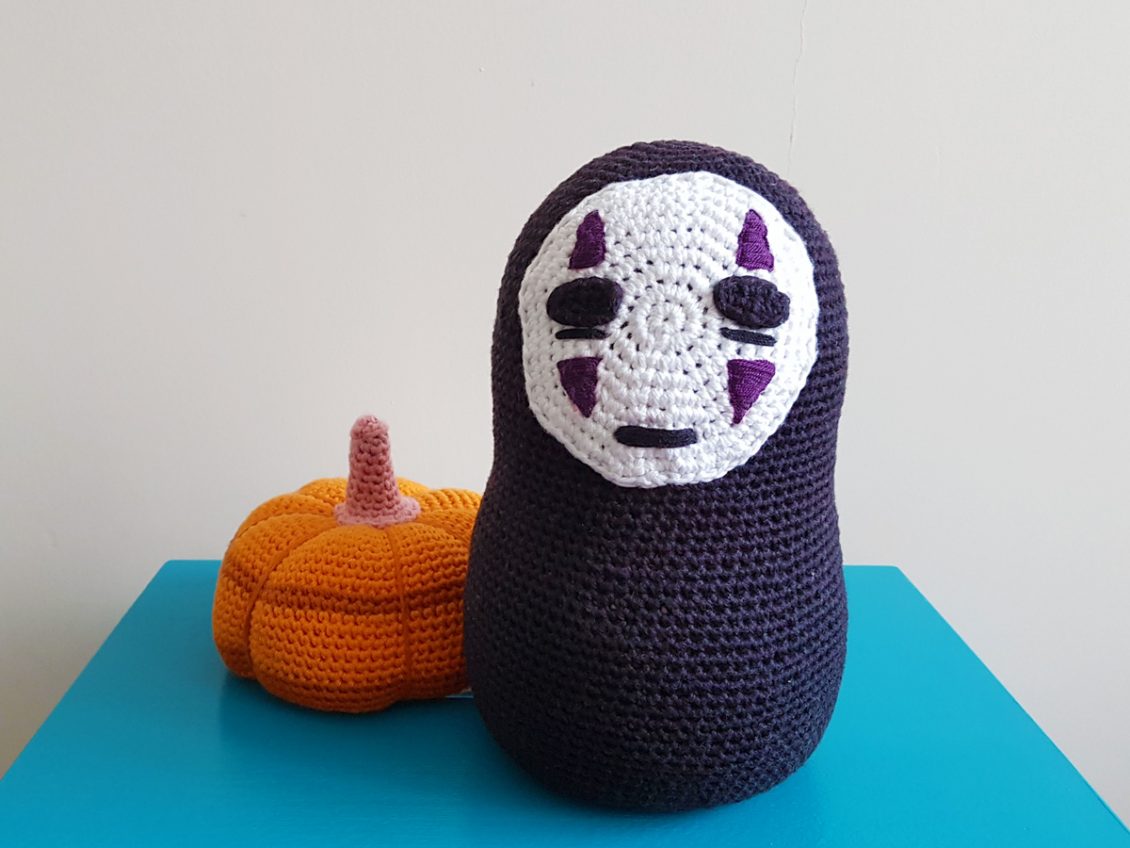
No-Face (Kaonashi) is a spirit in a famous Japanese animated film – Spirited Away, produced by Studio Ghibli.
The idea of the door stopper came up in my mind because I recently moved into a new apartment and noticed that the doors got easily slammed by the wind whenever the windows were open, causing a loud noise. I didn’t want to get any complaints from my neighbors, so I thought I better come up with a solution ASAP. And besides the slamming door problem, Halloween was approaching, it was a good time to decorate the house! Then I remembered this No-Face spirit from one of my favorite Studio Ghibli animated films (I love their animated films so much!!), Spirited Away, and I think its image is a great match for the Halloween theme. So I put these 2 ideas together and created this “No-Face Door Stopper”.
-Hooks: 3.5mm (6/0 JNP standard hook Or E4 US standard hook)
-Cotton Yarns: White & Black
– Embroidery Thread: Purple & Black
-Tapestry Needle
-Sewing Needle
-Scissors
-Stitch Marker
-Fabric Marker
-Beans or Rice (White bean is using in this project, about 1.5kg)
-This pattern is worked in both Crochet Rounds and Spiral Rounds
ch(s)= Chain(s)
st(s)= Stitch(es)
sl st= Slip Stitch
sc= Single Crochet
Inc= 2sc in next st
Dec= Join next 2 single crochet together
Use black yarn,
Rd 1: Magic Ring (7)
Rd 2: 2sc in each st around (14)
Rd 3: *sc, Inc, repeat from * till round ends (21)
Rd 4: *sc in next 2 sts, Inc, repeat from * till round ends (28)
Rd 5: *sc in next 3 sts, Inc, repeat from * till round ends (35)
Rd 6: sc around (35)
Rd 7: *sc in next 4 sts, Inc, repeat from * till round ends (42)
Rd 8: sc around (42)
Rd 9: *sc in next 5 sts, Inc, repeat from * till round ends (49)
Rd 10: sc around (49)
Rd 11: *sc in next 6 sts, Inc, repeat from * till round ends (56)
Rd 12: sc around (56)
Rd 13: *sc in next 7 sts, Inc, repeat from * till round ends (63)
Rd 14: sc around (63)
Rd 15: *sc in next 8 sts, Inc, repeat from * till round ends (70)
Rd 16– 34: sc around (70)
Rd 35: *sc in next 9 sts, Inc, repeat from * till round ends (77)
Rd 36 – 37: sc around (77)
Rd 38: *sc in next 10 sts, Inc, repeat from * till round ends (84)
Rd 39 – 55: sc around (84)
Rd 56: *sc in next 10 sts, Dec, repeat from * till round ends (77)
Rd 57: sc around (77)
Rd 58: *sc in next 9 sts, Dec, repeat from * till round ends (70)
Rd 59: *sc in next 8 sts, Dec, repeat from * till round ends (63)
Rd 60: *sc in next 7 sts, Dec, repeat from * till round ends (56)
Rd 61: *sc in next 6 sts, Dec, repeat from * till round ends (49)
Rd 62: *sc in next 5 sts, Dec, repeat from * till round ends (42)
Rd 63: *sc in next 4 sts, Dec, repeat from * till round ends (35)
-Fill up with beans or rice
Rd 64: *sc in next 3 sts, Dec, repeat from * till round ends (28)
Rd 65: *sc in next 2 sts, Dec, repeat from * till round ends (21)
Rd 66: *sc in next st, Dec, repeat from * till round ends (14)
-Fill up with more beans/rice
Rd 67: Dec till round ends (7)
-Cast off & weave in ends
Try to fill up with as much beans/ rice as possible, it will affect the shape if it is too loose.
Use white yarn,
Work in crochet rounds,
Rd 1: Magic Ring, sl st (8)
Rd 2: ch 1, 2sc in each st around, sl st (16)
Rd 3: ch 1, sc in same st, Inc, *sc in next st, Inc, repeat from * till round ends, sl st (24)
Rd 4: ch 1, sc in same st, sc in next st, Inc ,*sc in next 2sts, Inc, repeat from * till round ends, sl st (32)
Rd 5: ch 1, sc in same st, sc in next 2 sts, Inc, *sc in next 3sts, Inc, repeat from * till round ends, sl st (40)
Rd 6: ch 1, sc in same st, sc in next 3 sts, Inc,*sc in next 4sts, Inc, repeat from * till round ends, sl st (48)
Rd 7:ch 1, sc in same st, sc in next 4 sts, Inc,*sc in next 5sts, Inc, repeat from * till round ends, sl st (56)
Rd 8: ch 1, sc in same st, sc in next 5 sts, Inc,*sc in next 6sts, Inc, repeat from * till round ends, sl st (64)
Rd 9: ch 1, sc in same st, sc in next 6 sts, Inc,*sc in next 7sts, Inc, repeat from * till round ends, sl st (72)
-Leave a long tail for sewing the face onto the head
Use black yarn,
ch 5,
sc into the 2nd ch from hook, sc in next 3 chs, 3sc in next ch, sc in next 3 chs, sl st (9)
-Leave a tail, cast off
 Assemble the eyes on the face.
Use the fabric marker to mark 4 triangles, 2 above the eyes & 2 below the eyes.
Get the purple embroidery thread ready, follow the marks and embroider the triangles.
Next, use black embroidery thread to embroider the mouth and the lines below the eyes.
Last step, sew the face onto the head.
Please feel free to contact me if you have any questions about the pattern.
And it would be super nice if you can share with me your finished product of this pattern!!
Happy Crochet!!
There are two more patterns in this Spirited Away door stopper set, you can find them here: Boh & Ootori-Sama.
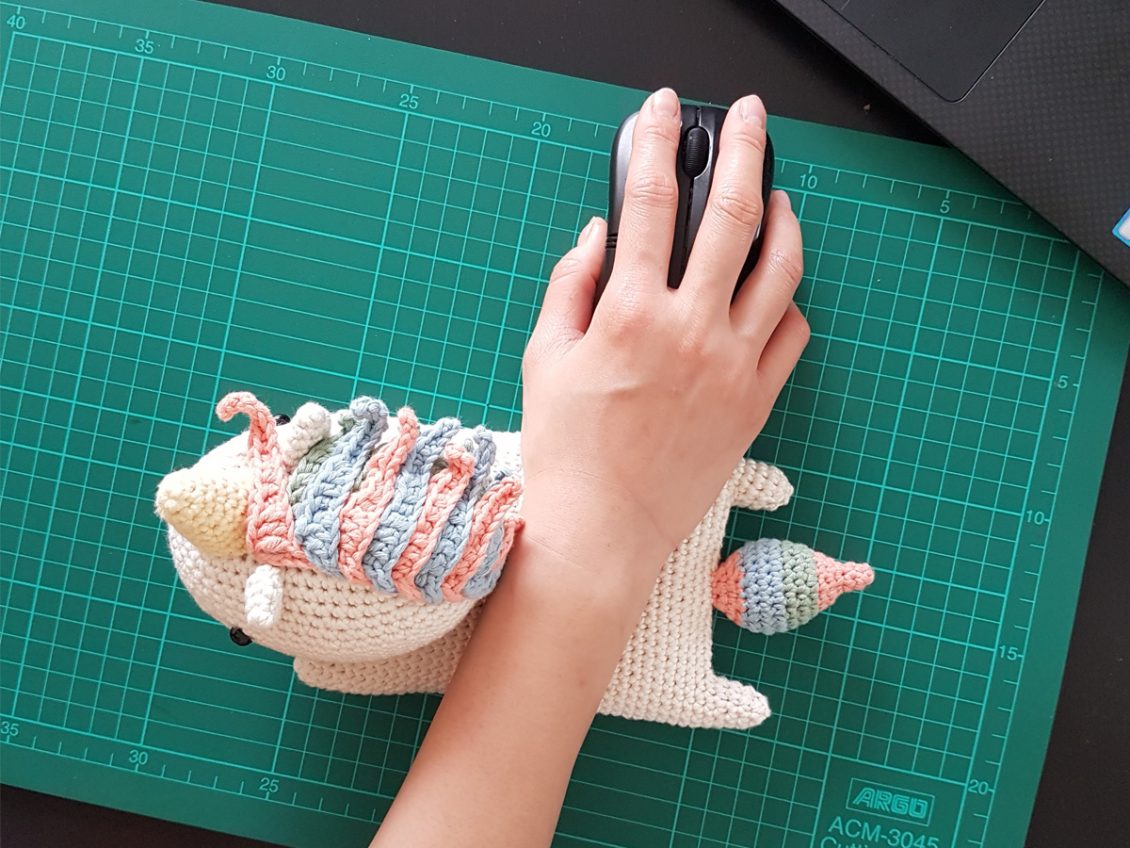
Most of us spend many hours on the computer and wrist pain can be quite common if you don’t have a way to to rest your wrist in a comfortable position. Instead of buying a generic mouse pad from the store, I decided to make my own wrist cushion. I love unicorns (who doesnt?!) so I thought it would make a cute companion to my mouse 🙂
-Hooks: 3.0mm (5/0 JNP standard hook) Or C2/D3 (US standard hook)
-Cotton Yarns (Fibra Natura Cottonwood Yarn): Cream, Janene (Light Yellow), Monica (Light Pink), Blue & Austin (Light Green)
– A pair of plastic eyes
-Polyester filling
-Tapestry Needle
-Scissors
-Stitch Marker
-This pattern is worked in Spiral Rounds
ch(s)= Chain(s)
st(s)= Stitch(es)
sl st= Slip Stitch
sc= Single Crochet
hdc= Half Double Crochet
dc= Double Crochet
tr= Treble Crochet
Dec= Join next 2 single crochet together
Use creamy color yarn,
ch 11,
[For round 1, we’re going to crochet on the both sides of the foundation chain]
Round 1: 2sc into 2nd ch from hook, sc in next 8 chs, 6sc in next ch, sc in next 8 chs, 3sc in last ch (27)
Round 1
Round 2: 2sc in each of the next 2 sts, sc in next 9sts, 2sc in each of the next 4 sts, sc in next 10 sts, 2sc in each of the next 2 sts (35)
Round 3: 2sc in each of the next 2 sts, sc in next 13sts, 2sc in each of the next 4 sts, sc in next 14 sts, 2sc in each of the next 2sts (43)
Round 4: 2sc in next st, sc in next 19 sts, 2sc in each of the next 2 sts, sc in next 20 sts, 2sc in next st (47)
Round 5: sc around (47)
Round 6: *sc in next 3 sts, 2sc in next st*, repeat ** 1 time, sc in next 7 sts, 2sc in next st, sc in next 3 sts, 2sc in next st, sc in next 6 sts, 2sc in next st, sc in next 3 sts, 2sc in next st, sc in next 8 sts, *2sc in next st, sc in next 3 sts*, repeat ** 1 time (55)
Round 7: sc around (55)
Round 8: sc in next 5 sts, 2sc in next st, sc in next 3 sts, 2sc in next st, sc in next 7 sts, 2sc in next st, sc in next 3 sts, 2sc in next st, sc in next 10 sts, 2sc in next st, sc in next 3 sts, 2sc in next st, sc in next 8 sts, 2sc in next st, sc in next 3 sts, 2sc in next st, sc in next 5 sts (63)
Round 9-16: sc around (63)
-Insert plastic eyes between Round 9 and 10, 22 sts between 2 eyes
Round 17: *sc in next 7 sts, Dec, repeat from * till round ends (56)
Round 18: sc around (56)
Round 19: *sc in next 6 sts, Dec, repeat from * till round ends (49)
Round 20: *sc in next 5 sts, Dec, repeat from * till round ends (42)
Round 21: *sc in next 4 sts, Dec, repeat from * till round ends (35)
Round 22: *sc in next 3 sts, Dec, repeat from * till round ends (28)
Round 23: *sc in next 2 sts, Dec, repeat from * till round ends (21)
-Stuff filling
Round 24: *sc, Dec, repeat from * till round ends (14)
Round 25: *Dec, repeat * till round ends (7)
-Cast off, weave in ends
Use light yellow yarn,
Round 1: Magic Ring (6)
Round 2: *sc, 2sc in next st, repeat from * till round ends (9)
Round 3: sc around (9)
Round 4: *sc in next 2 sts, 2sc in next st, repeat * till round ends (12)
Round 5-6: sc around (12)
Round 7: *sc in next 2 sts, 2sc in next st, repeat * till round ends (16)
Round 8: sc around (16)
-Leave a tail and cast off
-Assembling on the top of the head
Remain using creamy color yarn,
Start with the arms,
Arm A & B
Arm A
Round 1: Magic Ring (6)
Round 2: *sc, 2sc in next st, repeat * till round ends (9)
Round 3-4: sc around (9)
-Cast off
Arm B
The first 4 rounds are the same as Arm A but add 1 more round at the end of Arm B:
Round 1: Magic Ring (6)
Round 2: *sc, 2sc in next st, repeat * till round ends (9)
Round 3-5: sc around (9)
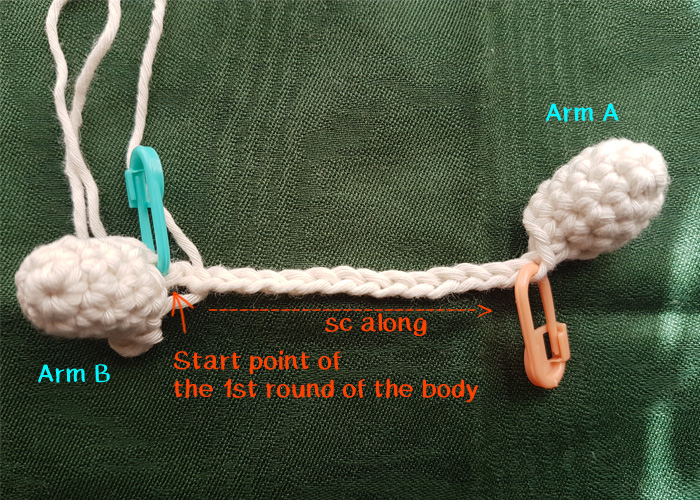
When Arm B is completed, do NOT cast off the yarn, we will continue to work on the body…
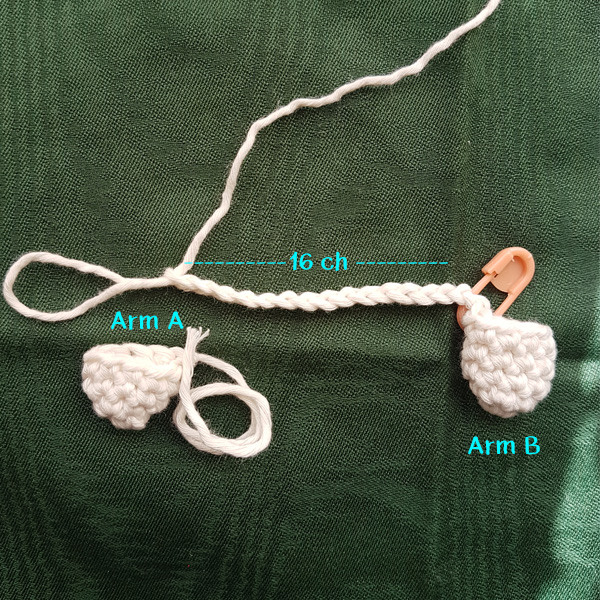

Body
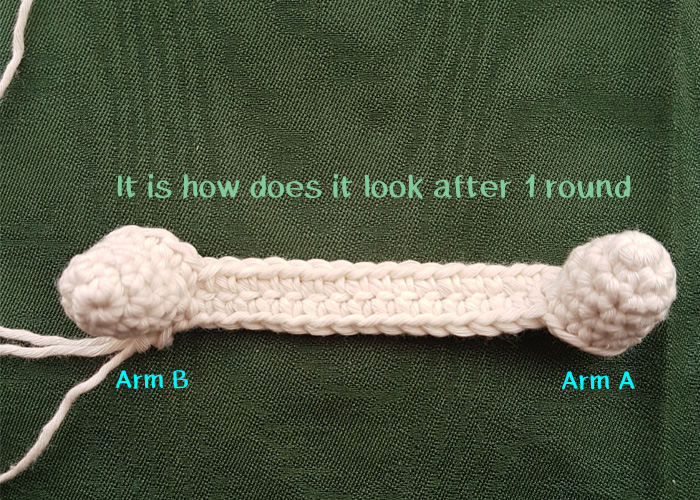
After completing the last sc of the last round of Arm B, ch 16, then bring back Arm A and crocheting 9 sc around Arm A to connect both parts together.
Now, we can start the 1st round of the body.
sc along the chain (16 sc) & the arm (2nd arm,9 sc), sc the other side of the chain (16 sc) & the arm (1st arm, 9 sc) (50)
Round 2-35: sc around (50)
You can add more rounds to make the body longer, which means to make more room for your wrist to place.
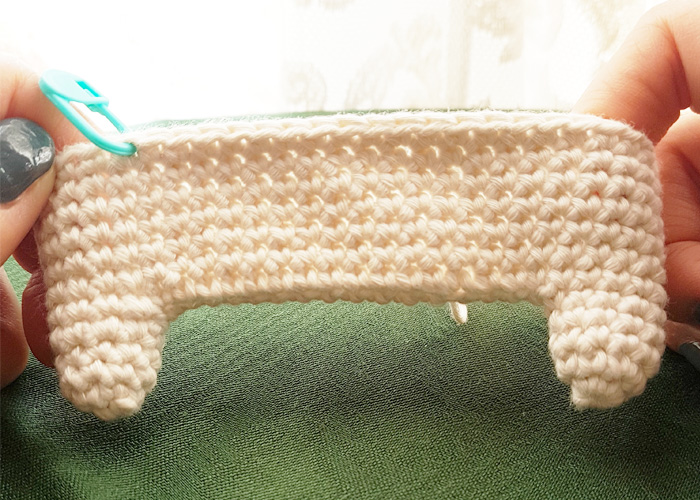
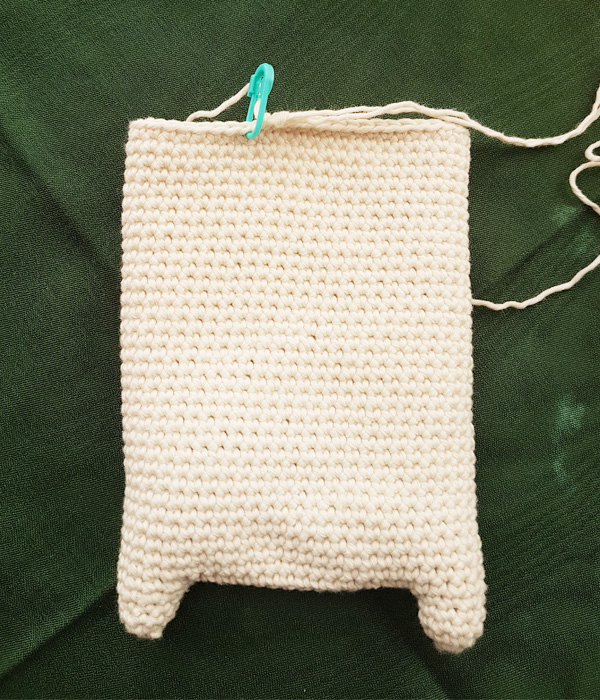

Then sc in next 9 sts, these 9 sts is the first leg.
Join the last sc of the leg into the 1st stitch of the leg, then continue the leg by crocheting 3 more 9sc rounds, then closing the leg by *sc, Dec, repeat * till round ends (6)

-Cast off, weave in ends
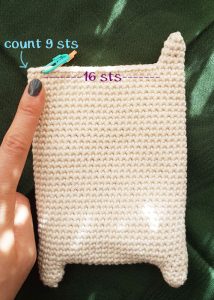
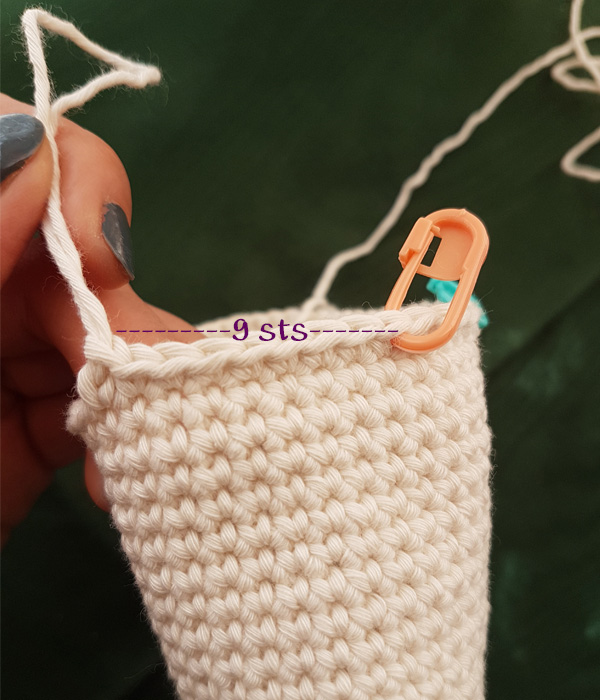
The second leg will be on the other end.
Leave 16 sts between 2 legs and count 9 sts on the other end.
Start with new yarn (same color), sc in those 9 sts.
Join the last sc of the leg into the 1st stitch of the leg, then continue crocheting 3 more 9sc rounds, then closing the leg by *sc, Dec, repeat * till round ends (6)
-Cast off
-Stuff the filling
Don’t stuff too much filling, just a thin layer which can support your wrist and make you feel comfortable.

Cut a long yarn and close the body.
Start with light pink yarn,
Round 1: Magic Ring (4)
Round 2: *sc, 2sc in next st, repeat * till round ends (6)
Round 3: sc around
Round 4: *sc, 2sc in next st, repeat * till round ends (9)
Round 5: *sc in next 2 sts, 2sc in next st, repeat * till round ends (12)
Round 6: sc around (12)
– Change yarn to light green color
Round 7: *sc in next st, 2sc in next st, repeat * till round ends (18)
Round 8-9: sc around (18)
-Change yarn to light blue color
Round 10: *sc in next 2 sts, 2sc in next st, repeat * till round ends (24)
Round 11: sc around (24)
Round 12: *sc in next 2 sts, Dec, repeat * till round ends (18)
-Change yarn to light pink color
Round 13: *sc in next st, Dec, repeat * till round ends (12)
Round 14: *Dec, repeat * till round ends (6)
-Leave a long tail and cast off
-Assembling the tail to body between the legs
3 different colors for hair, light pink, light blue and light green.
Light Green Hair
Use light green yarn,
ch 30,
sl st in the 3rd ch from hook, sc in next 3 chs, hdc in next 3 chs, dc in next 3 chs, skip next ch, sl st;
*skip next ch, sl st, ch 12, sl st in the 3rd ch from hook, sc in next 3 chs, hdc in next 3 chs, dc in next 3 chs, skip next ch, sl st in next ch, repeat * till the end of the chain.
-Leave a long tail and cast off
Light Pink & Blue Hair
Same pattern instruction for light pink and blue hair but except light blue hair has to do 4 extra chains,
Use light pink/blue yarn,
ch 28/ ch 32,
sl st in the 3rd ch from hook, sc in next 3 chs, hdc in next 2 chs, dc in next 2 chs, skip next ch, sl st, skip next ch, sl st;
ch 10, sl st in the 3rd ch from hook, sc in next 3 chs, hdc in next 2 chs, dc in next 2 chs, (skip next ch, sl st) x 2
ch 12, sl st in the 3rd ch from hook, sc in next 3 chs, hdc in next 3 chs, dc in next 3 chs, (skip next ch, sl st) x 2
ch 14, sl st in the 3rd ch from hook, sc in next 3 chs, hdc in next 4 chs, dc in next 4 chs, (skip next ch, sl st) x 2
ch 16, sl st in the 3rd ch from hook, sc in next 4 chs, hdc in next 4 chs, dc in next 4 chs, skip next ch, sl st
*For light blue hair, it will have 4 chains leftover at the end.
-Leave a long tail and cast off
-Assembling the hairs
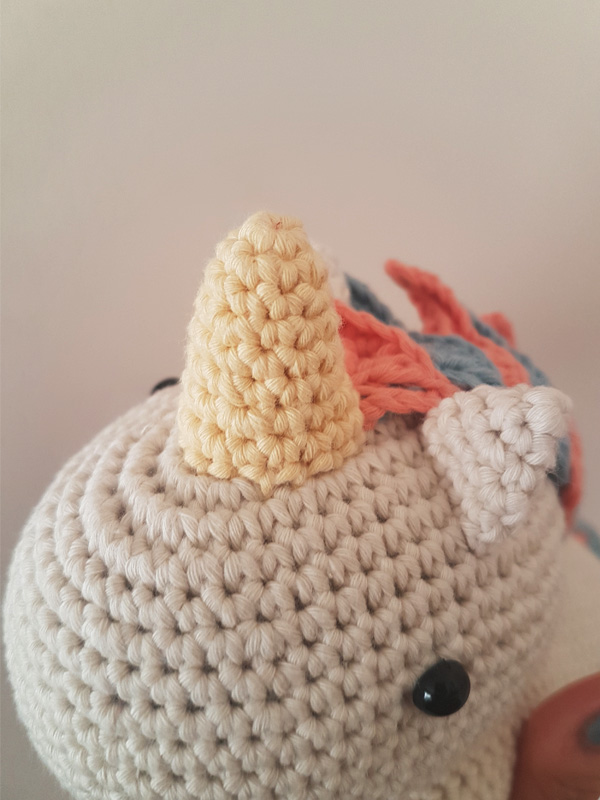
1, Sew light green hair on the head, behind the horn
2, Put the light pink hair on the top of the light blue hair
3, Hold the longest pink hair and bring the blue hair from the bottom to the top, like making hair braid,
4, Then, bring the pink hair from the bottom to the top,
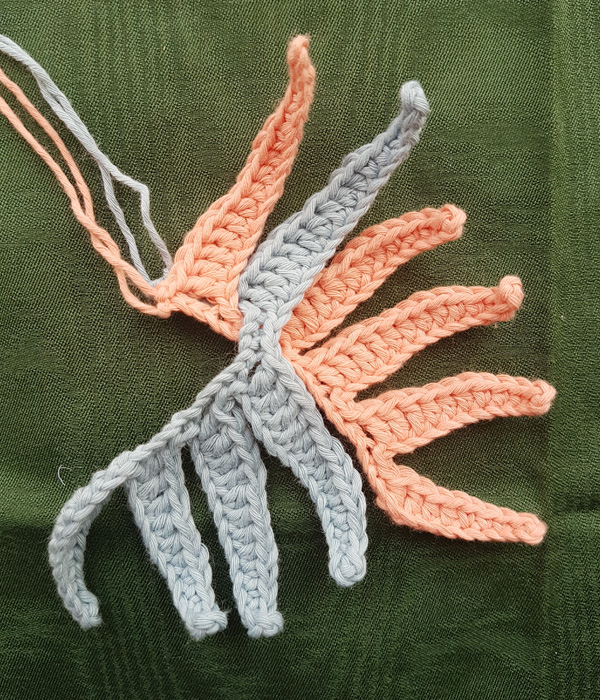

5, Alternatively bring either light pink or light blue hair from the bottom to the top till the end,
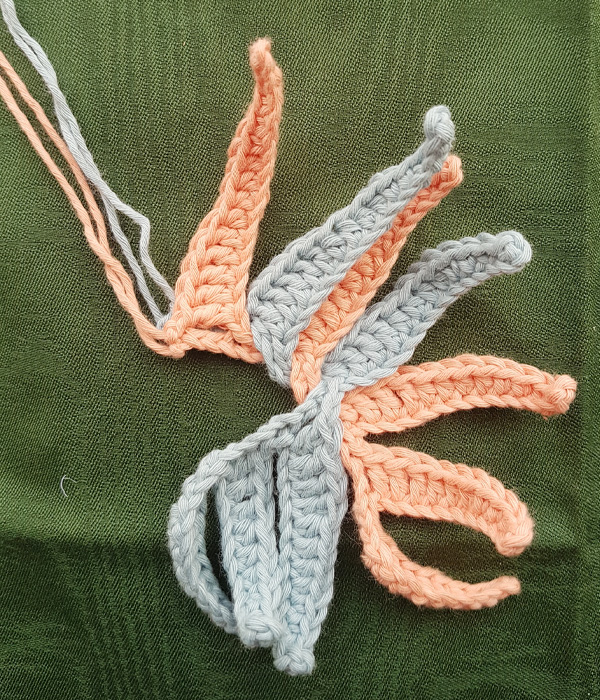
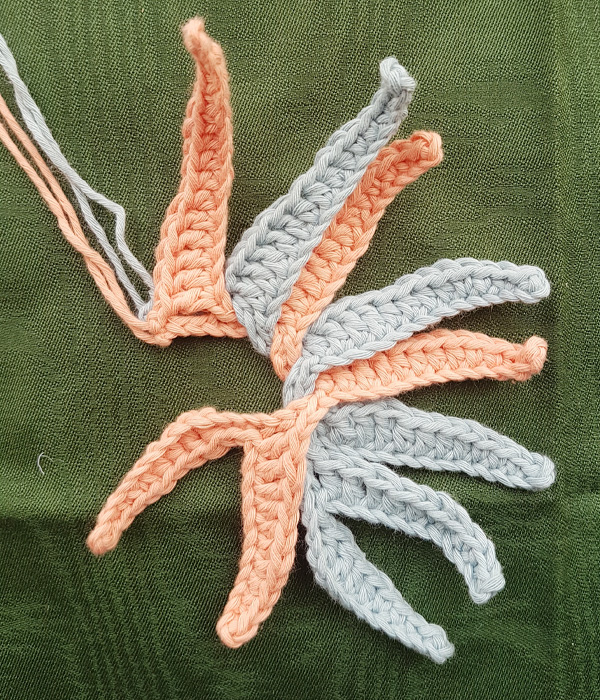

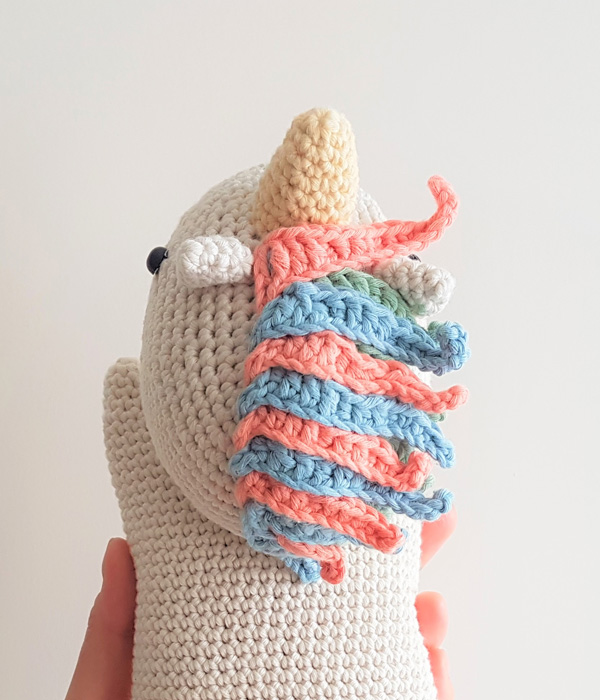
6, Attach the light pink and light blue hair braid on the top of the light green hair.
Ears (2 pieces)
Use creamy color yarn,
Round 1: Magic Ring (4)
Round 2: *sc, 2sc in next st, repeat * till round ends (6)
Round 3: *sc, 2sc in next st, repeat * till round ends (9)
Round 4-5: sc around (9)
-Leave a tail and cast off
-Assembling on the head, 2 sides behind the horn
Finally, sew 2 nostrils at the tip part of the head.
And here is your Unicorn Wrist Rest Cushion.
Notes:
-Hooks: 3.0mm (5/0 JNP standard hook) Or C2/D3 (US standard hook) & 1.0mm (Japanese lace hook 6) Or 12 steel (US steel hook)
-Cotton Yarns: Red, Creamy (Fibra Natura Cottonwood Yarn)
-Lace Cotton Yarns: Red, White & Black (Wolle Rödel Häkelgarn); Yellow, Green and Purple (Alize forever)
-Polyester filling
-Tapestry Needle and Small Size Needle
-Scissors
-Stitch Marker
-This pattern is worked in Spiral Rounds, except Ears & Head Accessory A & B
Abbreviation:
ch= Chain
st(s)= Stitch(es)
sl st= Slip Stitch
sc= Single Crochet
hdc= Half Double Crochet
dc= Double Crochet
tr= Treble Crochet
crochet round= sl st to join the first st of previous round, ch 1, sc in same st
We are using the red cotton yarn for the head with the hook 3.0mm…
Round 1: Magic Ring (7)
Round 2: 2sc in each st around (14)
Round 3: *sc, 2sc in next st, repeat from *till round ends (21)
Round 4: *sc in next 2 sts, then 2sc in next st, repeat from * till round ends (28)
Round 5: *sc in next 3 sts, then 2sc in next st, repeat from * till round ends (35)
Round 6: *sc in next 4 sts, then 2sc in next st, repeat from * till round ends (42)
Round 7: *sc in next 5 sts, then 2sc in next st, repeat from * till round ends (49)
Round 8: sc around (49)
Round 9: *sc in next 6 sts, then 2sc in next st, repeat from * till round ends (56)
Round 10: sc around (56)
Round 11: *sc in next 7 sts, then 2sc in next st, repeat from * till round ends (63)
Round 12-23: sc around (63)
Round 24: *sc in next 7 sts, then join next 2sc together, repeat from * till round ends (56)
Round 25: sc around (56)
Round 26: *sc in next 6 sts, then join the next 2sc together, repeat from * till round ends (49)
Round 27: sc around (49)
Round 28: *sc in next 5 sts, then join the next 2sc together, repeat from * till round ends (42)
Round 29: *sc in next 4 sts, then join the next 2sc together, repeat from * till round ends (35)
-Stuff the filling
Round 30: *sc in next 3 sts, then join the next 2sc together, repeat from * till round ends (28)
Round 31: *sc in next 2 sts, then join then next 2sc together, repeat from * till round ends (21)
Round 32: *sc, then join the next 2sc together, repeat from * till round ends (14)
-Stuff more filling before closing the end
Round 33: *join the next 2sc together, repeat from * till round ends (7)
-Cast off, weave in ends

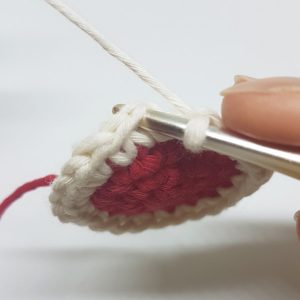
Use the red cotton yarn with 3.0mm crochet hook
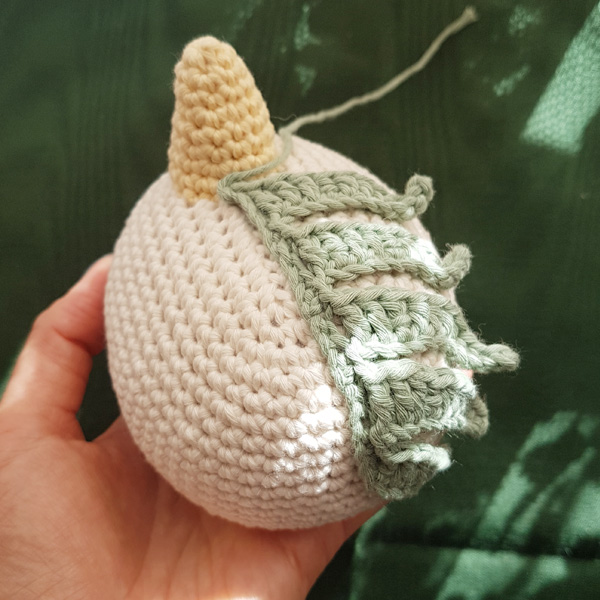
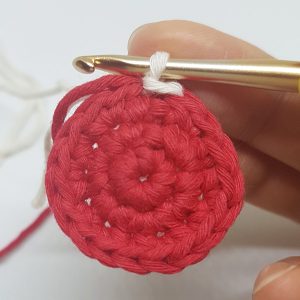
Turn the head upside down, count 10 rows from the middle of the bottom head
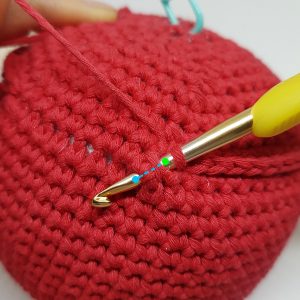
Decide the Back side of the Lion Head, then start a new round by working on the “bridge” between Round 10 and Round 11. (count from the bottom)
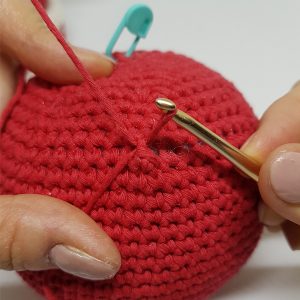
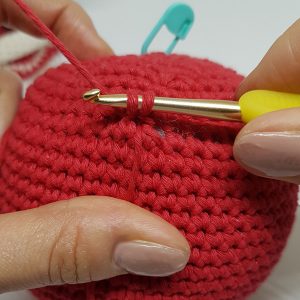
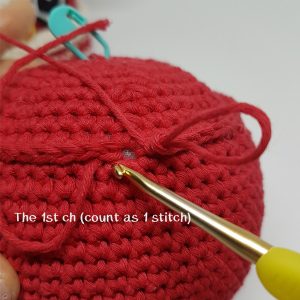
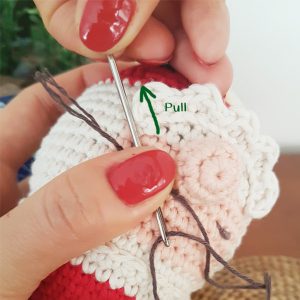
Use the same red cotton yarn as the lion head, hook goes through the holes as shown in the picture above, yarn over and pull the yarn out through the first hole, then chain 1. This chain will count as a stitch.
Chain 1

Continue sc around
Single crochet around (56)
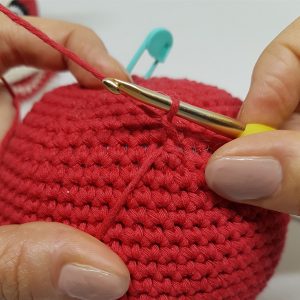
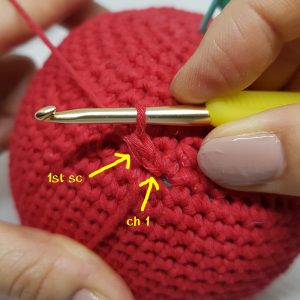
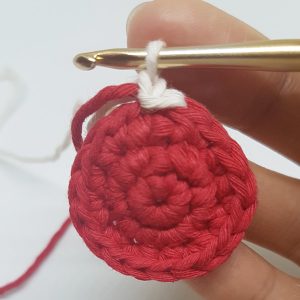
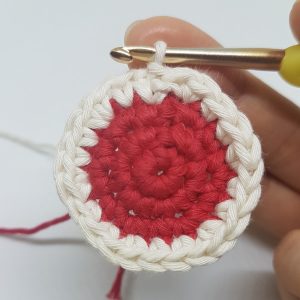
As the lion head is working in spiral rounds, we have to do some adjustment so that the beginning and the end are aligned.
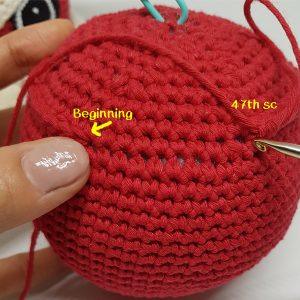
I did the adjustment at the 47th sc. You can see the picture below, the beginning stitch is 1 row below.
The beginning stitch is 1 row below
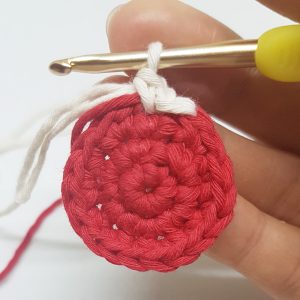
So, instead of continuing sc on the same row, we have to switch it to 1 row below. You can see the left hand side picture, instead of following the green line to make another sc, we follow the blue line.
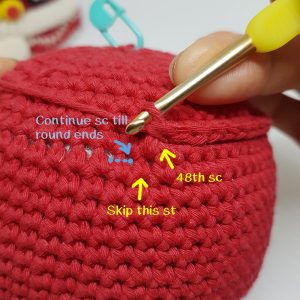
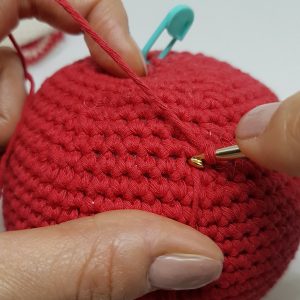
The 48th sc
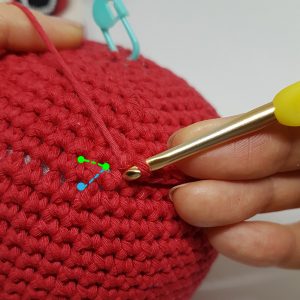
Skip the closest bridge after the 48th sc, sc into the next bridge (the blue line as shown in the picture) and continue till round ends.
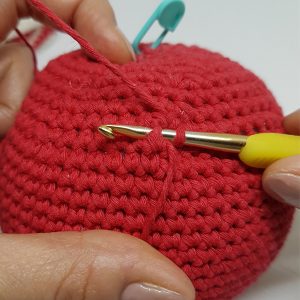
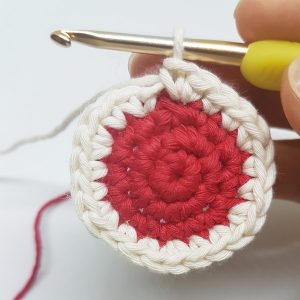
The end of the round
Round 1 of the Lion Costume is done.
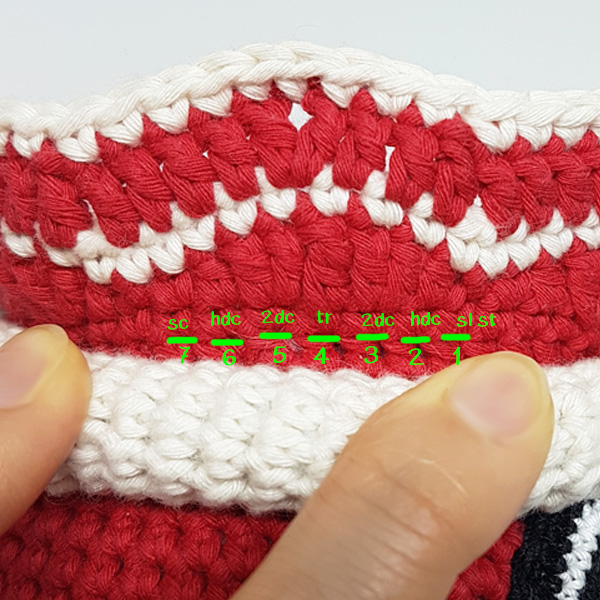
In round 2, 7 sts work as a group.
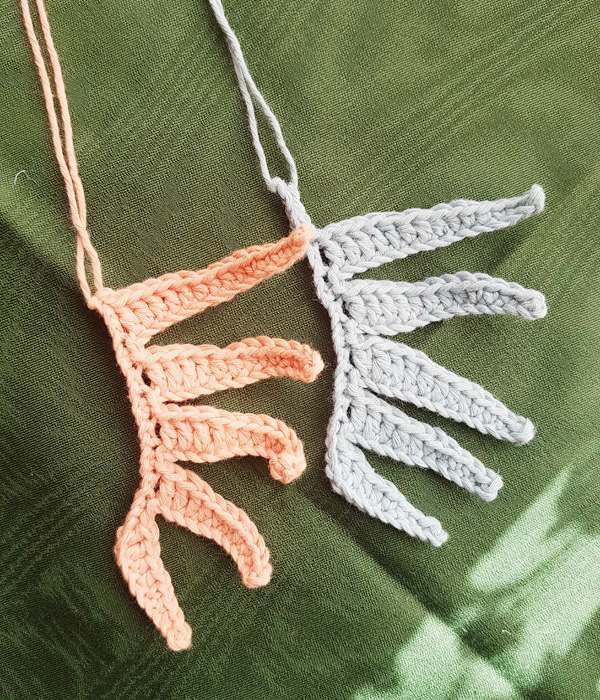
Round 2: * sl st, hdc, 2dc in next st, tr, 2dc in next st, hdc, sc * , repeat ** till round ends (8 groups)
-Change the color to creamy
Round 3: sc around (72)
-Switch the color back to red
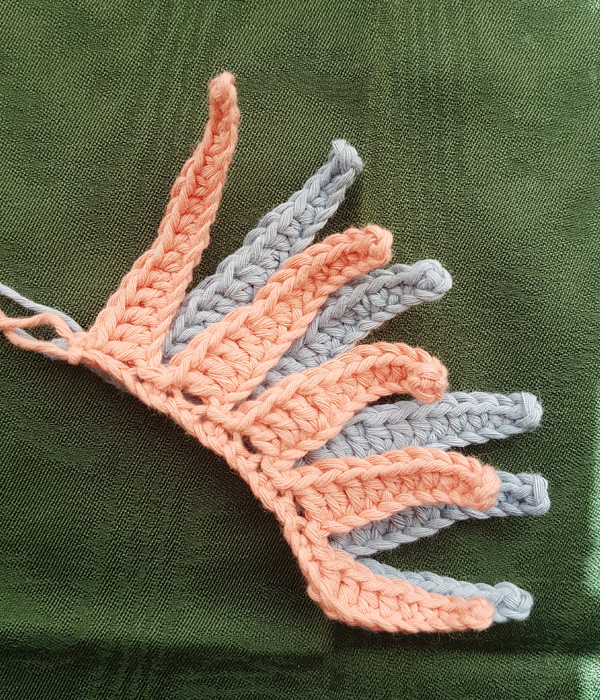
In Round 4, 9 sts work as a group.
Round 4: * skip first st, dc in next 4sts, ch 2, dc in same last st, dc in next 4sts*, repeat ** till round ends (8 groups)
-Change the color to creamy
Round 5: sc around (72) Note: skip the first st of each group & only 1 sc at the chain space in Round 4

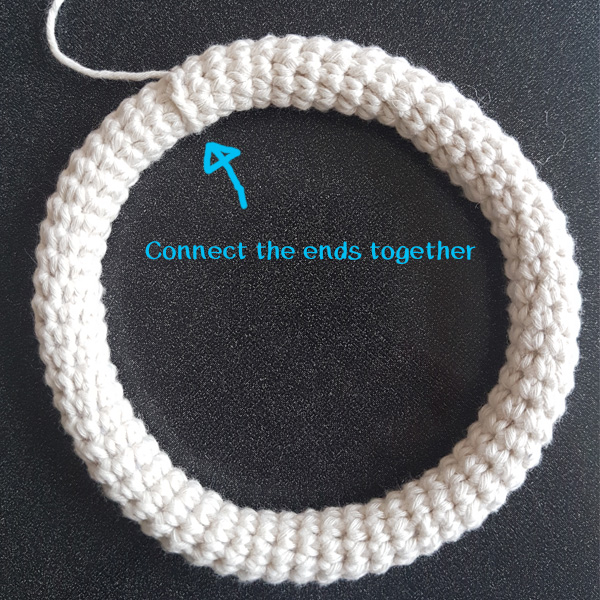
Round 1: Magic Ring (8)
Round 2-66: sc around (8)
-Leave a long tail and cast off, connect the ends together
Tip: Insert the filling every 10 or 15 rounds
We are working in rounds for ears…
Start with the red cotton yarn…
Round 1: Magic Ring (6)
Round 2: sl st to join the first st of the previous round, ch 1, 2sc into same st, 2sc in next st around (12)
Round 3: crochet round, sc into same st, 2sc in next st, *sc, 2sc in next st, repeat from * till round ends (18)
-Change the yarn from red cotton yarn to creamy cotton yarn
Round 4: crochet round, sc, 2sc in next st, *2sc, 2sc in next st, repeat from * till round ends (24)
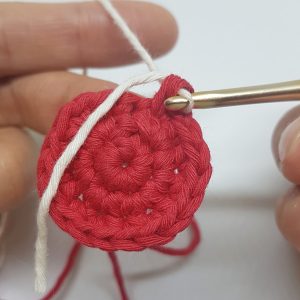
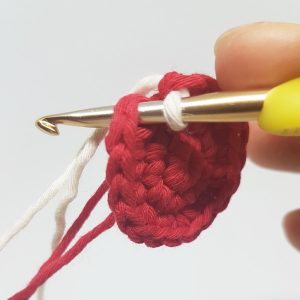
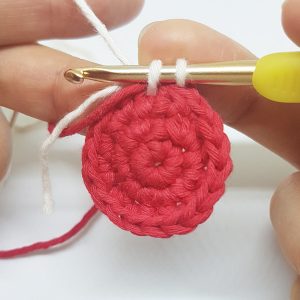
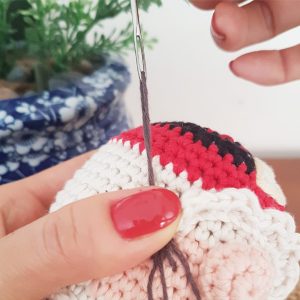
Tip for seamless color changing: change the yarn at the last st of round 3, before pulling the yarn through the loops (below pictures show you step by step)


-Cast off and leave a long tail for assembly later; Hidden and cut the rest of the yarn at the back
Note: Fold it into a half circle when assemble to the head
Use thr red lace cotton yarn with 1.0mm crochet hook
Round 1: Magic Ring (6)
Round 2: 2sc in each st around (12)
-Change the yarn to yellow lace cotton yarn
Round 3: sc around (12)
Round 4: *sc, 2sc in next st, repeat from * till round ends (18)
Round 5-6: sc around (18)
Round 7: *sc, then join the next 2sc together, repeat from * till round ends (12)
Round 8: *join the next 2sc together, repeat from * till round ends (6)
-Cast off with a long tail
Start with the black lace cotton yarn with 1.0mm crochet hook…
Round 1: Magic Ring (7)
Round 2: 2sc in each st around (14)
Round 3: *sc, 2sc in next st, repeat from * till round ends (21)
Round 4: *sc in next 2 sts , 2sc in next st, repeat from * till round ends (28)
-Change the yarn to white lace cotton yarn
Round 5: *sc in next 3 sts, 2sc in next st, repeat from * till round ends (35)
-Switch the yarn back to black lace cotton yarn
Round 6: *sc in next 4 sts, 2sc in next st, repeat from * till round ends (42)
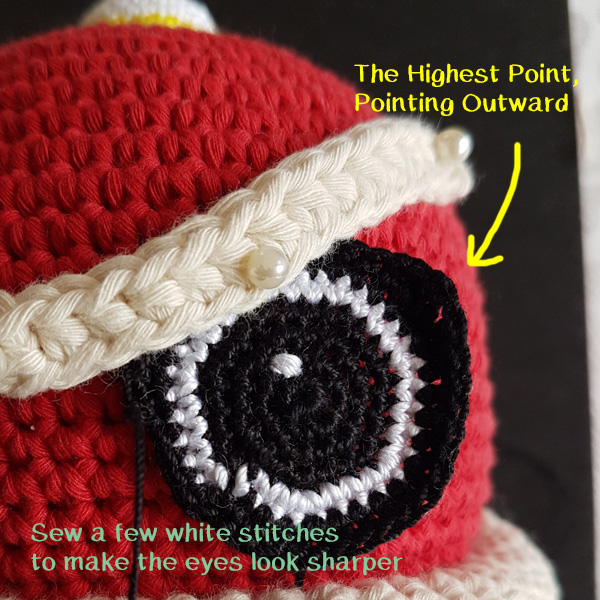
Round 7: *sc in next 15 sts, hdc, dc, tr, dc,hdc, sc in next 15 sts, sl st to end the round (35)
-Cast off with a long tail for assembly
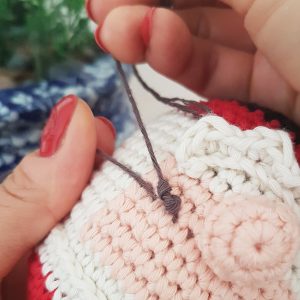
-Remember the highest point of the eye (treble crochet) will point outward as shown in the picture, sew a few white stitches close the middle of the eye accordingly
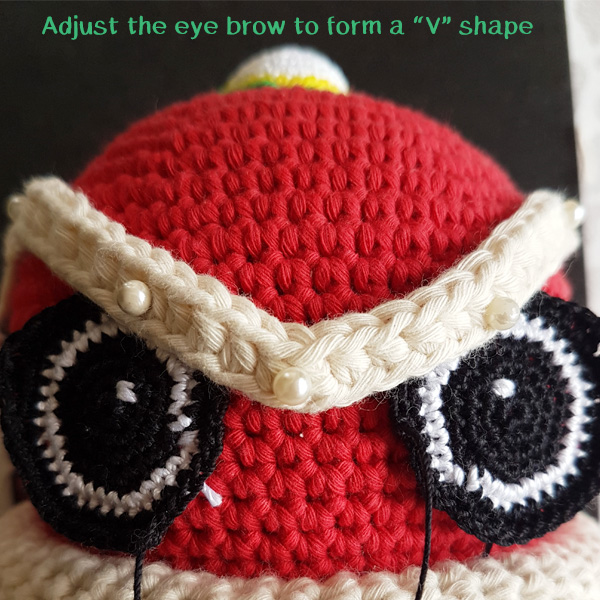
Use the creamy cotton yarn, Leave a short tail around 6/7cm at the beginning,
Row 1: ch 31
Row 2: skip the first ch, hdc in next 30 sts
-Cast off with a long long tail for assembly
Working in rounds for head accessory A…
Start with the purple lace cotton yarn with 1.0mm crochet hook…
Round 1: Magic Ring (7)
Round 2: sl st to join the first st of the previous round, ch 1, 2sc into same st, 2sc in next st around (14)
-Change the yarn to white lace cotton yarn
Round 3: crochet round, 2sc in next st, *sc, 2sc in next st, repeat from * till round ends (21)
Round 4: crochet round, sc, 2sc in next st, * sc in next 2 sts, 2sc in next st, repeat from * till round ends (28)
Round 5: crochet round, sc around (28)
-Leave a long tail and cast off
Working in rounds for head accessory B…
Start with the white lace cotton yarn with 1.0mm crochet hook…
Round 1: Magic Ring (7)
Round 2: sl st to join the first st of the previous round, ch 1, 2sc into same st, 2sc in next st around (14)
Round 3: crochet round, sc into same st, 2sc in next st, *sc, 2sc in next st, repeat from * till round ends (21)
Round 4: crochet round, sc around (21)
Round 5: crochet round, sc into same st, sc , 2sc in next st, * sc in next 2 sts, 2sc in next st, repeat from * till round ends (28)
-Change the yarn to yellow lace cotton yarn
Round 6: crochet round, sc around (28)
-Change the yarn to green lace cotton yarn and only work in the back loop
Round 7: crochet round, sc in next 2 sts, 2sc in next st, *sc in next 3 sts, 2scin next st, repeat from * till round ends (35)
Round 8: *sc, hdc, 2dc in next st, hdc, sl st, repeat from * till round ends (a flower shape)
Make a PomPom and trim it patiently to form a mustache like shape.
The last step is to assemble all together.
For the lace cotton yarn, it is better to use small size of needle instead of tapestry needle.
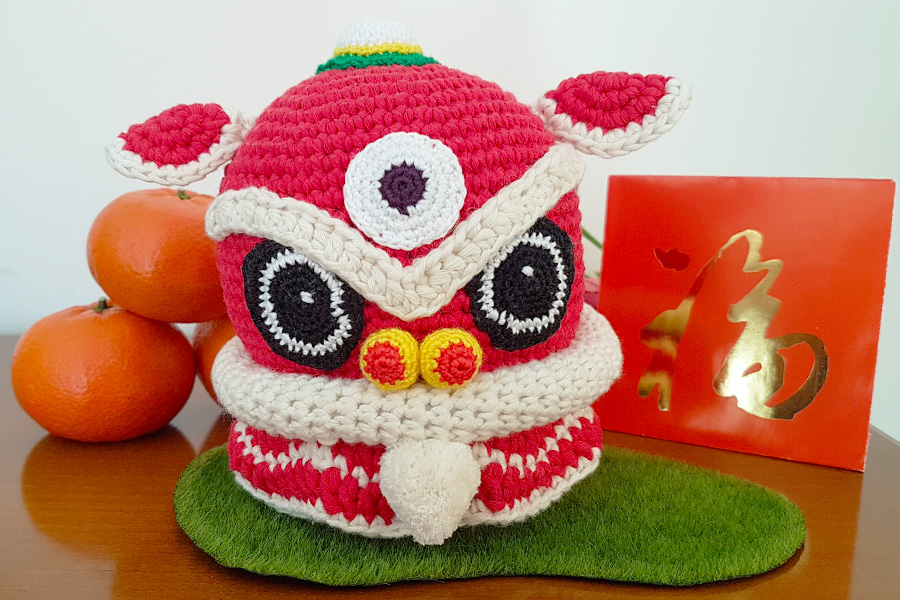
I hope you enjoy this pattern and feel free to share your lion head with me 🙂
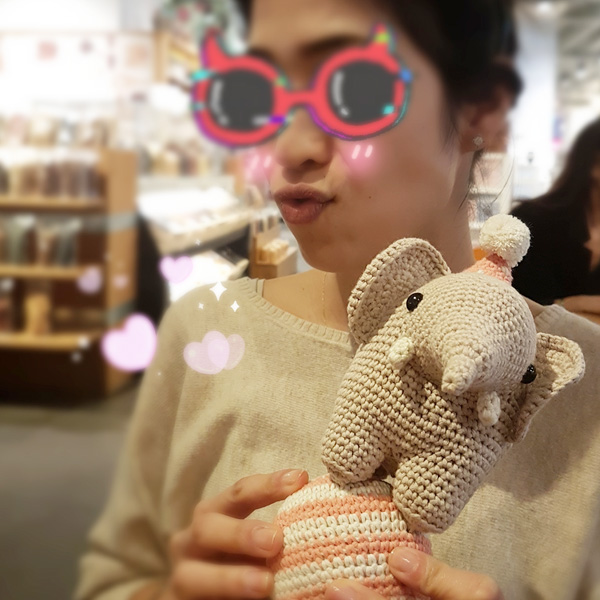
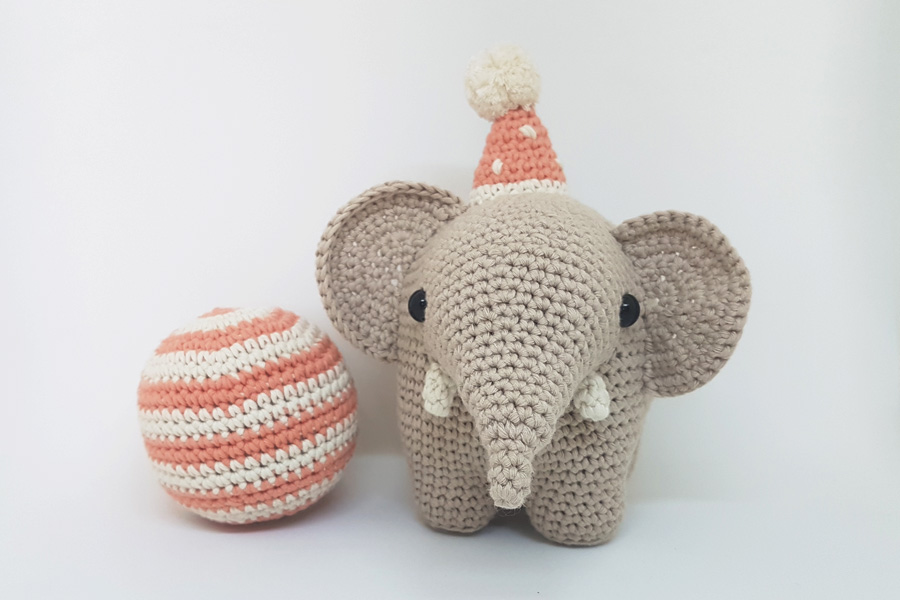
The last month of 2017, I was out of town for almost the whole December and came back to Istanbul just before the New Year Eve. I was missing crochet so so much and was so excited to pick up my crochet hook again! So the first day of 2018, I decided to crochet something and I found this adorable {Gustav, the balancing elephant}, Free Pattern designed by {Amour Fou}. This was a gift to my friend who I have promised to crochet an elephant for her since last year. (just a month ago😝)
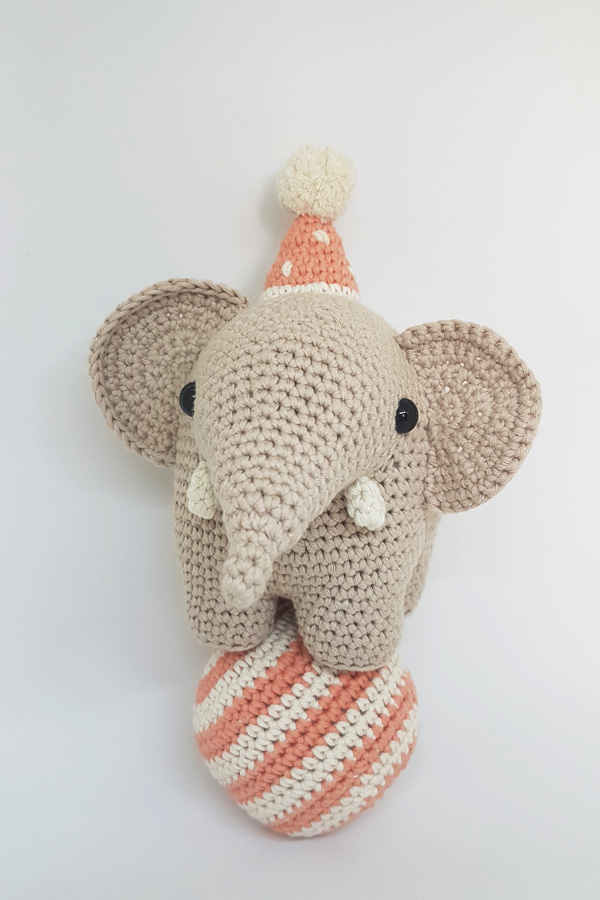
I found this pattern by {Amour Fou} is easy to follow, but I think I have made a mistake of positioning the nose. The tip part of the nose should be facing up, but I didn’t pay attention to that when I assembled it with the body, therefore, the front head is a bit bumped. Nonetheless, seemed that little part didn’t lose the cuteness of Gustav, it still looks so adorable and lovely and my friend loves it so much!! (She gave him a big kisssss xx)
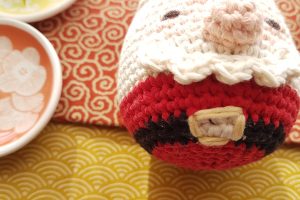
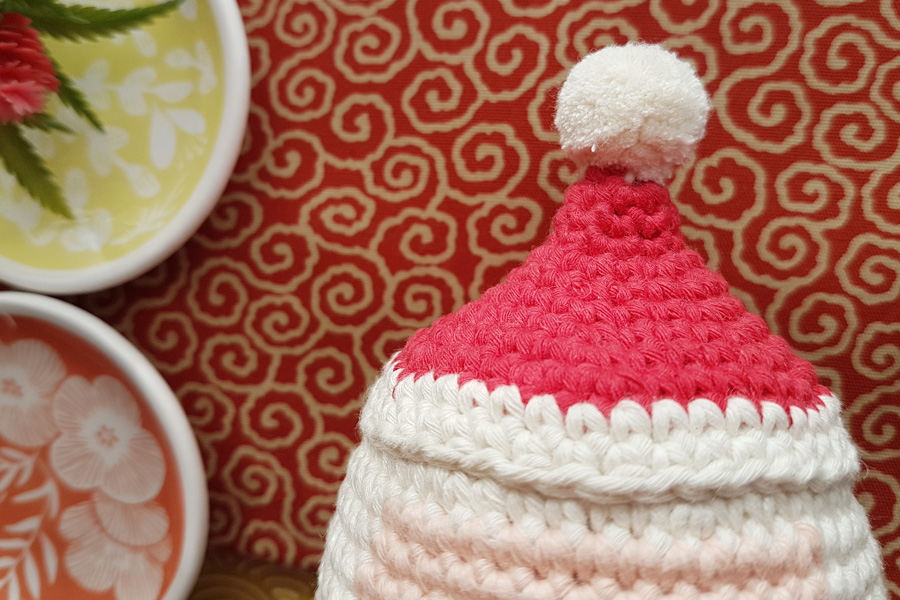
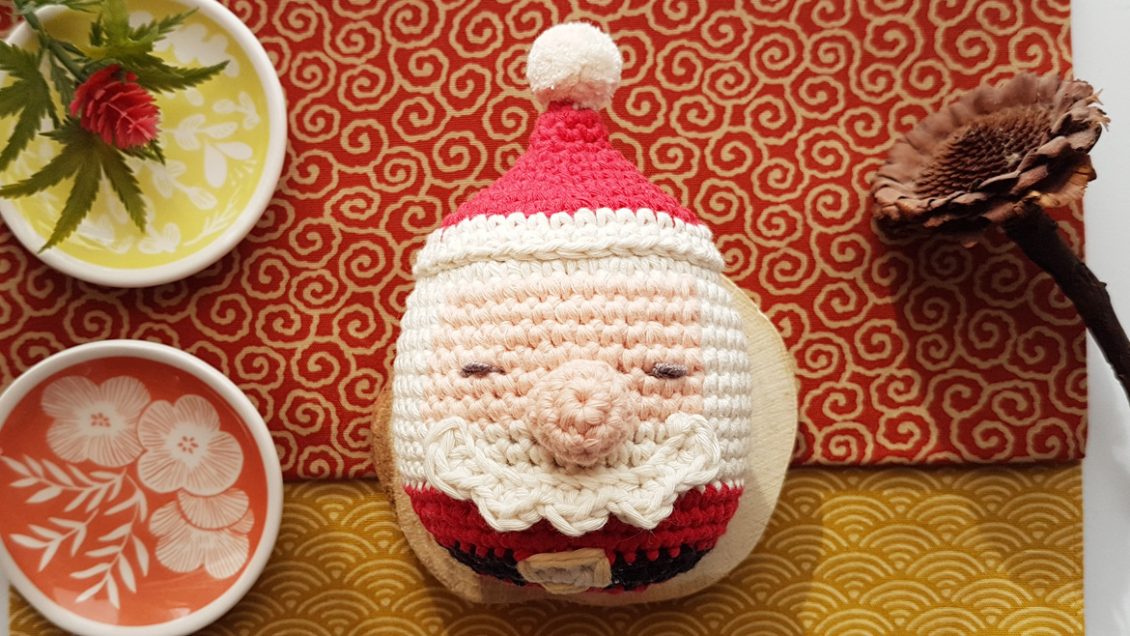
Looking for more X’mas ornaments to decorate your Christmas tree? This chubby Santa Clause is easy and fast to make.
Notes:
-Hook: 3.0mm (5/0 JNP standard hook) Or C2/D3 (US standard hook)
-Cotton yarn: Red, Creamy, Yellow, Black, Dark Brown (Fibra Natura Cottonwood Yarn was used in this project)
-Polyester filling
-Tapestry Needle
-Scissors
-Stitch Marker
-This pattern is worked in Spiral Rounds, except nose and hat
Abbreviation:
ch= Chain
st(s)= Stitch(es)
sl st= Slip Stitch
sc= Single Crochet
hdc= Half Double Crochet
dc= Double Crochet
crochet round= sl st into the first st of previous round, ch 1, sc in same st
Starting with the creamy color yarn…
Round 1: Magic Ring (7)
Round 2: 2sc in each st around (14)
Round 3: *sc, 2sc in next stitch, repeat from *till round ends (21)
Round 4: *sc in next 2 sts, then 2sc in next st, repeat from * till round ends (28)
Round 5: *sc in next 3 sts, then 2sc in next st, repeat from *till round ends (35)
Round 6: *sc in next 4 sts, then 2sc in next st, repeat from *till round ends (42)
Round 7: sc around (42)
Round 8: *sc in next 5 sts, then 2sc in next st, repeat from *till round ends (49)
-Get ready the skin color yarn for the next round**
**For color change, you have to work at the stitch before the color change. If you are working on the single crochet, before finishing up the last stitch by yarn over the same color of yarn and pull through the 2 loops on the hook, you change the yarn into a new color and yarn over it and pull through the 2 loops on the hook as normal, then slip stitch in next stitch and continue the pattern.
Round 9-14: sc in next 18 sts with creamy color, change color from creamy to skin, sc in next 13 sts with skin color, change color from skin to creamy, sc in next 18 sts with creamy color (49)
Round 15-16: sc around with creamy color (49)
-Get ready the red color yarn for the Santa Clause Costume
Round 17: sc around with red color (49)
Round 18: Continue with red color, *sc in next 5 sts, then join next 2sc together, repeat from *till round ends (42)
Round 19: sc around with red color (42)
-Change the yarn to black color
Round 20: *sc in next 4 sts, then join next 2sc together, repeat from *2 times, sc in next 3 sts, then change color from black to creamy, sc in next st, then join next 2sc together, sc in next st, change color from creamy to black, sc in next 3 sts, then join next 2sc together, **sc in next 4 sts, then join next 2sc together, repeat from ** 1 time (35)
Round 21: sc in next 18 with black yarn, then change color to creamy, sc in next 3 sts, change color back to black, sc in next 14 sts (35)
-Change the yarn to red color
Round 22: *sc in next 3 sts, then join next 2sc together, repeat from *till round ends (28)
-Insert the filling
Round 23: *sc in next 2 sts, then join next 2sc together, repeat from *till round ends (21)
Round 23: *sc, then join next 2sc together, repeat from *till round ends (14)
Round 24: *join next 2sc together, repeat from *till round ends (7)
-Cast off, weave in ends
– For the belt, use the yellow yarn to sew around the edges of the white rectangle in the middle
(Work in crochet rounds)
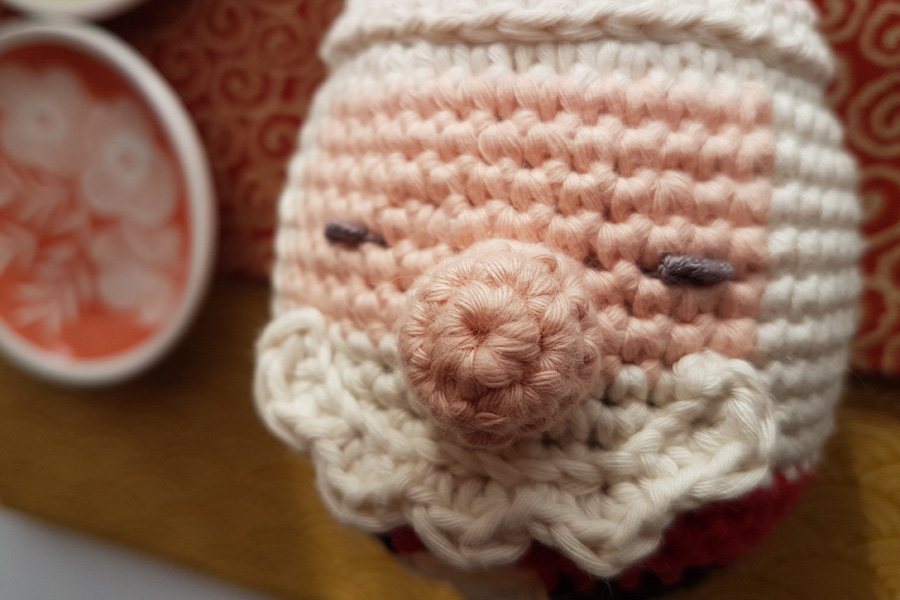
Using skin color yarn for the nose…
Round 1: Magic Ring (6)
Round 2: crochet round, 2sc in next st, *sc, 2sc in next st, repeat from *till round ends (12)
Round 3: crochet round, sc around (12)
-Cast off, leave a long tail for joining
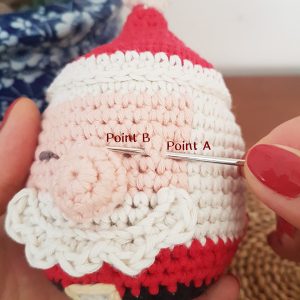
*While attaching the nose on the face, remember to add some filling to the nose to keep it firm.
(work in crochet rounds)
Starting with the red color yarn…
Round 1: Magic Ring (6)
Round 2: crochet round, 2sc in next st, *sc, 2sc in next st, repeat from *till round ends (9)
Round 3: crochet round, sc around (9)
Round 4: crochet round, sc, 2sc in next st, *sc in next 2 sts, 2sc in next st, repeat from *till round ends (12)
Round 5: crochet round, 2sc in next st, *sc, 2sc in next st, repeat from *till round ends (18)
Round 6: crochet round, sc around (18)
Round 7: crochet round, sc, 2sc in next st, *sc in next 2 sts, 2sc in next st, repeat from *till round ends (24)
Round 8: crochet round, sc in next 2 sts, 2sc in next st, *sc in next 3 sts, 2sc in next st, repeat from *till round ends (30)
Round 9: crochet round, sc in next 3 sts, 2sc in next st, *sc in next 4 sts, 2sc in next st, repeat from *till round ends (36)
Round 10: crochet round, sc in next 4 sts, 2sc in next st, *sc in next 5 sts, 2sc in next st, repeat from *till round ends (42)
-Change the yarn color to creamy
Round 11- 12: crochet round, sc around (42)
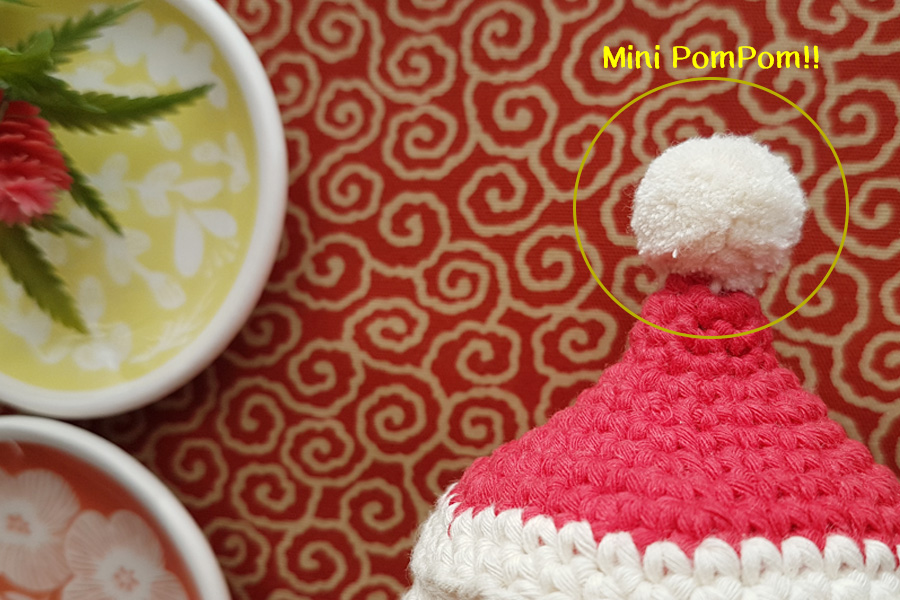
The last step to finish the hat is to make a mini pompom on the top of the hat. It is easy to make, what you need are a fork and a pair of scissors. I followed the link Here which is by Red Ted Art to make my mini pompom.
After you have made your mini pompom, just use the same color of yarn and assembly it on the tip of the hat.
-Attach the hat to the head
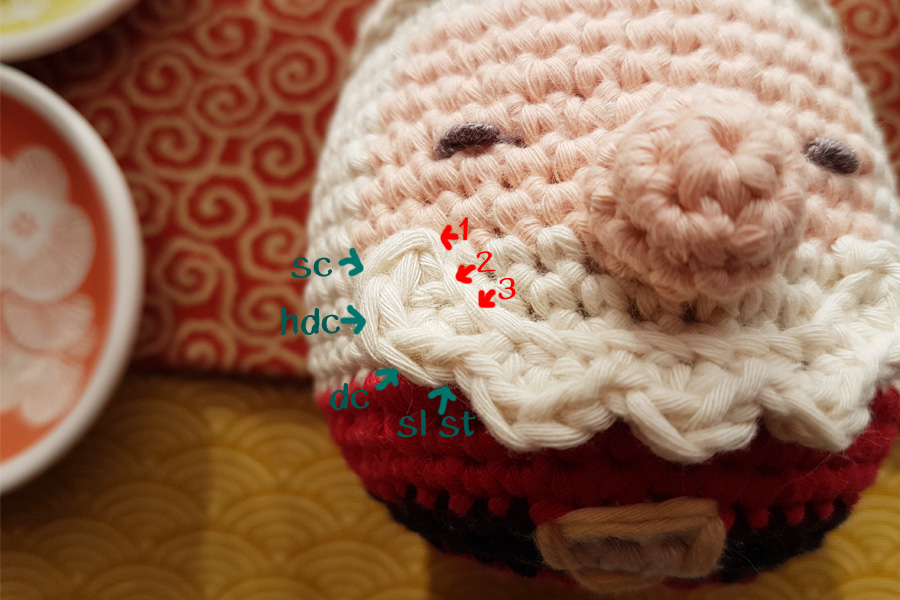
Step 1: ch 16
Step 2: Start at the second ch and work 3 chs as a group
Step 3: sc in first ch, hdc & dc in second ch, sl st in third ch
Step 4: Repeat Step 3 till the end
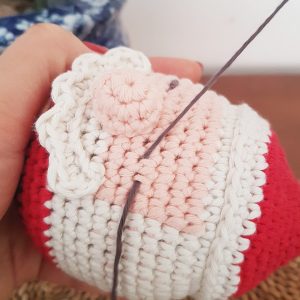
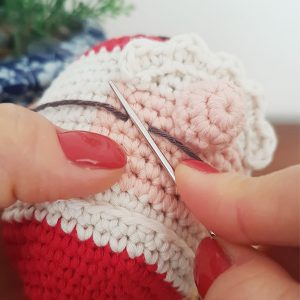
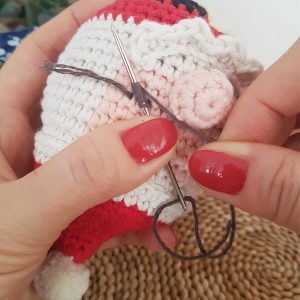
Step 5: Cast off, leave a long tail and sew the beard under the nose shown as the picture
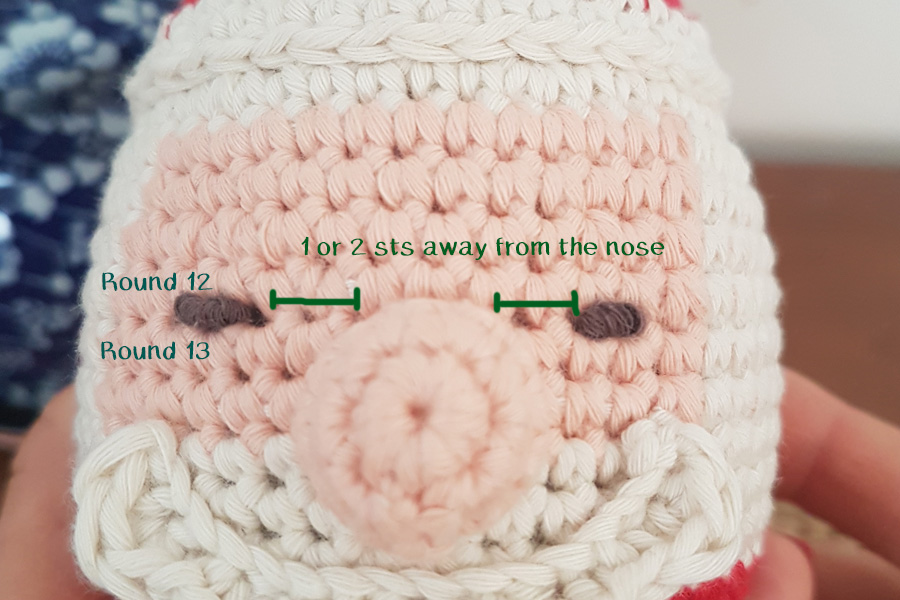
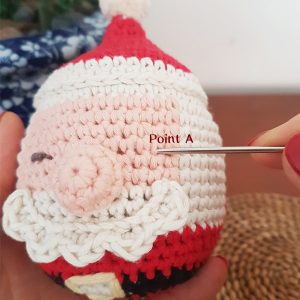
Work between round 12 & 13, 1 or 2 sts away from the nose
Step 1: Cut out a 20cm dark brown yarn and because the yarn is a bit thick, I divided it into 2 thinner yarns

Step 2: Use 1 thinner yarn, goes through the loop on the tapestry needle, leave one side shorter than the other side
Step 3:

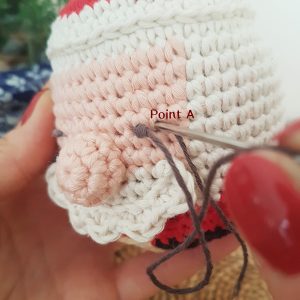
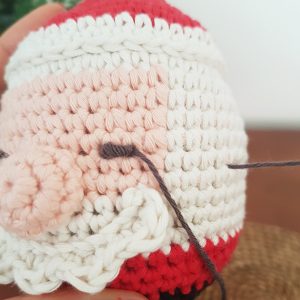
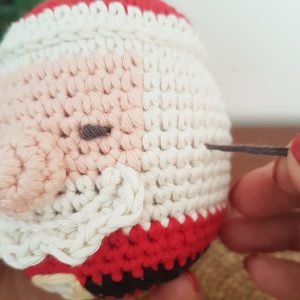
Join the short tail together, make a tight knot, cast off the tails
Now, you can attach a string close to the top of the hat and hang it up on your Christmas tree!!
Just make as many as you like and decorate all on your tree. I hope during crocheting this Santa Clause, it does bring you a lot of joys! Looking forwards to seeing your own made Xmas Santa Clause Ornament!
Please follow me for the latest crochet creations 🙂 See you next time!
P.S. I just started to write my own patterns, I know there is a lot of room for improvement, so please, if you have any questions or advice, don’t hesitate to contact me, I would love to hear from you! 🙂
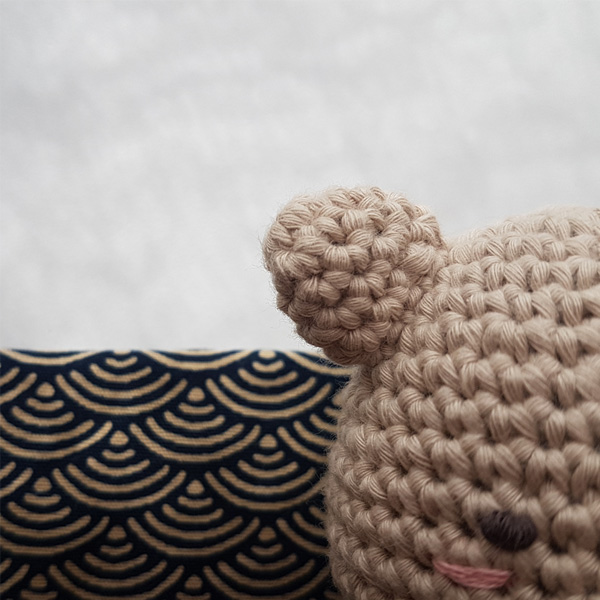
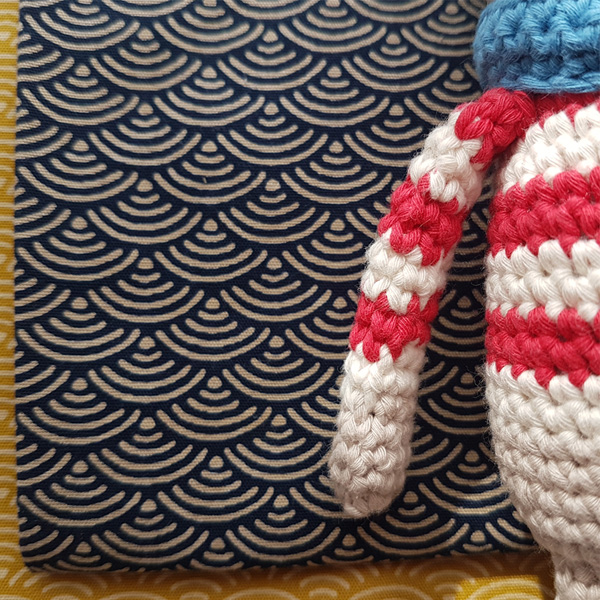
Christmas is coming soon, I guess many of you are already decorating your Christmas tree at home and also planning the Christmas gifts to your loved ones. So, how about a handmade crochet teddy bear? Teddy Jack is easy to make even you are the beginner. Here is the pattern:
-Hook: 3.0mm (5/0 JNP standard hook) Or C2/D3 (US standard hook)
-Cotton yarn (Fibra Natura Cottonwood Yarn was used in this project)
-Color: Beige, White, Red, Blue, Brown
-Polyester filling
-Tapestry Needle
-Scissors
-Stitch Marker
-Using Spiral Rounds, except the nose part
ch= Chain
st(s)= Stitch(es)
sl st= Slip Stitch
sc= Single Crochet
Round 1: Magic Ring (6)
Round 2: 2sc in each of the next st all around. (12)
Round 3: *sc, 2sc in next stitch, repeat from * till round ends (18)
Round 4: *sc in next 2 sts, then 2sc in next st, repeat from * till round ends (24)
Round 5: sc around (24)
Round 6: *sc in next 3 sts, then 2sc in next st, repeat from * till round ends (30)
Round 7: sc around (30)
Round 8: *sc in next 4 sts, then 2sc in next st, repeat from * till round ends (36)
Round 9 – 10: sc around (36)
Round 11: *sc in next 5 sts, then 2sc in next st, repeat from * till round ends (42)
Round 12 – 15: sc around (42)
-After Round 15, we start to do the decreasing to form the head shape.
Round 16: *sc in next 5 sts, then join next 2sc together, repeat from * till round ends (36)
Round 17: sc around (36)
Round 18: *sc in next 4 sts, then join next 2sc together, repeat from* till round ends (30)
Round 19: *sc in next 3 sts, then join next 2sc together, repeat from* till round ends (24)
Round 20: *sc in next 2 sts, then join next 2sc together, repeat from* till round endss (18)
Round 21: sc around the front loop (18)
Round 22: **Change color to White, sc around (18)
**For color change, you have to work at the stitch before the color change. If you are working on the single crochet, before finishing up the last stitch by yarn over the same color of yarn and pull through the 2 loops on the hook, you change the yarn into a new color and yarn over it and pull through the 2 loops on the hook as normal, then slip stitch in next stitch and continue the pattern.
Round 23: *sc in next 2 sts, then 2sc in next st, repeat from * till round ends (24)
Round 24: Change color to Red, *sc in next 3 sts, then 2sc in next st, repeat from* till round ends (30)
Round 25: sc around (Red Color) (30)
Round 26 – 27: sc around (White Color) (30)
Round 28 – 29: sc around (Red Color) (30)
-Insert the filling to the head
Round 30 – 31: sc around (White Color) (30)
Round 32 – 33: sc around (Red Color) (30)
Round 34 – 35: sc around (White Color) (30)
Round 36: Change color to Brown, sc around (30)
Round 37 – 39: sc around (30)
Round 40: *sc in next 3 sts, then join next 2sc together, repeat from* till round ends (24)
-Insert the filling to the body
Round 41: *sc in next 2 sts, then join next 2sc together, repeat from* till round ends (18)
Round 42: *sc, then join next 2sc together, repeat from* till round ends (12)
Round 43: *Join 2sc together, repeat from* till the end (6)
-Cast off, weave in ends
Round 1: Magic Ring (6)
Round 2: 2sc in each of the next st all around (12)
Round 3: sl st first st, sc into same st, 2sc in next st, *sc, 2sc in next st, repeat from* till round ends (18)
Round 4: sl st first st, sc into same st, sc around (18)
-Cast off, leave a long tail for joining
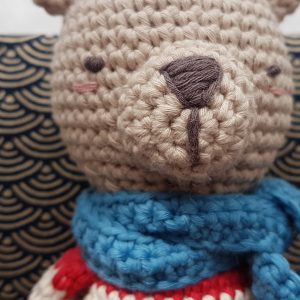
-Cut out about 30cm long brown yarn, divide the thickness into half, use the tapestry needle, sew the nose in the upper middle position (shown as the picture)
Round 1: Magic Ring (6)
Round 2: *sc, then 2sc in next st, repeat from* till round ends (9)
Round 3: sc around (9)
Round 4: *sc in next 2 sts, then 2sc in next st, repeat from* till round ends (12)
-Cast off, leave a long tail for joining
Round 1: Magic Ring (6)
Round 2: *sc, 2sc in next st, repeat from* till round ends (9)
Round 3 -6: sc around (9)
-From here, change the yarn color to White/ Red every 2 rounds.
Round 7 – 8: sc around (9) (White)
Round 9 -10: sc around (9) (Red)
Round 11 – 12: sc around (9) (White)
Round 13 -14: sc around (9) (Red)
Round 15 – 16: sc around (9) (White)
Round 17 – 18: sc around (9) (Red)
-Cast off, leave a long tail for joining
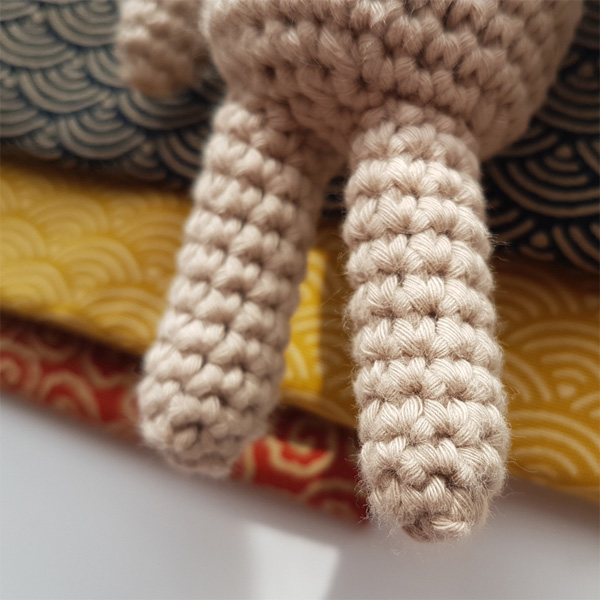
Round 1: Magic Ring (6)
Round 2: *sc, 2sc in next st, repeat from* till round ends (9)
Round 3 -11: sc around (9)
-Cast off, leave a long tail for joining
Row 1: Ch. 86
Row 2: skip the 1st ch, start sc on the 2nd ch till the end of the row, ch 1, turn (85)
Row 3: sc whole row, ch 1, turn (85)
Row 4: sc whole row, ch 1, turn (85)
-Make a tight knot before cast off, weave in ends
When all parts are ready, using the tapestry needle join them all together.
Last but not least, sew the eyes 1 or 2 stitches away from the nose.
Now, say Hi to your Teddy Jack! I hope you enjoy this Teddy Jack pattern and it would be nice if you can share with me your Teddy Jack, would appreciate a lot!
Please keep following me for the next inspiration. Ciao!
P.S. I just started to write my own patterns , if you have any questions or advice, please feel free to contact me, I would love to hear from you! 🙂

 Year of the Ox - Mr. Ox C...
$5.00
Year of the Ox - Mr. Ox C...
$5.00
 Twitter Bird Crochet Pattern
$2.00
Twitter Bird Crochet Pattern
$2.00
 Mulan Crochet Pattern
$5.00
Mulan Crochet Pattern
$5.00
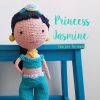 Jasmine Crochet Pattern
$5.00
Jasmine Crochet Pattern
$5.00
 Ariel Crochet Pattern
$5.00
Ariel Crochet Pattern
$5.00

 Unicorn Crochet Wrist Rest Cushion (Free Crochet Pattern)
  Crochet Magic Ring for Beginner
  Jasmine Crochet Pattern
  Lion Head for Lion Dance (Free Crochet Pattern)
  Crochet Round: Magic Ring ends with Slip Stitch